Author: shankarshruthi

  • Roasted Carrot and Fennel Soup

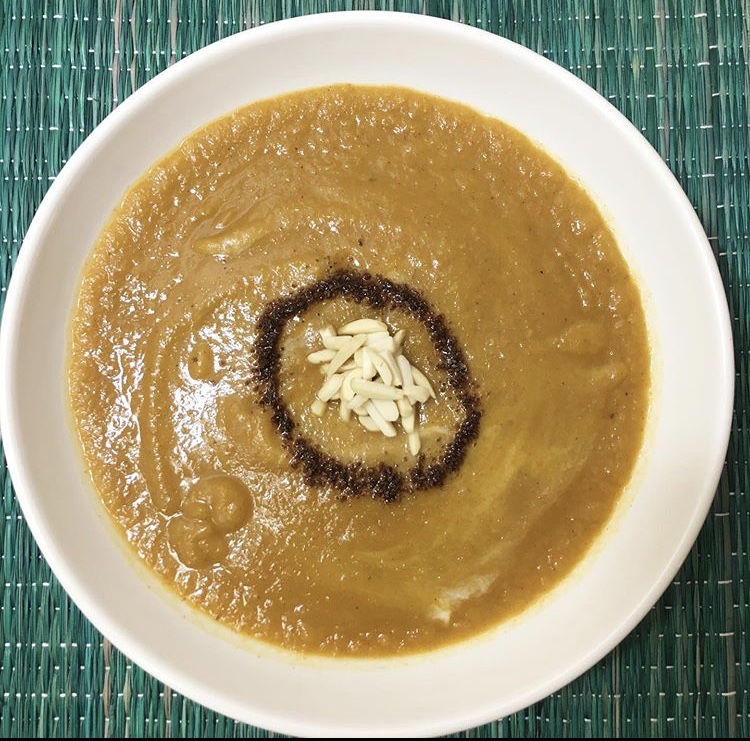
    Here is another soup that is perfect for the winters. Root vegetables, particularly roasted root vegetables are often my go-to during the winter months. And I had seen the Carrot and Fennel combos in winter salads. So, I decided to try this soup using that combo. The roasting of the vegetables caramelizes them and adds a deliciously sweet note to the otherwise savory and aromatic soup.


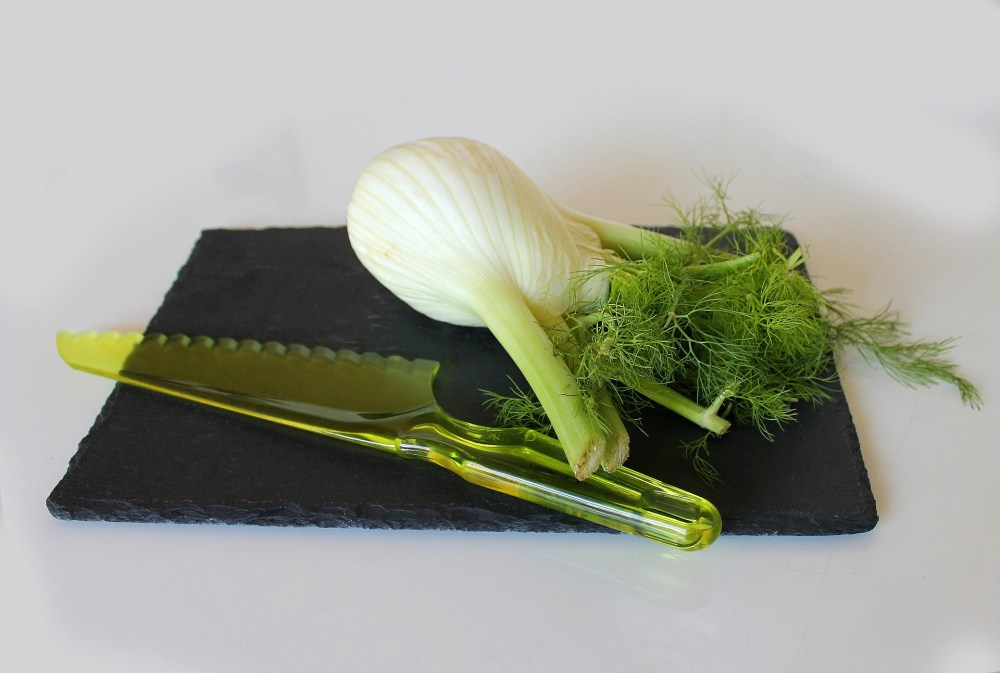
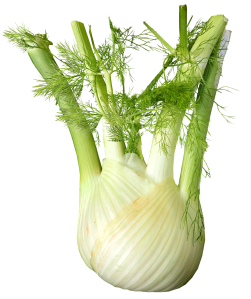
    The star of this soup is the Fennel. I have never used Fennel. I have walked by it everytime at the Farmer’s Market but never picked it up, party because I would be put off with the thought of cutting such a large vegetable and not know how it tasted. But when I finally did pick it up, I figured out what it is all about and you can learn it too, right here 🙂


    The preparation of this soup does not require a lot of effort, but it may require some time. I was using a small counter-top oven for roasting, but with a good quality oven, I would not imagine this recipe to take more than 45 minute, tops. It is completely vegan, in fact, in fact it does not use any type of milk. Just the vegetable, spices and homemade vegetable broth. For textural interest, I garnished it with roasted Sunflower Seeds.


    Prep time10 minutes
    Cook time45 minutes
    Serves2

    Ingredients

    Vegetables

    • Orange Carrots – 4 thick medium sized, chopped into large chunks
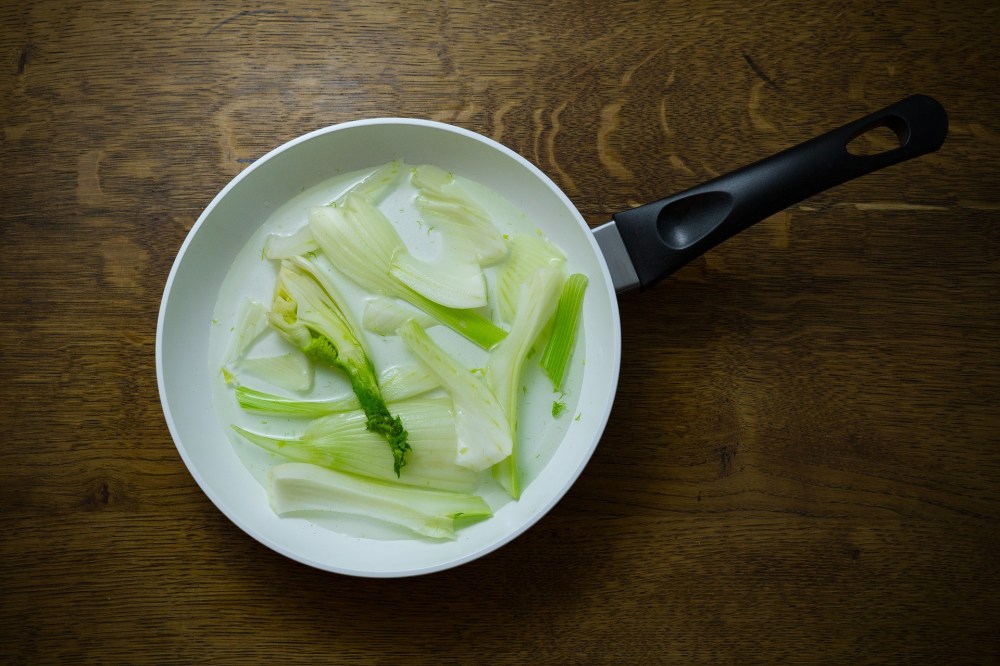
    • Fennel – 1 (with stalk and fronds), chopped into large chunks

    Nuts and Seeds

    • Roasted Sunflower Seeds – 1 tbsp

    Spices and Herbs

    • Garlic Powder – 1 tsp
    • Cumin Powder – 1 tsp
    • Coriander Powder – 1 tsp
    • Red Chilli Powder – 2 tsp (Reduce for lesser spice)
    • Salt – As per taste
    • Fennel Fronds – 1 tsp

    Oils

    • Olive Oil – 2-3 tbsp

    Liquids

    • Vegetable Broth – 1.5 cups

    Method

    1. Pre-heat oven to 425F (218C)
    2. Add the chopped fennel and carrot chunks to a mixing bowl. To this, add olive oil and all the spices. Mix well until all chinks are coated
    3. Line a tray with aluminium foil or parchment paper. Place the coated vegetables on the tray and spread out into an even layer. Roast the vegetables for 30-35 minutes or until they are tender and slightly charred
    4. After roasting and the vegetables have cooled down, add them to a blender. Add vegetable broth in small quantities while blending the soup so that the consistency can be controlled
    5. Add the blended soup to a pot and simmer for 5-10 minutes. During this time, adjust the spice and consistency as desired
    6. Pour a ladle of soup into a bowl. Garnish with fennel fronds and roasted sunflower seeds. Enjoy while it is hot

    You can also follow me on Instagram to be up-to-date with what is cooking my kitchen. If you like this recipe, do rate it and share your comments below. Don’t forget to post your version on Instagram using #foodformyloveblog.

  • Fennel : A secret with a unique flavor

    If you have wondered what the cross between an Onion and Celery looking vegetable is, you ar not alone. Fennel, the vegetable, is very new to me too. When I used to think of Fennel, only the Fennel seeds (Saunf in Hindi) used to come to mind. But Fennel, the vegetable, is very new to me and I had a bit of learning to figure out what it is and how to use it, and to realize that Fennel seeds come from the Fennel plant.


    Fennel comes from a flowering plant and it originated in the Mediterranean region, particularly Italy. The flavor is difficult to describe but delightful. Several have described it to have a Star Anise like sweet, spicy and bitter flavor. I would agree with the spicy (not up-front, but runs up your nose type of spicy) but I also think it taste fresh (for lack of a better word). Think of fresh grass and now taste it, a spicy freshness it what Fennel tastes like to me. Fennel can be eaten raw (just like celery), but it can also be transformed for different uses by roasting, braising or sauteing.

    • Raw – Shave into paper thin slices using a mandolin and add to salads for a crisp texture and a distinct flavor
    • Sautee – Chop and cook with choice of spices until the Fennel is tender
    • Roast – Cut into chunks, drizzle some Olive Oil and roast to tender, sweet perfection
    • Braise – Choose a cooking liquid (Wine, Citrus Juice, Water, Broth etc.) add the Fennel and allow is absorb the flavors as it tenderizes


    Remember, Fennel is a multi-purpose vegetable. We have only scratched the surface of what it can be used for by talking about the bulb. The stalks and fronds also have great uses. The stalks can be used just like celery to flavor a vegetable broth or a stew. As for the fronds, they also impart a delicate flavor and can be a good substitute for other herbs such as dill or tarragon. I even used the fronds in a Tzatziki sauce and a raita. Better yet, use them as a garnish on a soup or in a green smoothie.

    Why eat Fennel at all? Because the vegetable itself has a substantial amount of fiber, which is sure to keep your system clean. Fennel is also a surprisingly great source of Vitamin C. In addition to this, Fennel is known to have medicinal benefits such as being a digestive aid or providing relief from flatulence or other gastrointestinal discomforts.

    Quick tips: To alleviate stomach discomfort, chew on a handful of fennel seeds for 5-10 minutes. Do not swallow the seeds, only take in the juices. After this time period, you can either expectorate the seeds or swallow them. You can also chew on a handful of Fennel seeds after every meal to aid in digestion.

    What are some other things to know about Fennel?

    • Fennel is grown in cold seasons, but it is now available all year around
    • When buying Fennel, make sure that the bulbs are firm and clean with no cracks or brown spots. Also make sure that the stalks are firm and the fronds are feathery and not wilted
    • Fennel should be wrapped in plastic wrap and be stored in the refrigerator for no more than 4-5 days. Otherwise, it will dry up and will lose flavor

    A vegetable and a spice lumped in one. This is truly a vegetable that deserves more popularity than it has today. I know that my impression of Fennel has changed, has yours?

  • Mediterranean Chickpea Fajitas

    This recipe is fusion in all its glory. Perfectly seasoned, colorful and delicious, oh and did I mention, healthy?


    Fajitas are a great “meatless” Monday (for those who eat meat) option. It is one of the best ways to get your dose of vegetables, all at once. Any choice of colorful, seasonal vegetables work great. But, just vegetables are never enough, not for me at least. It is not quite as filling. So, adding a plant-based protein such as Mushrooms, Tofu, or Chickpeas (in this case) adds a healthy twist to these fajitas.


    Any flavor goes well with vegetables on a Fajita. But these are Mediterranean flavored, because that seems to be my obsession this week. Alter the spice as you desire , roast up the vegetables for that charred flavor and load them on a Corn tortilla. The best part of all is a cooling, refreshing, 5 minute, on the spot, Tzatziki sauce for a topping.


    Although this takes more than 30 minutes to prepare, I could call this a quick weeknight meal, only if the veggies are pre-prepared. This is absolutely do-able to roast a whole batch of the veggies over the weekend when you have a little more time (which is what I get my husband to do when we are in long-distance so he can eat a ton of veggies, hassle-free 🙂 ). When you are ready to eat, just warm up your tortillas, load it up with veggies and top it off with the cooling Tzatziki sauce and you are good to go. It is strange that I am posting this recipe in the winter, but I am thinking of the upcoming spring and summer picnics that will see these Fajitas 🙂

    Prep time20 minutes
    Cook time45-50 minutes
    Serves2-3

    Ingredients

    Vegetables

    • Zucchini – 2, sliced into semi-circles (This recipe uses 1 green and 1 yellow squash)
    • Orange Carrot – 1 medium, sliced into semi-circles
    • Purple Carrot – 1 medium, sliced into semi-circles
    • Bell Peppers – 1 large, sliced
    • Cucumber – 1/2, finely chopped

    Legumes

    • Chickpeas – 1 can or 1 1/2 cups, cooked

    Spices and Herbs

    • Garlic Powder – 1 tbsp
    • Cinnamon Powder – 1 tsp
    • Cumin Powder – 1 tsp
    • Coriander Powder – 1 tsp
    • Red Chilli Powder – 1 1/2 tsps
    • Salt – As per taste
    • Lemon Juice – 1 tbsp
    • Lemon Zest – 1 tsp
    • Dill – 2 tbsp

    Dairy


    • Plain Greek Yoghurt – 1/2 cup

    Oils

    • Olive Oil – 3-4 tbsps

    Breads

    • Corn Tortillas – As many as you would like to eat 🙂

    Ingredient notes

    • Any combination of vegetables can be used
    • Any other legume such as kidney beans or black beans work well
    • Any plant-based protein source such as Tofu or Mushroom will also work well
    • I have used a Persian Cucumber in this recipe

    Method

    1. Pre-heat oven to 400F (Apprx. 200C)
    2. In a large mixing bowl, add all the vegetables, chickpeas, and olive oil. Then add, 1/2 tbsp garlic powder, chilli, cumin, coriander and cinnamon powders and mix well until every piece is coated well. Add salt and mix again
    3. Line a baking tray with aluminium foil or parchment paper. Add the coated mixture to the tray, spreading it out into a single layer for even roasting. Place the tray in the oven and roast for 40-45 minutes (time depends on the oven model and capacity)
    4. In the meanwhile, prepare the Tzatziki sauce. In a bowl, add the yoghurt, /12 tbsp garlic powder, salt, lemon juice and lemon zest. Whisk it together. Add the chopped cucumbers and dill and mix again. Chill the sauce in the refrigerator until ready to use
    5. As the roasting is about to end, warm up corn tortillas and place on a plate
    6. Once the vegetables are roasted and out of oven, load them up on the tortillas. Top with some Tzatziki sauce and enjoy the fajitas

    Cooking Suggestion

    • If you don’t have an oven at home, the coated vegetables can be sauteed on a pan, just for a little longer than an oven so that they char well
    • The chickpeas can also be roasted on a pan by stirring until they becomes slightly crisp on the outside

    You can also follow me on Instagram to be up-to-date with what is cooking my kitchen. If you like this recipe, do rate it and share your comments below. Don’t forget to post your version on Instagram using #foodformyloveblog.

  • Moroccan Chickpea and Quinoa Salad

    Salads are like an empty canvas and the chef is the artist. There are an umpteen number of combinations with grains, vegetables, greens and legumes that can be used to compose not just a tasty salad, but one with a solid boost of nutrition. Salad’s don’t always have to be the conventional lettuce, carrots, tomatoes and dressing, they can be much more than that.


    This salad illustrates exactly that by combining grains and legumes with some vegetables and a simple dressing. The combination of spices used in the preparation of the salad and the dressing has brought out a zesty, sweet and spicy Moroccan flavor profile. Because of the dense elements of this salad, it not only makes a great lunch-box salad (to keep you satiated but not make you drowsy), but it also makes for an entree sized dinner salad for a quick weeknight meal (with pre-prepared ingredients, of course).

    Another very important aspect of this salad is its nutrient composition. For vegetarians, this salad has everything in it starting from multiple sources of plant-based protein, fiber, iron and folate. Which brings me back to my point that salads can be so nutritious with the use of dense nutritious elements. All in all, this salad offers nutrition, color, texture and flavor. Try it now!


    Prep time10 minutes
    Cook time60 minutes
    Serves2-3

    Ingredients

    Grains

    • Quinoa – 1 cup, uncooked (Any color of Quinoa is fine)

    Legumes

    • Chickpeas – 2 cups, cooked

    Vegetables

    • Bell Peppers – 2, chopped (This recipe uses 1 red and 1 yellow)
    • Cherry Tomatoes – 10-12 pieces, sliced in half
    • Carrots – 1/2 cup, shredded

    Nuts and Fruits

    • Golden Raisins – A handful (Optional)
    • Pistachios – A handful, slivered (Optional)

    Spices, Flavors and Herbs

    • Cumin Powder – 1/2 tsp
    • Cinnamon Powder – 1/2 tsp
    • Red Chilli Powder – 1/2 tsp
    • Salt – As per taste
    • Garlic Powder – 1/4 tsp
    • Black Pepper Powder – 2 tsp
    • Cilantro – A handful
    • Lemon Juice – 1/4 cup

    Oils

    • Olive Oil – 1/4 cup + 2 tbsps

    Ingredient notes

    • Use Paprika for a less intense spice
    • Mint can be used in place of Cilantro
    • Although this recipe does not use it, a handful of greens such as Spinach or Arugula would be great

    Method

    1. Pre-heat oven to 400F (Approx. 200C).
    2. To a mixing bowl, add chickpeas, 2 tbsps of olive oil, ground cumin, ground cinnamon, red chilli powder, garlic powder and salt. Mix well until all the chickpeas are well coated with the spices
    3. Line a baking tray with aluminium foil or parchment paper and spread the chickpeas on the tray. Keep them in a single layer so that they roast evenly
    4. Once pre-heating of the oven is complete, place the tray in the oven and roast the chickpeas for 40-45 minutes until they are crunchy
    5. In the meanwhile, to a pot, add the quinoa and 1 cup water and cook until the quinoa is fluffy
    6. To prepare the zest dressing, to a bowl, add olive oil, lemon juice, black pepper and a pinch of salt. Whisk the dressing together and place to the side
    7. In a serving bowl, add quinoa, chickpeas and chopped vegetables. Add the dressing and toss everything together
    8. Garnish with crunchy slivered almonds, a handful of golden raisins and chopped cilantro
    9. Enjoy the salad warm or after it has cooled down

    Cooking notes

    • If an oven is not available, the chickpeas can be roasted on a pan as well. Option 1 is to add oil to a pan, heat it up and add the spice coated chickpeas. Option 2 is to heat up the oil, add the chickpeas and then incorporate the spices. Either way, make sure to keep stirring the chickpeas until they are roasted and crunchy
    • Any leftover roasted chickpeas can be put in an airtight container to eat as a super healthy snack

    You can also follow me on Instagram to be up-to-date with what is cooking my kitchen. If you like this recipe, do rate it and share your comments below. Don’t forget to post your version on Instagram using #foodformyloveblog.

  • Vegan Butternut Squash Soup

    Winters = Soup. Enough said. Well, let’s just say one more thing – this is quite possibly the easiest bowl of thick, velvety, soul-warming bowl of flavorful soup to prepare in less than 30 minutes.


    Prep time5-10 minutes
    Cook time20 minutes
    Serves2-3

    Ingredients

    Vegetables

    • Butternut Squash – 1 medium sized, diced
    • Onions – 1 large, chopped

    Spices and Herbs

    • Garlic – 1 tbsp, crushed
    • Red Chilli Powder – 1-2 tsps
    • Roasted Cumin Powder – 2 tsps
    • Cinnamon Powder – 1 tsp
    • Salt – As per taste

    Oils

    • Cooking Oil – 2 tbsps

    Liquids

    • Coconut Milk – 1/2 cup
    • Vegetable Broth – 1 cup

    Nuts and Seeds

    • Slivered Almonds – A handful for garnish

    Ingredient notes

    • Frozen diced Butternut Squash can also be used
    • Substitute Red Chilli Powder with Paprika for a less intense spice
    • Any other plant based milk can also be used such as almond, oats or soy
    • Roasted Pumpkin Seeds can also be used for a garnish

    Method

    1. In a large pot, add oil and let it heat up
    2. To the hot oil, add the crushed garlic. Once it is nice and brown, add the chopped onions and saute until the onions are translucent
    3. Add the diced butternut squash and cook for 2-3 minutes
    4. Add all the spices and mix well for 1-2 minutes
    5. Add the liquids, mix well and simmer the mixture on medium heat for 8-10 minutes
    6. At this point, use an immersion blender to blend the mixture in the same pot. Alternatively, allow the mixture to cool down and transfer to a blender (The alternate step will add 10-15 minutes extra minutes to the total preparation)
    7. Simmer the blended soup for an additional 3-5 minutes. During this time, adjust the spices and consistency as desired
    8. Transfer to a soup bowl. Garnish with roasted cumin powder and slivered almonds and enjoy immediately

    You can also follow me on Instagram to be up-to-date with what is cooking my kitchen. If you like this recipe, do rate it and share your comments below. Don’t forget to post your version on Instagram using #foodformyloveblog.

  • Hing (Asafoetida)

    If you have read the “About Me” section of my website, you would have learnt that Hing is one of my absolute favorite spices. When I think of Hing, the aroma of it sizzling away in ghee comes to mind. It makes Indian food taste all the more Indian. But, I am sure there are a ton of people who wonder what Hing is.


    Hing is the Hindi name for Asafoetida (pronounced as written). Funnily enough, the origin of the word Asafoetida comes from two languages – “Asa” means resin in Parsi and “Foetidus” means smelling in Latin. Why is the name important? Because across the world, its many different languages and the many different names, this unusual spice was literally termed “dung of devil” because of its pungent, sulfurous, rotten smell. And yet, not only does this remain one of my favorite spices, but is a staple across Indian households.

    Hing comes from an herb called Ferula, which is from the Celery/Fennel family. Essentially, the resin that is extracted from the roots and stems of the Ferula herb is dried into a resin-mass and turned into a fine powder (often mixed with wheat or rice flour to prevent clumping).

    Let’s talk about Hing’s place in the Indian spice pantry despite its unpleasant aroma. Because of its origins, Hing imparts a deep onion and garlic aroma. For the vegetarian population in India and certain communities within India who don’t consume onion and garlic (that story for another day!), Hing is a huge flavor booster. For vegetarians, whose protein source is often legumes (particularly more so in the south of India), dal is always cooked with Hing tadka (A tempering of Hing, Cumin, Green Chillies, Curry Leaves and other spices that vary across households). Alternatively, Hing is also used for subzis where it is first fried in ghee with other spices and then vegetables are added to it to cook.

    So, it is fair to say that Hing is a spice of vegetables, and not meat. But it is important to use it judiciously so as to not overpower the dish. If the pure version (the resin) if being used, a pea sized amount fried in ghee will allow the flavors to disperse well and be enough for a large pot of the dish. On the other hand, with a compounded version (which has anti-clumping additives), a little more than the pea sized amount can be added (because the flavor will not be as intense) and it does not necessarily need to be fried in ghee.

    Just like several other Indian spices, Hing is not only a culinary spice, it also has medicinal properties. For instance, Hing is believed to be a remedy for digestive disorders such as flatulence and irritable bowel syndrome. Furthermore, it is believed Hing is a great spice for women’s ailments, particularly after before and childbirth.


    There are a couple of different brands that I use. One of the most common brands that most Indian households will resonate with is the LG (Laljee Godhoo) brand. This is a compounded Hing that contains Gum Arabic and Wheat Starch as anti-clumping agents. I have also used the Vandevi brand which contains Rice Flour, Gum Arabic, Wheat Flour and Turmeric, therefore giving it a slightly yellowish tinge. Both of these are readily available at Indian grocery stores and on Amazon. There are several other brands, but I will recommend these since I am most familiar with them.

    Food safety tip: If you or someone in your family has a wheat allergy, you should avoid using compounded Hing (especially avoid ones that contain wheat starch). There are organic and gluten-free versions, as well as compounded versions without wheat starch/flour available on Amazon for you to try

    Hing is a spice that has not yet made its way to the mainstream to become a widely used spice. Because of its aroma, it may be a shock for first-time non-Indian users. But I strongly encourage those who have not tried it to certainly give it a try and you will see the result with an intensely flavorful and aromatic Indian dish.

  • Oats Cheela

    Oats, as many of us know, are a powerhouse of health benefits. These include nutrient richness (protein, carbohydrates, calcium and fiber), low in sugar, low in fat, good for cholesterol and diabetes control, and most of all satiety. In fact, research from the World Health Organization has shown that the protein content of oats is nearly equivalent to soy, meat, milk and egg protein.

    It is a good idea to learn the basics of Oats before you cook, so that you can choose the Oats most suitable to your recipe. So, here goes – Oats start out as oat groats, which are then processed into different formats such as steel cut, rolled, instant/quick oats and oat flour/bran. When oat groats are cut using a sharp blade, that makes steel cut oats. These take the longest to cook and have a chewy texture. On the other hand, rolled oats are are created when the oat groats are steamed (to make them pliable) and then rolled to make them flat. These take less time to cook (compared to steel cut), and manage to retain their size and texture after cooking. Finally, instant oats are made when the rolled oats are steamed and further rolled to make them thinner. This allows them to absorb moisture more quickly and therefore, cook instantly. Because of this, they don’t retain a shape of texture and end up mushy. Clear as mud?


    In my quest to find a breakfast that would satisfy my monstrous morning hunger and keep me full, I made the transition from cereal to oats. However, the store brought oats are either plain or flavored, and therefore loaded with sugar. The serving size and quantity just does not justify the amount of sugar that comes with it. Plus, being Indian, my palate is always looking for something savory, even on a breakfast occasion. That led me to the discovery of Oats Chilla, courtesy Shilpa Shetty’s cooking channel.

    A Cheela is basically a savory pancake made out of a grain based flour. A lot of Cheela recipes that I found were besan (gram/chickpea flour) based. My stomach does not do very well with besan, so I avoid it as much as possible. Therefore, this Oats Cheela recipe, that I adapted from Shilpa Shetty’s recipe, is a wholesome and nutritious breakfast. And of course I decided to experiment on my husband, and he loved it. But what made it a super, duper hit was when my husband’s 6 year old niece, who is generally a very picky eater (as any other 6 year old), gorged on 6 Cheelas!!! Now, these can be very heavy because of the Oats, but she loved them, and I was beyond excited. I have been getting my mum to eat Oats forever, but she finds the mushiness of Oats to be repulsive. Yet, this recipe was a hit with her too, which means the world to me. And thus began my love for Cheelas that I continue to share with family and friends.


    Prep time10 minutes
    Cook time10 minutes
    Serves2 (2-4 medium sized Cheelas)

    Ingredients

    Vegetables

    • Onions – 1/4 cup, finely chopped
    • Carrots – 1/4 cup, shredded or finely chopped

    Grains

    • Oats – 3/4 cup

    Spices and Herbs

    • Roasted Jeera Powder (Cumin) – 1/2 tsp
    • Black Pepper – 1/2 tsp
    • Chaat Masala – 1/2 tbsp (Add more as your taste)
    • Salt as per taste
    • Cilantro – 2 tbsp, finely chopped
    • Ginger – 1 tbsp, crushed
    • Green Chillies – 1 tbsp, finely chopped (or as per your taste requirement)

    Dairy

    • Milk – 1 cup (Add extra as needed to adjust the consistency)

    Oils

    • Cooking Oil – 2 tbsp

    Ingredient notes


    Method

    1. In a pan, toast the oats until they are slightly brown and release a nutty aroma
    2. Grind the toasted oats to make a fine powder
    3. Add milk and blend until the batter has a smooth consistency. The ideal consistency should not be too smooth and nor too grainy. So adjust the amount of milk to achieve the desired consistency. Transfer the batter to a mixing bowl
    4. Add the vegetables, spices, herbs and mix well
    5. Adjust consistency with more milk, if required
    6. Heat a pan, add 1tbsp oil, and use a brush to spread the oil on the pan
    7. Add the batter and slowly spread it evenly. You may not able to spread with a spoon, so lift the pan and turn it in a circular motion to spread the batter
    8. Cover with a lid and cook on medium heat for 45-60 seconds
    9. Remove the lid, drizzle 1 tsp oil on the cheela and flip it to cook the other side. You will know that it is cooked when it has brown spots on it, just like a roti
    10. Transfer to a plate and serve with your choice of chutney

    You can also follow me on Instagram to be up-to-date with what is cooking my kitchen. If you like this recipe, do rate it and share your comments below. Don’t forget to post your version on Instagram using #foodformyloveblog.

  • Roasted Butternut Squash Salad

    I think I have mentioned this before, but I am salad junkie. Spring, summer or winter, I will eat salads all year around. And if that salad has one of my favorite vegetables, the salad is taken to the next level.


    Butternut Squash is a popular winter squash and it makes for a great vegetable for a warm winter salad. Roasting the butternut squash gives it such as beautiful caramelized flavor, and when the squash is marinated with garlic, salt pepper and red chilli flakes, the flavors amalgamate to perfection. This salad has an extra special zing with a homemade orange-ginger dressing.

    Salads are much more fun to eat when they have a variety of colors and textures, after all, we eat with all our senses. So think of not just the vegetable, but the greens, a crunchy element, a variety of colors etc. With all of those elements, this warm salad is sure to please you. Even for a non-salad lover (i.e. my husband) is sure to enjoy this beautiful salad (which he did 🙂 ).


    Prep time20 minutes
    Cook time30 minutes
    Serves2-3

    Ingredients

    Vegetables

    • Butternut Squash – 1 medium, peeled and cubed
    • Baby Arugula – 3 cups

    Fruits

    • Pomegranate Seeds – 1/2 cup
    • Orange – 1 medium (juiced to 1/2 cup)

    Nuts & Seeds

    • Roasted Pumpkin Seeds – 1/4 cup

    Spices & Herbs

    • Ginger – 1 tbsp, crushed
    • Salt – As per taste
    • Pepper – 1/2 tbsp
    • Red Chilli Flakes – 1 tbsp
    • Garlic – 1 tbsp, crushed

    Oils

    • Olive Oil – 2 tbsp

    Ingredient notes

    • Arugula adds a peppery zing to the salad, but feel free to choose any other green leafy vegetable of your choice

    Method

    1. Preheat oven to 400F (Approx. 200C) and line a baking tray with aluminium foil or parchment paper
    2. Place the cubed butternut squash on the tray. Drizzle olive oil. Add salt, pepper, crushed garlic and red chilli flakes. Mix well
    3. After the oven is ready to go, place the tray in the oven and roast the butternut squash for 25-30 minutes
    4. To prepare the dressing, in a mason jar, add olive oil orange juice, crushed ginger, salt and pepper. Close the lid of the jar and mix well until the dressing comes together
    5. Once the butternut squash has roasted, take it out of the oven and add to a mixing bowl
    6. To the same bowl, add the baby arugula and the dressing and toss the salad using wooden spatulas
    7. Transfer to a serving bowl and garnish with bright red pomegranate seeds and roasted pumpkin seeds. Enjoy the warm salad

    You can also follow me on Instagram to be up-to-date with what is cooking my kitchen. If you like this recipe, do rate it and share your comments below. Don’t forget to post your version on Instagram using #foodformyloveblog.

  • Makhana Chaat

    Makhana, also known as Phool Makhana or Fox Nuts are dried and puffed lotus seeds. These seeds originate in East Asia. The the process of cultivating, harvesting and processing these seeds is laborious, intricate work that only skilled farmers are known to manage.


    Having originated in East Asia, Makhanas have gained popularity in the Western world as they are powerhouses of nutrition. Makhanas are loaded with soluble fiber, minerals such as magnesium and zinc, are low in fat and rich in protein.

    In the Indian culture, several religious occassions call for a fast, and Makhanas are often the go to due to their nutrition and the satiety factor. I say, why only during a fast? Makhanas can be a great snack. They can be a snack, just like popcorn, because they can be used in snack mixes and can take on a variety of flavor profiles

    Makhanas are readily available in Indian grocery stores. Alternatively, they are also available on Amazon. This Makhana chaat uses spiced homemade spiced Makhanas with traditional elements of a chaat such as onions, tomatoes, cilantro and chaat masala. A quick chaat recipe for for an afternoon snack or along with an evening desi chai.

    Prep time10 minutes
    Cook time10 minutes
    Serves2

    Ingredients

    Base

    • Makhana – 2 cups

    Vegetables

    • Carrots – 1/2 cup, shredded
    • Tomatoes – 1/2 cup, chopped
    • Onions – 1/4 cup, finely chopped

    Spices and Herbs

    • Green Chillies – 1 tsp, finely chopped (Optional)
    • Curry Leaves – 4-5
    • Haldi Powder (Turmeric) – 1/4 tsp
    • Red Chilli Powder – 1/4 tsp
    • Chaat Masala – 1 tsp
    • Lemon Juice – 1 tsp
    • Cilantro – 2 tbsp, finely chopped
    • Salt – As per taste
    • Hing (Asafoetida) – 1/4 tsp

    Oils

    • Cooking Oil – 1 tbsp

    Method

    1. In a pan, add oil. Once it has heated up, add curry leaves
    2. When the curry leaves splutter, add the hing, haldi and red chilli powder. Fry these in the oil for 30 seconds until the spices bloom and the rawness of the spices has been cooked
    3. Add the makhana and mix well with the spices. Continue to roast for 3-4 minutes
    4. Transfer the spiced roasted makhana to a mixing bowl
    5. Add the chopped vegetables, chaat masala (and green chillies) and mix well. Adjust the chaat masala as needed
    6. Transfer a portion to a bowl, garnish with cilantro (and optional peanuts for a crunch) and enjoy with a side of masala chai or as an afternoon snack at work

    You can also follow me on Instagram to be up-to-date with what is cooking my kitchen. If you like this recipe, do rate it and share your comments below. Don’t forget to post your version on Instagram using #foodformyloveblog.

  • Vegan Broccoli Soup

    Broccoli is a bright green cruciferous miracle food. This vegetable provides solid support to many elements of human health. This support is in the form of providing vital vitamins and minerals such as vitamin A, C and potassium. The best part of Broccoli is that it is low in calories, fat free and and has a ton of fiber.

    I am a salad and soup junkie. I will pretty much use any seasonal vegetable in a soup or salad. In fact, soups are a great way to hide vegetables that kids or in my case, my husband does not like (LOL!). This is the best way to leverage the wonderful health benefits of a plethora of vegetables.


    For this soup, both the florets and the stem of the Broccoli has been used. This soup is creamy, vegan and has only 5 ingredients. It is that simple. Despite not using any potatoes or a milk source, the soup still turned out to be thick and silky.

    Prep time15 minutes
    Cook time50 minutes
    Serves2-3

    Ingredients

    Vegetables

    • Broccoli – 5 cups (florets and stem), chopped (Frozen or Fresh)
    • Red Onions – 1 large, cubed

    Nuts

    • Cashews – A handful

    Spices & Herbs

    • Garlic – 1-2 tbsp, crushed
    • Salt – As per taste

    Liquids

    • Vegetable Broth – 2-3 cups (depending on the desired consistency

    Oils

    • Olive Oil – 2-3 tbsp

    Method

    1. Preheat the oven to 425F (Apprx. 220C)
    2. If using fresh Broccoli, wash it under cold running water for 20-30 seconds. Pat dry with a paper towel and place on a baking tray lined with aluminium foil or parchment paper, along with the cubed onions
    3. Drizzle olive oil on the broccoli and onions. Season with salt and add the crushed garlic. Mix together in the tray
    4. Roast the broccoli and onions for 30-35 minutes until they have a good char on them
    5. In the meanwhile, soak the cashews in lukewarm water until the soup is ready to be blended
    6. Once roasted, add the vegetables and the soaked cashews into a blender. Slowly add the vegetable broth in small quantities as you blend the mixture. Blend until the soup is smooth and silky
    7. Transfer the soup to a pot and bring to a simmer. During this process, add more vegetable broth to adjust to the desired consistency
    8. Transfer a ladle full of the hot soup to a bowl. Garnish with red pepper flakes and roasted pumpkin seeds and enjoy!

    You can also follow me on Instagram to be up-to-date with what is cooking my kitchen. If you like this recipe, do rate it and share your comments below. Don’t forget to post your version on Instagram using #foodformyloveblog.