Author: shankarshruthi

  • Quinoa and Moong Dal Khichdi

    Khichdi, a dish from the Indian subcontinent, is made with rice and lentils. In the south of India, it is called Pongal. It is wholesome, mildly spiced and is easy to digest. Khichdi has a creamy porridge like consistency. It is a comfort food to some, a staple for others and a dish prepared on religious occasions in some cases.

    For me, it is most definitely comfort food. Growing up, Sunday nights used to be and continue to be Khichdi nights. Just the incredible aroma of the ghee roasted ginger and onions is enough to get me salivating. These days, when I am out of vegetables in my pantry or cannot think of what to cook, dear old khichdi comes to my rescue, and it never disappoints. In fact, when my husband comes home after a long day or work and workout, he throws everything in a pot while he freshens up. From start to finish, this is a meal under 30 minutes.

    Khichdi has evolved and many variations are seen today. The variations are based on flavor differences across the many Indian states, spices and most recently, a variation in lentils and grains used for the preparation.


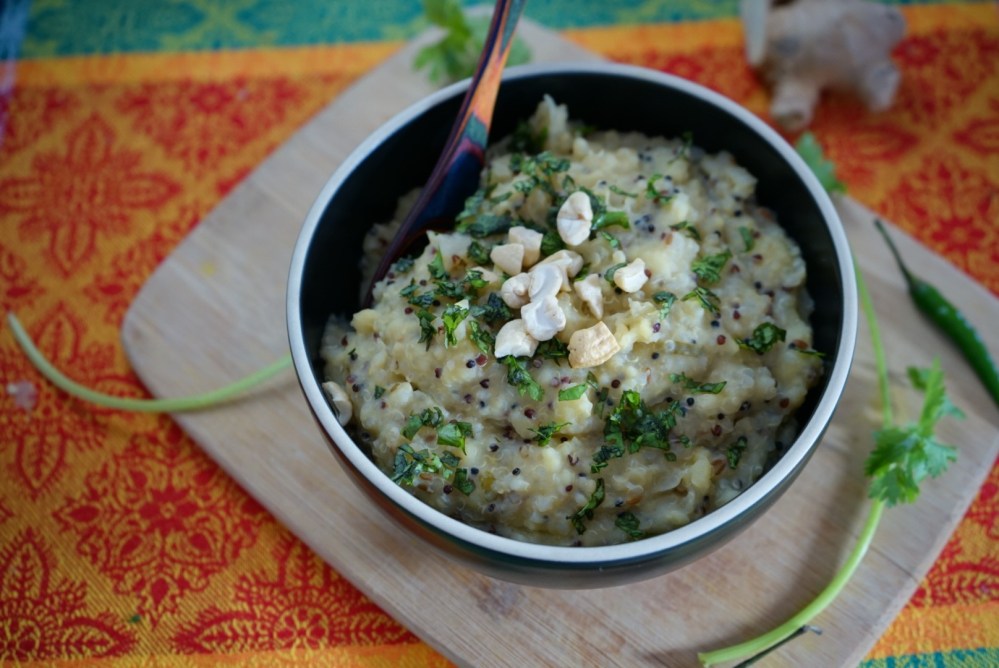
    As someone who is not much of a rice eater, I have replaced the rice with quinoa, a more nutritious grain, and it beautifully complements the moong dal (petite yellow lentils), which are traditionally used in khichidis. It is a one-pot meal perfect for a quick weeknight dinner or a weekend lunch.

    Prep time10 minutes
    Cook time15 minutes
    Serves2

    Ingredients

    Grains and Lentils

    • Quinoa – 1 cup
    • Moong Dal (Petite Yellow Lentils) – 1.5 cups

    Vegetables

    • Onions – 1 medium, finely chopped
    • Mixed vegetables of choice (Optional) – 1 cup, chopped

    Spices & Herbs

    • Ginger – 2 tbsp, crushed
    • Jeera (Cumin Seeds) – 2 tsps
    • Green Chillies – 5-6, finely chopped (Feel free to add more or less depending on your spice tolerance)
    • Hing (Asafoetida) – 1/4 tsp
    • Salt – As per taste
    • Haldi Powder (Turmeric) – 1 tsp (Optional)
    • Cilantro – A few sprigs, finely chopped (For garnish)

    Oils

    • Ghee (Plain) – 2 tbsp (Recommended for great flavor)

    Method

    1. Set the Instant Pot to Saute mode.
    2. Add ghee and jeera.
    3. Once the jeera splutters, add the chopped ginger and onions. Saute until the onions are translucent
    4. Add the green chilies and saute for 1 minute
    5. Add the quinoa, yellow moong dal and water
    6. Add salt and mix well
    7. Cancel the saute mode. Turn on the pressure cook mode and set the timer to 15 minutes under high pressure. Close the lid and make sure the vent is closed
    8. After the cooking time is complete, manually release the vent and open the lid
    9. If the khichdi is thick, feel free to add some water to loosen it up. Completely your choice. Don’t worry if it is too mushy, that is the right consistency for a Khichdi
    10. Transfer to a serving bowl. Garnish with cilantro and cashews and serve piping hot

    Cooking and serving suggestions

    • A pressure cooker can be used for the recipe too. The cook time will be about 5-6 whistles
    • If using the stove-top method, soak the moong dal for 30 minutes and then follow-up the above method. It will greatly reduce the cook time
    • The Khichdi is best served with a a drizzle more of ghee on the top and with a side of yoghurt or pickle
    • If vegan, eliminate the ghee and use regular cooking oil
    • The petite yellow lentils can be replaced with sprouted mung beans, black lentils or other lentils of your choice

    You can also follow me on Instagram to be up-to-date with what is cooking my kitchen. If you like this recipe, do rate it and share your comments below. Don’t forget to post your version on Instagram using #foodformyloveblog.

  • Berry-Quinoa Tabbouleh

    Tabbouleh is a Lebanese salad and traditionally has mint, parsley, finely chopped vegetables and bulgar wheat. It is light and refreshing salad that can be a side salad, used in a wrap or can be a meal-sized salad in itself.


    This recipe replaces the vegetables with fresh berries, so this salad is perfect for the spring and summer seasons. The berries truly add a sweet freshness like none other.

    Prep time20 minutes
    Cook time15 minutes
    Serves1-2

    Ingredients

    Fruits

    • Strawberries – 1 cup, chopped
    • Blackberries – 1 cup, chopped or whole

    Nuts & Seeds

    • Almonds – 1/4 cup, slivered (optional)

    Vegetables

    • Red onions – 1 medium, sliced

    Spices & Herbs

    • Parsley – 2 cups, chopped
    • Mint – 1 cup, chopped
    • Black pepper – 1 tsp
    • Salt as per taste
    • Lemon juice – 1/4 cup
    • Garlic – 1/4 tsp

    Grains

    • Quinoa – 1 cup, uncooked

    Oils

    • Olive Oil – 2-3 tbsps

    Method

    1. Rinse the quinoa under cold running water. Then add the quinoa to a pot with 1 3/4 cup water and cook the quinoa until all the water is absorbed
    2. While the quinoa is cooking, prepare the salad dressing by whisking together the olive oil, lemon juice, salt, pepper and garlic
    3. To this bowl of dressing, add the chopped berries, parsley and mint. Mix well to ensure all the ingredients are coated with the dressing
    4. Once the quinoa is fluffy and cooked, add it to the bowl and mix well with the rest of the salad ingredients
    5. Chill in refrigerator for 1-2 hours for all the flavors to come together and develop
    6. Top with crunchy slivered almonds and enjoy!

    Serving Suggestions

    • Use any other grain of your choice such as pearl couscous or millets
    • Use berries in any combination
    • To add an extra crunch, replace almonds with walnuts or toasted pine nuts

    You can also follow me on Instagram to be up-to-date with what is cooking my kitchen. If you like this recipe, do rate it and share your comments below. Don’t forget to post your version on Instagram using #foodformyloveblog.

  • Cucumber Sushi

    Who says Sushi cannot be truly “vegetarian” or refreshing. Of course it can. These little refreshing bites are a perfect summer snack for the kids or adults. Pick your choice of fillings, stuff in the cucumbers and you are good to go.


    Prep time10 minutes
    Cook timeN/A
    Serves12 rolls (Depending on the size of the cucumbers)

    Ingredients

    Vegetables

    • Garden Cucumbers – 2, cut into round pieces with approx. 2″ thickness
    • Carrots – 1/4 cup, matchstick or shredded

    Legumes

    • Sprouted Mung Beans – 1/2 cup

    Seeds

    • White Sesame Seeds – 1 tsp

    Condiments (Optional)

    • Low sodium Soy Sauce – 2 tsp
    • Sriracha – 1/4 tsp

    Ingredient notes

    • I recommend Garden Cucumbers because they will provide the required thickness to create a center to stuff the sushi roll. Although these cucumbers are seedy, when cored, the seeds will be taken out
    • Other vegetable options include shredded purple cabbage, colorful peppers or greens
    • Rice is optional if you would like to add a heavier element to the roll
    • The condiments can be used either to marinate the vegetables or to prepare a dipping sauce

    Method

    1. Slice off the ends of the cucumbers
    2. Make approx. 2″ sized pieces
    3. Using an apple corer, melon baller or just a spoon, scoop out the center of each of the pieces. Remember not to core it all the way through, let a small base remain to hold the fillings. Set these cored cucumber roll pieces aside
    4. In a bowl, add all the vegetables and sprouts. Add the condiments and mix well
    5. Take a small spoonful of the marinated vegetables and fill the cucumber rolls
    6. Garnish with sesame seeds. Chill in the refrigerator for 15-20 minutes and then serve

    You can also follow me on Instagram to be up-to-date with what is cooking my kitchen. If you like this recipe, do rate it and share your comments below. Don’t forget to post your version on Instagram using #foodformyloveblog.

  • Spicy Sweet Potato and Quinoa Cakes

    Weekend brunches are my favorite. Whether it is an outdoor one or a home one. I try to spend at least one weekend day experimenting and trying new recipes. This time, I was inspired by Sadia from Pick Up Limes and I decided to make it my own.

    As the name suggests, this recipe’s star ingredients are sweet potatoes and quinoa. While the former provides a dose of complex carbohydrates, the latter acts as a good protein source. This recipe involves a little more effort than normal, but I guarantee you, it is well worth your time. The best part is that cakes are baked with minimal oil, making it uber healthy.


    The cakes can be eaten by themselves or with a variety of toppings. This recipes uses garlicky chilli tomatoes and sauteed spinach as toppings.


    Prep time30 minutes
    Cook time30 minutes
    Serves2-3 (Makes 8-10 medium sized cakes)

    Ingredients

    Vegetables

    • Sweet Potatoes – 1-2 medium, shredded
    • Carrot – 1 medium, shredded
    • Onion – 1 medium, finely chopped
    • Fresh Spinach – 2-3 cups
    • Cherry Tomatoes – 20-25 pieces

    Grains

    • Quinoa – 3/4 cup (uncooked)

    Spices & Herbs

    • Salt – As per taste
    • Ground Black Pepper – 1/4 tsps
    • Garlic – 1 tbsp, crushed
    • Paprika – 1 1/2 tsps
    • Red Chilli Flakes (Optional) – 1/2 tsp
    • Fresh Cilantro – 2 tbsps, finely chopped
    • Cumin Powder – 1 tsp

    Flours

    • Chickpea Flour – 3-4 tbsp (for binding)

    Oils

    • Olive Oil – As needed to brush on the baking tray and on the cakes prior to baking

    Method

    1. Add the quinoa to a pot with 1 1/2 cups of water and let it cook on medium heath until all the water has evaporated and the quinoa can be fluffed with a fork
    2. In the meanwhile, begin shredding the sweet potatoes and carrots. If they are pre-shredded, great!. Chop up the onions and halve the cherry tomatoes. (Make sure to wash all the vegetables prior to chopping/shredding)
    3. In a mixing bowl, add the shredded vegetables, onions, spices & herbs, and the cooked quinoa. Also add the chickpea flour. Mix thoroughly
    4. Pre-heat the oven to 400F (200C)
    5. In the meanwhile, lay out a baking tray with parchment paper or aluminium foil as a lining. Brush some olive oil on the lining
    6. Using a 1/4 cup measure, scoop the mixture onto the lined tray. Using 2 spoons, flatten the cake (don’t apply too much pressure and make it thin, maintain at least a 1/4″ thickness to the cake) and maintain its round shape. Drizzle some olive oil over the cakes
    7. Once oven is heated, place the prepared tray in the oven and bake for 15 minutes. Then flip the cakes, drizzle some more olive oil and bake for another 10 minutes
    8. Broil for additional 5 minutes. This will not only cook the cake faster due to the direct heat from the top of the oven, it will make the cakes crispier. Just watch the oven so that the cakes don’t burn
    9. While the cakes are baking, in a pan, add some olive oil and the cherry tomatoes. Cook them (on medium heat) until the skin starts to shrivel. At this point, add just 1 tsp of garlic and 1/2 tsp of red pepper flakes. Cook for an additional 5 minutes and set aside
    10. To the same pan, add some spinach and let it wilt in 2-3 minutes
    11. To assemble the cakes, place them on a plate (feel free to stack them like pancakes). Top with the spinach and chilli garlicky tomatoes

    Serving Suggestions

    • Drizzle some cucumber raita or Tzatziki sauce for a cooling component to compliment the spicy cakes OR with sriracha for an extra kick of spice
    • Any variation of sauteed green or veggies can work as a topping
    • Make an egg sandwich (with eggs the way you like them) using two cakes as substitutes for break

    You can also follow me on Instagram to be up-to-date with what is cooking my kitchen. If you like this recipe, do rate it and share your comments below. Don’t forget to post your version on Instagram using #foodformyloveblog.

  • Lemony Pea Mash Toast

    Its time to leave the avocado toast behind and take your toast experience to the next level with the little green protein machines – peas. Yes, peas. Fresh peas means the spring has arrived. And peas are so unassuming yet are humble powerhouses of nutrition. While this recipe is focused on the protein aspect, other nutrients include fiber and inflammatory phytonutrients .

    For those looking for a non-bean or non-soy plant based protein source, this recipe is a great option. The sweetness of the green peas compliments the citrusy lemon, earthy cumin and fresh parsley. Whats best is that it literally takes 10 minutes to prepare (if you are using frozen peas, that is).

    The best part about this recipe is that the mash can be prepared in advance. It can be as chunky or as smooth as you like. So for a quick on the go breakfast, all you need is a couple of slices of crisp toast, spread the mash on it, and top with your favorite toppings. It is that easy!


    Prep time5 minutes
    Cook time10 minutes
    Serves1

    Ingredients

    Legumes

    • Green Peas – 1.5 cups (Fresh of frozen)

    Vegetables

    • Onions – 1 small, finely chopped

    Spices & Herbs

    • Roasted Jeera Powder (Cumin) – 1 tsp
    • Black Pepper – 1 tsp
    • Garlic – 1 tsp, crushed
    • Parsley – 1 tbsp, chopped
    • Lemon Juice – 1 tbsp
    • Salt – As per taste

    Oils

    • Cooking Oil – 1 tbsp

    Method

    1. In a pan, add oil
    2. Once the oil heats up, add onions and garlic. Saute until the onions turn translucent
    3. Add the peas, salt and black pepper. Let the peas cook for 3-5 minutes until they become soft
    4. Add ground roasted cumin powder. Using a fork or the back of a wooden spatula, mash the peas. Mash the peas as per your desired consistency – chunky, or a complete mash. Cook for an additional 1-2 minutes. Add this point, you add a splash of water if the mixture is sticking to the pan
    5. Turn off the heat. Add chopped parsley and lemon juice
    6. Scoop a generous amount of the pea mash onto a crisp toast, spread and enjoy!

    Serving Suggestions

    • For a kick of spice, add a sprinkle of crushed red pepper flakes
    • Top with sesame seeds or slivered almonds for a crunch
    • Top with eggs the way you like them

    You can also follow me on Instagram to be up-to-date with what is cooking my kitchen. If you like this recipe, do rate it and share your comments below. Don’t forget to post your version on Instagram using #foodformyloveblog.

  • Masala Bhaat

    This dish holds a special place in my heart because it is from my childhood. It is a specialty of a close family friend who is Maharashtrian. She introduced me and my mum to her secret masala (spice mixture) that was used in this dish – Goda Masala. Whenever we met, she would prepare this dish and the house would simply smell magical. While I don’t get to eat her version anymore (because we live in different countries and we have not met in years), she does transport a whole load of the masala for me and mum.

    Goda masala is a unique masala from the Indian state of Maharashtra. It has a very distinguishable flavor and aroma. Its uniqueness comes from the use of very rare spices such as cassia buds and lichen. Every household is known to have their own variation and personal touch to the masala. While it has a very pungent aroma, it is not “hot”. The masala typically has standalone use in a dish due to its overpowering flavor. The version of masala that I use is from India and is not available here in the US (Maybe I will do a giveaway some day 🙂 ). In the meanwhile, other brands of this masala are readily available on Amazon or at an Indian grocery store.

    This dish makes for a perfect, one-pot weeknight meal and leftovers can be used for lunch boxes. Some basic spices, the secret masala, rice and a bag of frozen mixed vegetables are all you need. Go all out and use fresh vegetables if you have the time.


    Prep time10 minutes
    Cook time20 minutes
    Serves2

    Ingredients

    Vegetables

    • Mixed Vegetables – 2 cups, frozen (Or 2 cups worth of any combination of vegetables)
    • Baby Potatoes – 8-10, halved
    • Onion – 1 medium, finely chopped

    Spices & Herbs

    • Dhania Powder (Coriander) – 1/2 tbsp
    • Goda Masala – 2 tbsp
    • Tej Patta (Bay Leaf) – 1
    • Dalchini Powder (Cinnamon) – 1/2 tsp
    • Laung (Cloves) – 3-4
    • Elaichi (Cardamom) – 2 pods or 1/2 tsp of the powder
    • Green Chillies – 3-4, finely chopped
    • Ginger – 1/2 tbsp, crushed
    • Garlic – 1/2 tbsp crushed
    • Salt – As per taste
    • Fresh Dhania (Cilantro) – A few sprigs for garnish and spice paste

    Oils

    • Cooking Oil – 2 tbsp

    Grains

    • Rice – 1 1/2 cups (washed and soaked)

    Method

    1. In a blender, add cilantro, green chillis, ginger and garlic (with a splash of water) to make an aromatic green paste. Keep this aside for use later
    2. Turn on the Instant Pot to “sauté” mode. If using a pressure cooker, heat it up on medium heat
    3. Add 2 tbsp of oil. To this, add the bay leaves, cinnamon, cardamom and cloves. Fry for 30-45 seconds until the bay leaves start to sizzle
    4. Add onions and sauté until they are translucent
    5. All the baby potatoes, vegetables and sauté for 1-2 minutes
    6. Add the soaked rice and mix for 1 minute
    7. Add the blended green paste. Mix well for an additional 1-2 minutes
    8. Add coriander powder, goda masala and mix for 1-2 minutes
    9. Add the required water (approx. 3 cups of water of 1 ½ cups of rice), and then add salt as per taste
    10. Close the Instant Pot lid. Use the pressure cooker mode with a cook time of a 12-13 minutes. If using a pressure cooker, close the lid, place the pressure weight on the lid. Cook for 4-5 whistles
    11. Once the cooking is complete, manually release the pressure from the Instant Pot. If using a pressure cooker, wait for the cool down and then remove the pressure weight.
    12. Serve the masala bhaat on a plate. Garnish with lemon juice, fresh cilantro and dried coconut. Enjoy with a side of raita (spiced yogurt) or pickle

    Cooking Suggestions

    • This recipe can work just as well with other grains such as quinoa or cous cous (for those who want to avoid rice)

    You can also follow me on Instagram to be up-to-date with what is cooking my kitchen. If you like this recipe, do rate it and share your comments below. Don’t forget to post your version on Instagram using #foodformyloveblog.

  • Sweet Potato and Green Moong Sprouts Salad

    If it were up to me, there would be sweet potatoes in everything. And because it is up to me in my kitchen, I use sweet potatoes wherever I can, such as in this salad. A sweet potato and green moong (mung beans) sprouts salad is a perfect salad bowl with the protein from the sprouts and the complex carbohydrates from the sweet potatoes. The pomegranates add a beautiful freshness to the salad. It is a simple, refreshing and healthy salad.


    Prep time10 minutes
    Cook time15 minutes (This does not include sprouting time)
    Serves2

    Ingredients

    Legumes

    • Sprouted Green Moong (Mung Beans) – 2 cups

    Fruits

    • Pomegranates – 1 cup

    Vegetables

    • Sweet Potato – 2 medium, diced
    • Persian Cucumbers – 3, diced
    • Sweet Onions – 1 cup, finely chopped

    Spices & Herbs

    • Cilantro – Enough sprigs to have 1 cup
    • Black Pepper – 1 tsp
    • Salt – As per taste
    • Garlic – 1 tsp
    • Dhania (Coriander) Powder – 1 tsp

    Other

    • Olive Oil – 2 tbsp
    • Lemon Juice – 2 tbsp

    Method

    1. In a pan, add olive oil and garlic
    2. Once the rawness of the garlic is cooked, add the diced sweet potatoes and saute for 5 minutes. Add salt and saute for an additional 5 minutes
    3. Add black pepper, dhania powder and continue to saute for a a few more minutes until the sweet potatoes are cooked through and are soft (but not mushy)
    4. Begin assembling the salad. Add the sprouted mung beans, sweet potatoes, chopped sweet onions and diced cucumbers to a mixing bowl. Add lemon juice and mix well
    5. Garnish with pomegranates and cilantro
    6. Chill in the refrigerator for 20-30 minutes and enjoy the cold salad. Alternatively, the salad can also be enjoyed warm as soon as it is assembled

    Serving Suggestions

    • If a plain paapad or a tostada is available in your pantry, top this salad on them and serve as “masala paapad” or a “chaat tostada”
    • Make a lettuce wrap using the salad (make sure to warm it slightly) as a filling
    • Use the salad as a part of a filling in a Kathi roll for a great crunch and freshness

    Give this refreshing salad a try. If you like this recipe, do rate it and share your comments below. You can also follow me on Instagram to be up-to-date with what is cooking in my kitchen and to share your version of the recipe with #foodformyloveblog.

  • Leek and Green Beans Subzi

    Leeks are an interesting vegetable. They are white and green and look like scallions, but are not. They are like a gourmet onion. They don’t have the pungency of an onion, but have a delicate onion flavor, and a sweet one at that. They add a subtle flavor to recipes without overpowering other flavors.


    Here are some pointers about purchasing leeks:

    • Clean white bulbs without any spots or blemishes are the freshest leeks
    • Firm, dark green leafs that are not wilted are also an indication of the freshness of leeks

    Cleaning and preparation of leeks is also important to be aware of. Leeks are grown in trench like settings deep in the soil. Once they are ready, they are pulled out of the soil. So, how should you clean them?

    • Rinse the entire leek from top to bottom under running water
    • Once you cut it up, place the cut pieces in a container cold water. This will let the soil and other debris to loosen and settle to the bottom of the container
    • Using your hands, pick out the cut pieces from the container and place into a colander, and re-rinse under running water
    • Pat dry with paper towel

    Leeks cannot be eaten raw, because they will have a harsh flavor. Starting from white portion of the leeks, following the light green portion and up until the dark green leafy portion can be consumed. The dark green leafs are tough and are difficult to consume straight. They can be cooked for a long time to soften and used in fillings or in soups, or it can be simply be used to flavor homemade broths.

    Leeks can be prepared in many different ways. They can sliced vertically into juliennes or can be sliced into ringlets. Because of their mild onion flavor, leeks work great as an onion replacement and in many different vegetable combinations. They can be sauteed or pureed.


    This “green” subzi has leeks and green beans, but is ripe for customization with vegetables and seasonings. The subzi is a simple saute with my choice of simple seasonings and be served with hot, fresh rotis.


    Prep time15 minutes
    Cook time15 minutes
    Serves2

    Ingredients

    Vegetables

    • Leeks – 2, sliced into ringlets
    • Green Beans – Fresh or frozen, 1.5 cups

    Spices & Herbs

    • Fresh Ginger – 1 tbsp, chopped
    • Cumin Seeds (Jeera) – 1/2 tbsp
    • Salt – As per taste
    • Haldi (Turmeric Powder) – 1 tsp
    • Kashmiri Red Chilli Powder – 1.5 tsp (For a milder spice, use Paprika powder)
    • Dhania (Corainder Powder) – 1 tsp
    • Tandoori Masala (Optional) – 1/2 tsp
    • Kasuri Methi (Dried Fenugreek Leaves) – A handful to sprinkle

    Oils

    • Cooking Oil – 1-2 tbsp

    Method

    1. In a pan, add oil and and jeera. Let the jeera splutter
    2. Add the chopped ginger and saute for 30 seconds
    3. Add the green beans and saute until they have cooked all but a little
    4. Add salt, haldi, red chilli powder and coriander powder. Mix. Add a sprinkle of water to de-glaze the pan
    5. Add the leek ringlets, mix and cook (with lid covered) for 3-4 minutes. Make sure the ringlets are not a mush, but have become tender
    6. Add tandoori masala and kasuri methi. Mix well and cook (with the lid open) for an additional 1-2 minutes
    7. Take the pan off the heat. Serve the subzi with fresh, hot rotis

    You can also follow me on Instagram to be up-to-date with what is cooking my kitchen. If you like this recipe, do rate it and share your comments below. Don’t forget to post your version on Instagram using #foodformyloveblog.

  • Food Safety Basics

    What is Food Safety? Food safety is the practice of preparing, handling, storing and serving food in a manner that is free of contaminants and hazards, and is safe for consumption.

    Why is it important? Because it helps to prevent food borne illnesses.

    What are foodborne illnesses? When I was little and I ate something that resulted in a stomach ache, I remember my mother telling that it was a stomach infection and she would give me the appropriate antibiotic medicines to rid my body of the infection. As a food safety professional, I now realize that the stomach infection was a foodborne illness. So essentially, a foodborne illness is an illness that can result from eating food that is spoilt or contaminated with bacteria, virus, chemicals or toxins. Food borne illneses are more than just a “stomach infection” as they can become serious heath issues and a huge cost to society.

    It is important to have a basic understanding of the types of hazards that are present in the environment that can be introduced to food through various stages of production, both commercially and in a home setting. These hazards include:

    • Biological – Bacteria, virus, fungi etc. These are ubiquitous in nature and several of them are important for the functioning of the human body and nature in general. However, given the right conditions, certain strains of these organisms can get to our food, grow in them, release toxins and make us ill.
    • Chemical – These can be naturally occurring or can be process induced. Examples include pesticides residues, allergens, sanitizers etc. Chemical hazards can react with the body’s immune system or with other bodily functions and cause illness.
    • Physical – These can be anything ranging from broken pieces of crockery, small bones/shells, hair, stones, nails, plastic film etc. Several of these can lead to choking or internal bleeding, and therefore it is important to be observant in a home setting as well as in a restaurant setting.

    What do food safety professionals do?

    Food safety professionals either work for a food manufacturing company, for the government, consult with food manufacteres etc. to ensure the quality and safety of food supply. This food supply includes agricultural and packaged products all the way from harvesting, to formulation, processing, packaging, labeling and distribution to the store shelves.

    I practice what I preach. And yes, it drives my family crazy but that’s because it requires some knowledge, change and some extra due diligence. But I strongly believe that a few extra steps will help ensure the safety of the food we prepare and the health of our near and dear ones.

  • Fig and Walnut Granola

    I am going to be honest with you. Snacks like cookies, trail mixes etc. are always scarce in my pantry. I prefer fruits and nuts as a healthy snacking option over ready-made snacks. Plus, I am not much of a snacker. But, of course, my husband is a snacker. The minute he is back home from work, he goes straight to the pantry hunting for snacks. I have been able to turn his attention to healthier snacking options like fruits, but this fig and nut granola hit it out of the park for him.

    Naturally sweetened with Figs, Dates and Honey, this granola also has the power packed goodness of Walnuts and Oats and has delicate flavors. So, no artificial ingredients, completely natural and if the honey is eliminated (which is possible if the sweetness of the Figs work), this is a vegan granola.

    I had originally made this granola to carry on our hiking trip. We even ended up using it as a topping for our breakfast at our cabins during our trip. It was such a hit, that he has put in a sweet request to make a huge batch of this granola for his snacking needs.

    This granola can be eaten on its own, with milk, with other nuts as a trail mix, topped on yoghurt, added to a smoothie bowl – the possibilities are endless. The most exciting for me is that my husband has at least turned to a healthier snacking option, so taste and health for him is a win-win for me.


    Prep time15 minutes
    Cook time35 minutes
    ServesMultiple

    Ingredients

    Grains

    • Rolled Oats

    Nuts & Seeds

    • Walnuts – 1/2 cup, chopped
    • Almonds – 1/2 cup slivered
    • Figs – 1/2 cup chopped
    • Dates – 1/2 cup chopped

    Spices & Flavors

    • Ground Cinnamon – 1 tsp
    • Ground Nutmeg – 1 tsp
    • Salt – A pinch
    • Freshly squeezed Orange Juice – 2 medium Oranges
    • Honey – 2 tbsp

    Ingredient notes

    • Turkish Figs work best here because they are moist enough to not dry out during the baking process
    • Mejdool Dates work best because they are sweeter and moist to not dry out during the baking process
    • If vegan, eliminate honey. Alternate sweeteners such as Date Syrup, Maple Syrup, Jaggery or Coconut Sugar can be used

    Method

    1. Preheat oven to 350F
    2. Prepare a baking tray lined with parchment paper
    3. In a mixing bowl, add the all the dry ingredients first beginning with Oats, chopped Figs, Dates, and Nuts. Mix well
    4. Add the Cinnamon, Nutmeg and a punch of salt. Mix well again
    5. Now add he wet ingredients beginning with Honey, then Orange juice and mix well. At this point, the mixture should come together in a fairly tight mixture, but still with loose Oat and Nut bits
    6. Pour the granola on the tray and spread into an even layer. To get chunky granola bits (this is how I like it), press down on the mixture so that mixture is crowded and tightly packed, but not so much that it does not bake evenly
    7. Bake for 20 minutes. At this point, take the tray out and using a spatula, gently stir. Put it back in the oven and bake for an additional 10-15 minutes
    8. Once the baking is complete, allow the granola to cool, undisturbed. It will crisp up as it cools
    9. Break the granola into pieces and enjoy as you please (These can be stored in an air-tight container for 1-2 weeks)

    You can also follow me on Instagram to be up-to-date with what is cooking my kitchen. If you like this recipe, do rate it and share your comments below. Don’t forget to post your version on Instagram using #foodformyloveblog.