Category: Retro Recipes

Traditional Indian food recipies. Ever wondered how mummy makes such amazing masala dosa?

  • Ginger Chutney

    With a recent affinity towards Ginger, I got introduced to this mind-blowingly delicious Ginger Chutney, courtesy: my mother-in-law. Now, being married into a family from the southern Indian state of Andhra Pradesh, I have the luxury of enjoying an incredible variety of condiments such as chutneys and podis. This one happens to be one of my absolute favorites.

    Ginger, or Allam, as it is known in Telugu is know for its medicinal properties, particularly the immunity boosting and anti-inflammatory properties. So a little Ginger Chutney (or Allam Pachadi, as it is called in Telugu) everyday will be amazing for the body.


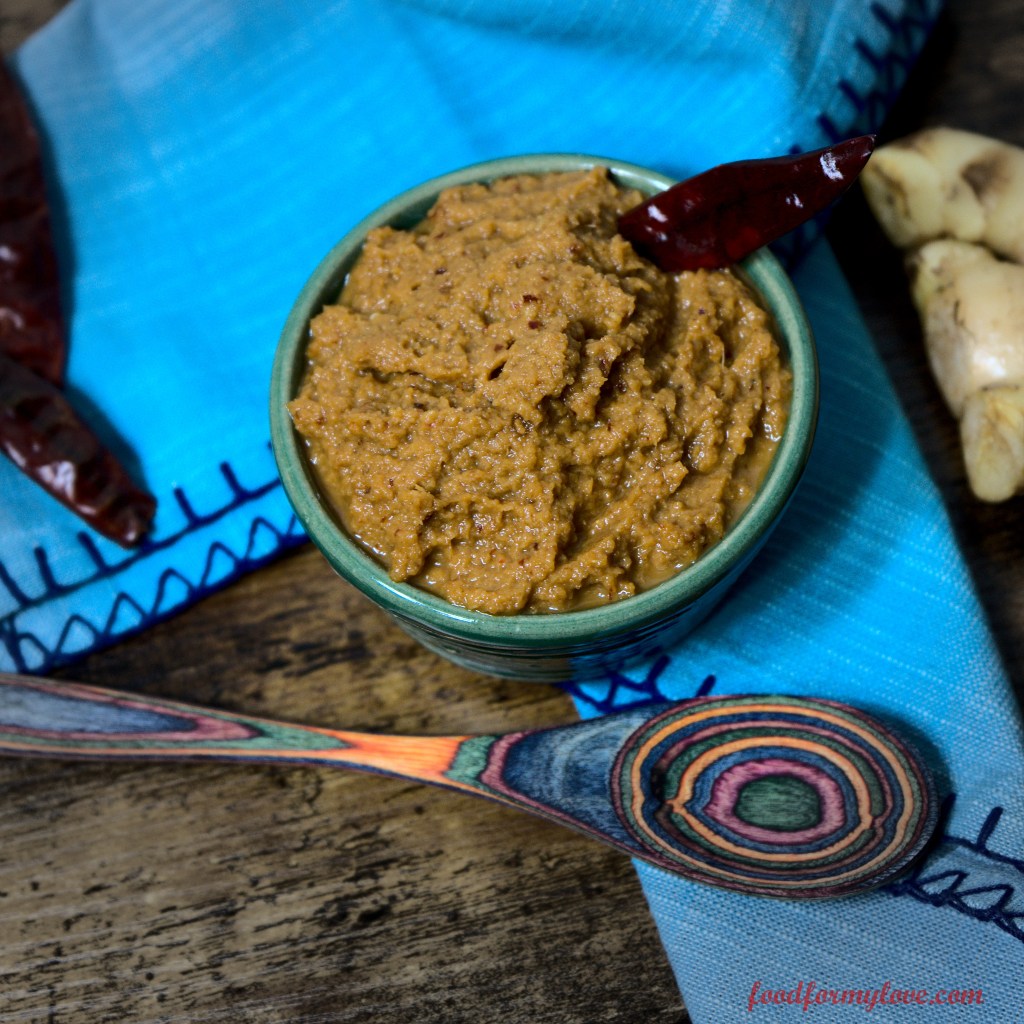
    The pungent and bitter flavor of the Ginger may be off-putting to some. But the flavor profile can be managed with other ingredients such as Coconut and Jaggery. The key is in properly frying the Ginger before blitzing it into a chutney. Otherwise, the chutney will taste like eating raw Ginger.


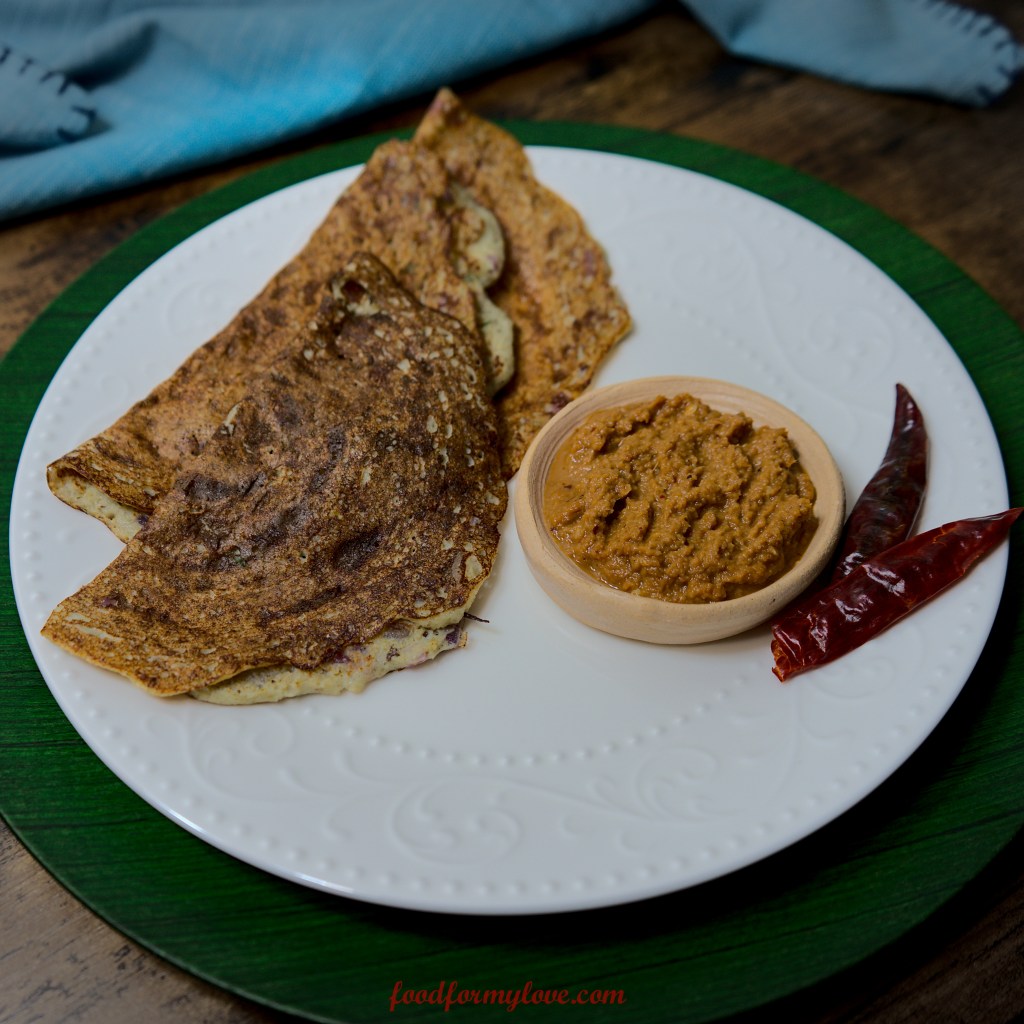
    This chutney can be enjoyed with Rice, Rotis, Dosas and Rottis.

    Prep time10 minutes
    Cook time15 minutes
    ServesBulk item that can be stored long-term

    Ingredients

    • Ginger – 2 medium sized roots. Peeled, cleaned and roughly chopped
    • Dried Red Chili – 2-3
    • White Urad Dal – 2 tbsp
    • Dry or desiccated Coconut – 1 cup
    • Jaggery Powder – 1 cup
    • Salt – As per taste
    • Tamarind Juice – 1 tsp
    • Water – As needed for the desired Chutney consistency
    • Oil – 2-3 tbsp for frying

    Method

    1. Add oil to a pan. Once it is hot, add the dried red chilies and white urad dal. Fry until the urad dal turns slightly brown and remove from the pan
    2. To the same pan, add the roughly chopped ginger and fry for 10-15 minutes until the ginger pieces are transparent and are completely cooked through (This step can be combined with step 1, just be careful not burn the urad dal during the frying process). Set aside to cool
    3. To a blending jar, add the fried ingredients followed by the remaining ingredients
    4. At first, add a splash of water and pulse the blender. This is to achieve a coarse consistency for the chutney, which is the best way to enjoy it. If you prefer a smoother consistency, add additional water and blend until the desired consistency is achieved
    5. Serve immediately or store in an air-tight container for 1-2 weeks

    Pro tips from my mother-in-law:

    • Thoroughly cook the ginger pieces until they turn transparent. Under-cooked ginger will result in a bitter tasting chutney and will make the chutney inedible
    • Adjust the tanginess and sweetness by adjusting the quantity of tamarind juice and jaggery
    • Adjust the consistency of the chutney by adding additional water (a little at a time) to achieve a thinner and smoother chutney consistency

    You can also follow me on Instagram to be up-to-date with what is cooking my kitchen. If you like this recipe, do share your comments below. Don’t forget to post your version on Instagram using #foodformyloveblog.

  • Bell Pepper Chutney

    Condiments, especially chutneys are synonymous with India. In a vast country like India, every state, every city and every household has varieties of chutneys – so many that it can take a lifetime to explore them all.

    But here, let’s just explore one simple chutney that my mum taught me, using one of her favorite vegetables (and frankly, mine too) — Bell Peppers. This Bell Pepper (or Capsicum) chutney is a quick and easy recipe that can served with Dosas, Akki Rottis and Rotis. It is definitely different from the the regular Coconut or Mint chutneys, but yet has a very similar texture to a Salsa, or even a chip dip :’)


    For this recipe, I recommend using the Green Bell Peppers because of the flavor they carry. The Red Bell Peppers have a sweetness to them that won’t support the flavor of the chutney. Furthermore, the key to achieving the flavor of this chutney is in dry roasting the Bell Peppers. It is the charred flavor that adds a beautiful note to the Chutney.

    Prep time10 minutes
    Cook time10 minutes
    Serves2

    Ingredients

    Vegetables

    • Green Bell Pepper – 2, medium sized, roughly chopped
    • Onion – 1 small, roughly chopped
    • Tomato – 1 small, roughly chopped

    Spices, Flavors and Herbs

    • Green Chilies – 2-3
    • Tamarind juice – 1-2 tbsp
    • Salt – As per taste
    • Cilantro – A handful

    Tadka/Tempering

    • Oil – 2 tbsp
    • Mustard Seeds – 1 tsp
    • Dry Red Chilies – 2
    • White Urad Dal – 1 tsp
    • Hing (Asafoetida) – A pinch
    • Curry Leaves – A few

    Method

    1. In a glass bowl, add roughly chopped onions, tomatoes and green chilies with 1/4 cup water. Place this in the microwave for 2-3 minutes. This is a quick cook method for sauces.
    2. In the meanwhile, add the roughly chopped bell peppers to a pan and dry roast them until the skin of bell peppers blisters and roasted.
    3. To a blending jar, add the cooked onions, tomatoes and green chilies, together with the roasted bell peppers. To this, add salt and tamarind juice. Also add the cilantro. Blend the mixture into a coarse paste (or fine as per your preference). Once done, pour into a serving bowl and set aside.
    4. Prepare the tadka – First heat oil in a tadka pan. To this, add mustard seeds. Once they splutter, add the urad dal, hing, red chilies and curry leaves.
    5. Pour the tadka over the chutney, mix well and serve with Dosa, Rotti or Chapathi

    You can also follow me on Instagram to be up-to-date with what is cooking my kitchen. If you like this recipe, do share your comments below. Don’t forget to post your version on Instagram using #foodformyloveblog.

  • Pineapple Gojju

    The smell of sweet jaggery, tangy tamarind and roasted sesame. That is the smell that I used to wake up to many mornings. That smell was my mum making gojju. What is it you ask?

    The simplest explanation for gojju is that it is a curry that uses a masala paste prepared using roasted and ground spices together with a vegetable of choice. It is a sweet, spicy and tangy curry that is usually eaten as a side with rice and rasam or is eaten with rice itself. Gojjus are a delicacy in the southern Indian state of Karnataka, which is where I come from.

    Gojjus are made with a variety of vegetables such as Bell Peppers, Okra, Tomato, Plantain, Eggplant and Pumpkin, which is one my favorites. But an even more favorite one is a Pineapple gojju. Having grown up outside India, my my only source of gojju would be my mum. But often times, when we visited India and attended pujas (religious ceremonies) or weddings, I noticed that a Pineapple gojju was a constant on the plantain leaf food menu. Turns out, this gojju is extremely popular for festive and celebratory meals. I loved it so much that I had to have it on my wedding menu 🙂


    I used to think that making gojju is difficult, because eating my mum’s gojju was a magical experience which I believed I could not replicate. While that is almost true, this first attempt at making this Pineapple gojju was quite successful. My husband is from Andhra (another southern Indian state) and gojjus are not a delicacy there. So neither was he familiar with it and nor did he like it. But this, he gorged on it. So, I am going to give myself a pat on the back and share the recipe with you all.

    To make this gojju, you will need a couple of specific ingredients (if you are not an Indian household, you want to head over to the Indian grocery store or shop at Amazon). As far as the Pineapple, fresh or canned, either of them work. I encourage you to try it because it is a great accompaniment not only with rice, but can also be enjoyed with rotis.

    Prep time10 minues
    Cook time15 minutes
    Serves2

    Ingredients

    Fruits

    • Pineapple – 1 cup, chopped (fresh and ripe or canned)

    For the masala paste

    • Chana Dal (Split Baby Chickpeas) – 1 tbsp
    • White Sesame Seeds – 1 tbsp
    • Fenugreek Seeds – 1 tbsp

    Other

    • Green Chillies – 3, slit lengthwise
    • Tamarind paste – 1 tsp (juice or concentrate can also be used)
    • Jaggery Powder – 1 tbsp
    • Salt – As per taste
    • Dry Coconut – 1/4 cup
    • Turmeric Powder – 1 tsp


    Method

    1. In a pan, add the ingredients for the masala paste and dry roast it until it turns lightly brown. Set aside in a bowl or on a plate to cool
    2. In the same pan, add oil and mustard seeds. Once the mustard seeds crackle, add the slit green chillies and fry for 30 seconds. Remove only the fried green chillies and set them aside
    3. To make the masala paste, add the roasted ingredients to a blending jar. To this jar, add dry coconut, fried green chillies and some water. Blend into a smooth paste
    4. Heat the same pan with the crackled mustard seeds. To this, add the chopped pineapple and saute for 1-2 minutes
    5. Add salt and turmeric powder and mix. Continue to sautee until the pineapple is cooked, but mushy
    6. At this point, add the masala paste and mix well. To this, the tamarind paste, water for the desired consistency and let the gojju simmer for 3-5 minutes
    7. Before taking it off the heat, add jaggery powder and mix well
    8. Transfer to a serving bowl. Enjoy the gojju with rice, as a side with rice and rasam or even with rotis

    You can also follow me on Instagram to be up-to-date with what is cooking my kitchen. If you like this recipe, do share your comments below. Don’t forget to post your version on Instagram using #foodformyloveblog.

  • Tomato Chutney

    It would be hard to find an Indian household without a chutney or pickle. Every region, every state and every household have their own secret recipes, some often passed down through generations. This Tomato Chutney has not been passed down through the generations, but has certainly been passed to me by my mum and it has a very special place in my heart.


    The memory of the aroma of this chutney cooking downstairs in the kitchen is fresh in my mind. There was always something different about this chutney, a distinct flavor that I could never figure out what it was, and frankly, until recently, I had bothered to find out. I just know that the chutney tasted incredible. That distinct flavor comes from the secret ingredient that my mum has used, drum roll………rasam powder. I would have never guessed, but it works.

    I have grown up eating this chutney with roti, rice dosas and even idlis. In fact, when I used to go off to college after every summer or winter holidays, my mum used to pack me a lot of food, some of them in 4 months supply, like theplas and podis. One of the items was this chutney that she used to pack in a spill-proof manner to travel half way across the world. Any every time I ate theplas, I would eat it with this chutney and would miss being at home. That’s how far thus chutney has traveled.

    I tried making this chutney for the first time and it turned out great. But there was just something missing, I guess its mum’s touch. My mother-in-law also makes a tomato chutney, but her recipe uses different spices and the chutney is more fine and pasty instead of a chunky one. As I said, each household has its own variation of a chutney. But this one, you’ve got to try it.

    Prep time5 minutes
    Cook time15 minutes
    Serves4-6

    Ingredients

    Vegetables

    • Onion – 1, medium, diced
    • Tomatoes – 3, medium, diced

    Spices, Flavors and Herbs

    • Garlic – 1 1/2 tbsp, finely chopped
    • Rasam Powder – 1 tbsp
    • Jaggery Powder – 1 tbsp (If unavailable use sugar)
    • Mustard Seeds – 1 tsp
    • Salt – As per taste

    Oils

    • Cooking Oil – 1 tbsp

    Method

    1. Heat a pan. To this add, onions and tomatoes
    2. Add salt, jaggery powder and mix. Close the lid. Cook the onions and tomatoes for 5 minutes on medium-high heat
    3. Open the lid and cook for 5 minutes until most of the water evaporates
    4. Add rasam powder. Mix well and cook for 3-5 minutes with the lid open
    5. In the meanwhile, prepare the tadka (tempering). For this, add oil to a small pan
    6. Once the oil has heated, add mustard seeds. Once they crackle, add the chopped garlic. Once the garlic browns, add the tadka to the chutney
    7. Mix well. Serve immediately with roti, rice or dosas. The chutney can be stored in an air-tight container for approx. 30 days in the refrigerator for upto 3 months in the freezer

    ** Pair this chutney with Adai (A mixed lentil Dosa). Get the recipe here.


    You can also follow me on Instagram to be up-to-date with what is cooking my kitchen. If you like this recipe, do share your comments below. Don’t forget to post your version on Instagram using #foodformyloveblog.

  • Spinach Majjige Huli

    Yoghurt and greens. This recipe has everything that I love and everything that my husband does not. Yet, he ate it, not once, but twice. So, I am going to take the win.

    This recipe is yet another good and very interesting way to incorporate greens into your diet. Unfortunately it is not vegan because of the use of yoghurt. If you try this recipe with plant based yoghurt, I would love to know how to turns out. Now, on to the the recipe.


    Majjige Huli is a popular dish from the Southern Indian state of Karnataka. Growing up, it was a favorite at my parent’s place. Majjige Huli, when translated backwards means “Sour (Huli) Buttermilk (Majjige)“. Traditionally, the recipe is made with sour buttermilk and uses different types of vegetables. There is a boiled version (where the buttermilk is boiled to reduce its sourness, which would make it similar to the North Indian version of this called Kadhi). But this is a “raw” version because buttermilk (NOT RAW) is used but not boiled. Therefore, it is called a Hasi Majjige Huli (Hasi = Raw in Kannada). But, since I did not have buttermilk at home, I made do with yoghurt. Furthermore, Spinach is used in this recipe. But traditionally, vegetables such as Cucumber, Bottle Gourd, Green Plantains, Bell Peppers etc. are used in the preparation of the boiled version of this curry.

    The recipe has a distinct flavor due to the use of both raw and crackled mustard seeds along with its coconut and yoghurt base. It is definitely an acquired taste and therefore should be adjusted as per individual taste preferences. Anyone with any skill level can prepare this recipe in under 20 minutes. The curry is served with rice and is usually a second accompaniment along with rasam or sambhar.

    With good probiotics from yoghurt or buttermilk and vitamins and minerals from the greens, it is nutritious and cooling on the body. Definitely worth a try.

    Prep time10 minutes
    Cook time5
    Serves2

    Ingredients

    Vegetables

    • Spinach – 2-3 cups, roughly chopped

    Dairy

    • Greek Yoghurt – 2 tbsps

    Masala Paste

    • Mustard Seeds – 1.5 tsp
    • Green Chillies – 2
    • Cilantro – 1 handful
    • Turmeric – 1/2 tsp
    • Salt – As per taste
    • Fresh Coconut – 1/4 cup

    Oils

    • Cooking oil – 2 tsps

    Method

    1. Heat oil in a pan. Add 1/2 tsp mustard seeds. Once the mustard seeds crackle, add the chopped spinach. Saute for 1-2 minutes until the spinach has lightly wilted. Take it off the heat and allow it to cool
    2. In the meanwhile, to prepare the paste, add coconut, cilantro, green chillies, remaining mustard seeds and turmeric into a blending jar. Add 1/2 cup water and blend into a smooth paste
    3. To the blended paste, add yoghurt, salt, 1/2 cup water and blend into a smooth paste
    4. In a bowl, add the cooled sauteed spinach and the blended masala paste. Mix well to break up any spinach lumps
    5. Serve over warm rice and enjoy!

    Serving suggestion

    • Feel free to add a tadka (tempering) on the top. For the tadka, add some mustard seeds to hot oil. Allow it to crackle before adding some hing and curry leaves. Fry for 30 seconds and add to the Majjige Huli

    You can also follow me on Instagram to be up-to-date with what is cooking my kitchen. If you like this recipe, do share your comments below. Don’t forget to post your version on Instagram using #foodformyloveblog.

    Rating: 1 out of 5.