Welcome to WordPress. This is your first post. Edit or delete it, then start writing!
Blog
-
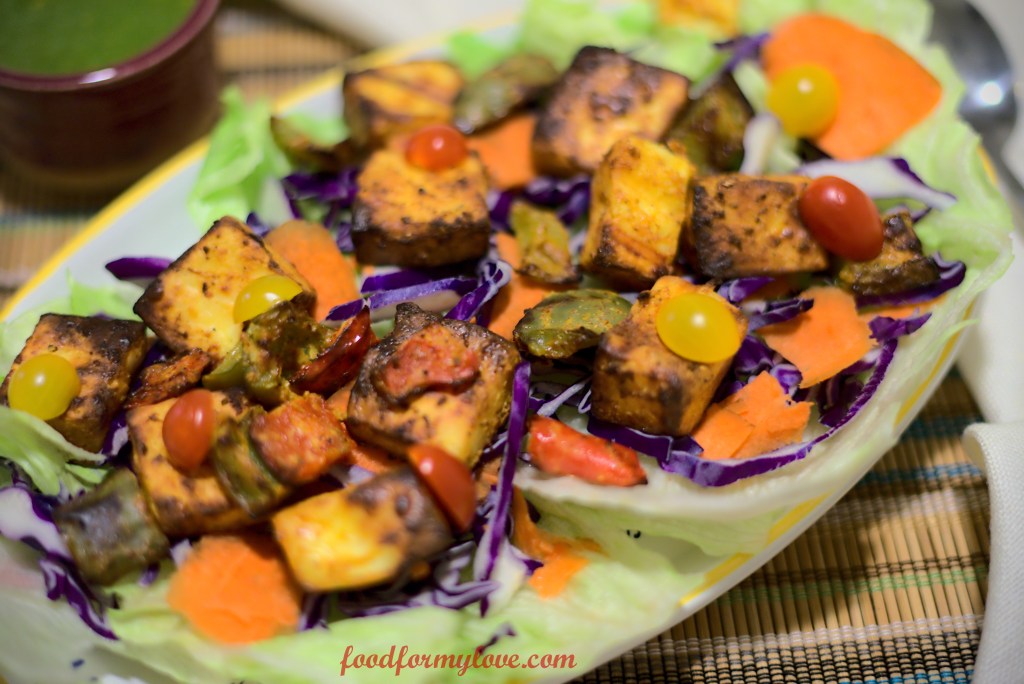
Grilled Paneer Salad
Paneer is one of those things that every Indian loves. Whether it is paneer tikka masala, paneer makhani, palak paneer or paneer bhurji. I am taking my paneer love to the next level with this salad. It adds an extra feel good factor to my paneer tikka cravings with the addition of vegetables and greens. Low carb and high in protein, this salad is certainly not a side one and can be a meal in itself.
Making paneer tikka can be daunting. Let me tell you, it is not. It uses pantry ingredients and nothing exotic. Yes, the marination can take a couple of extra hours, but putting the salad together thereafter takes just a few minutes.
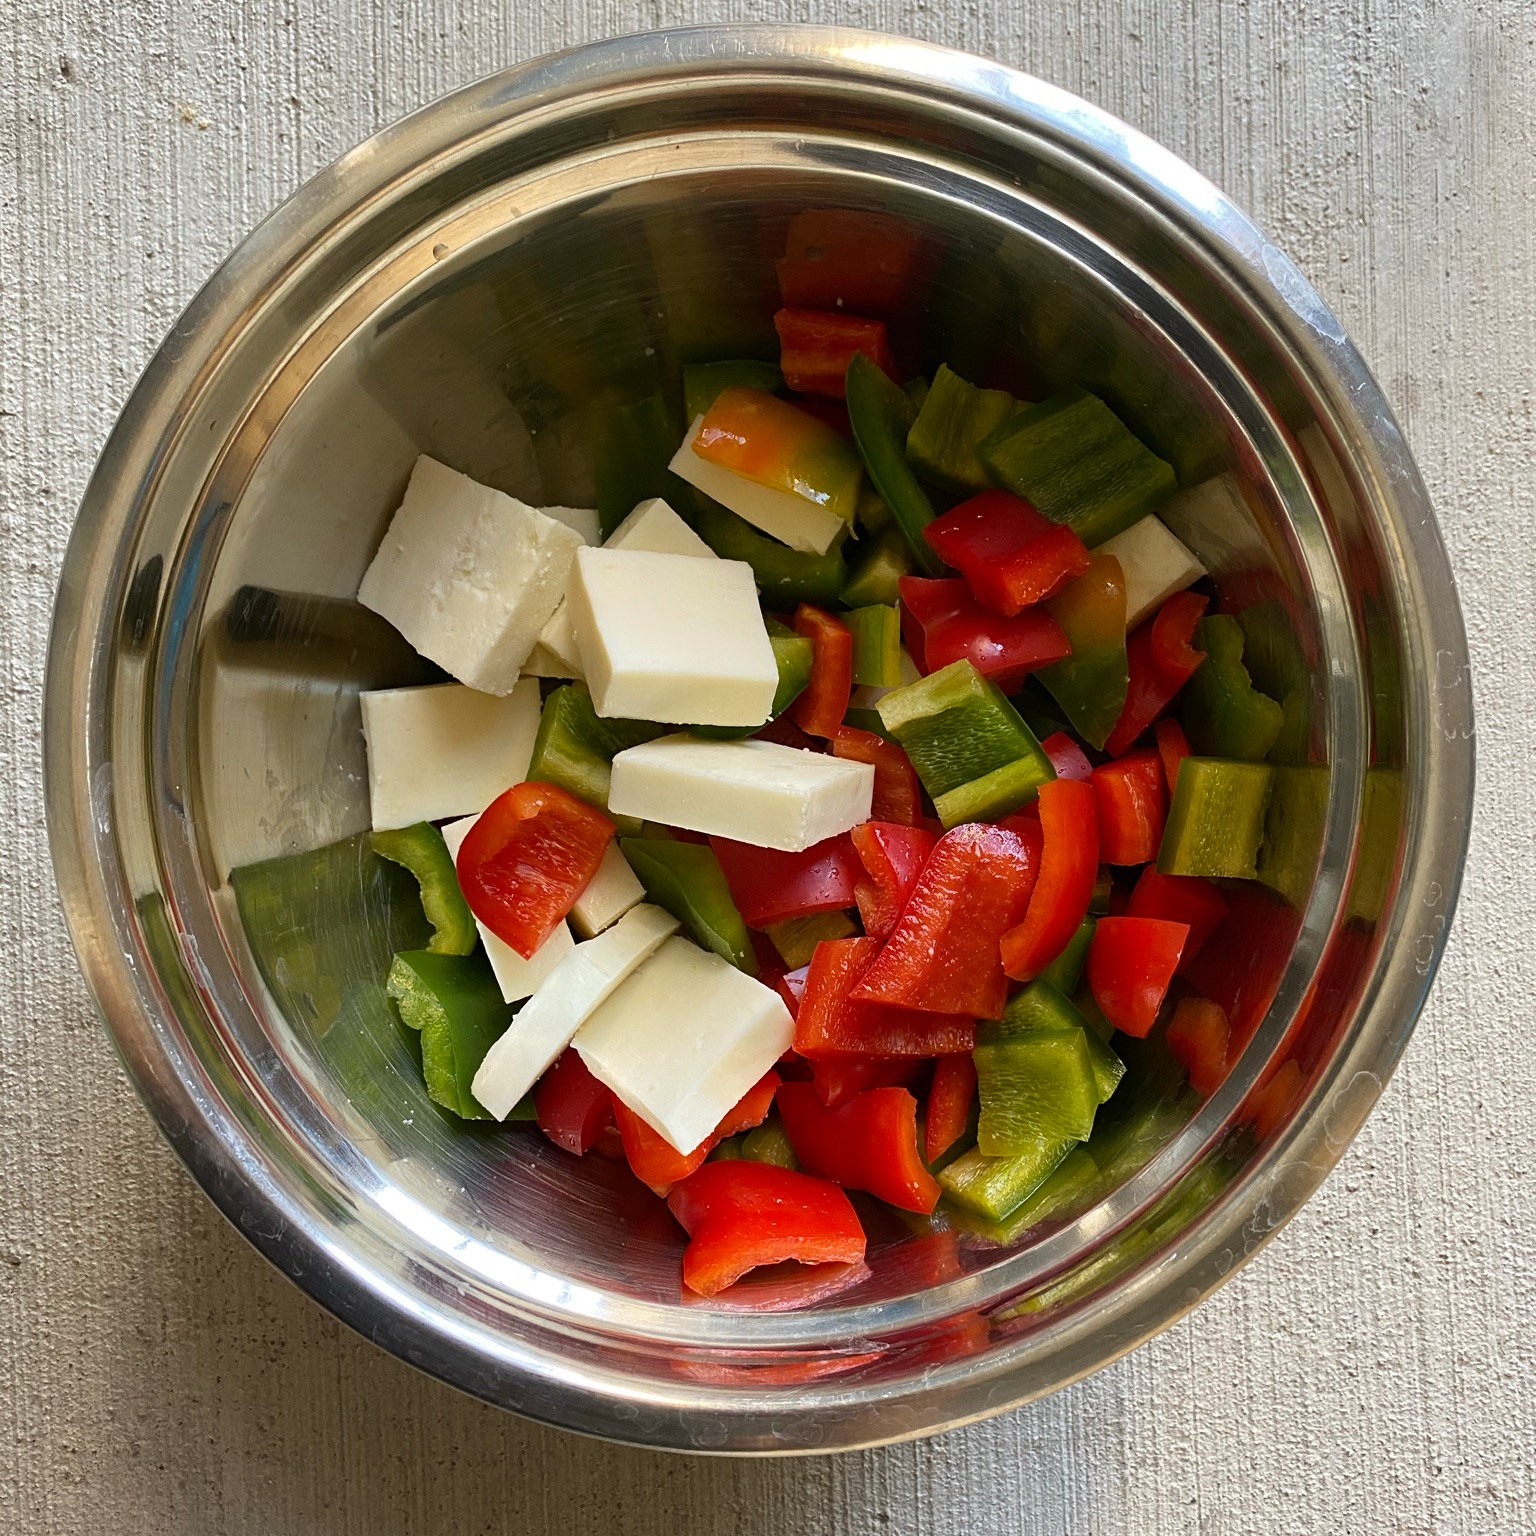
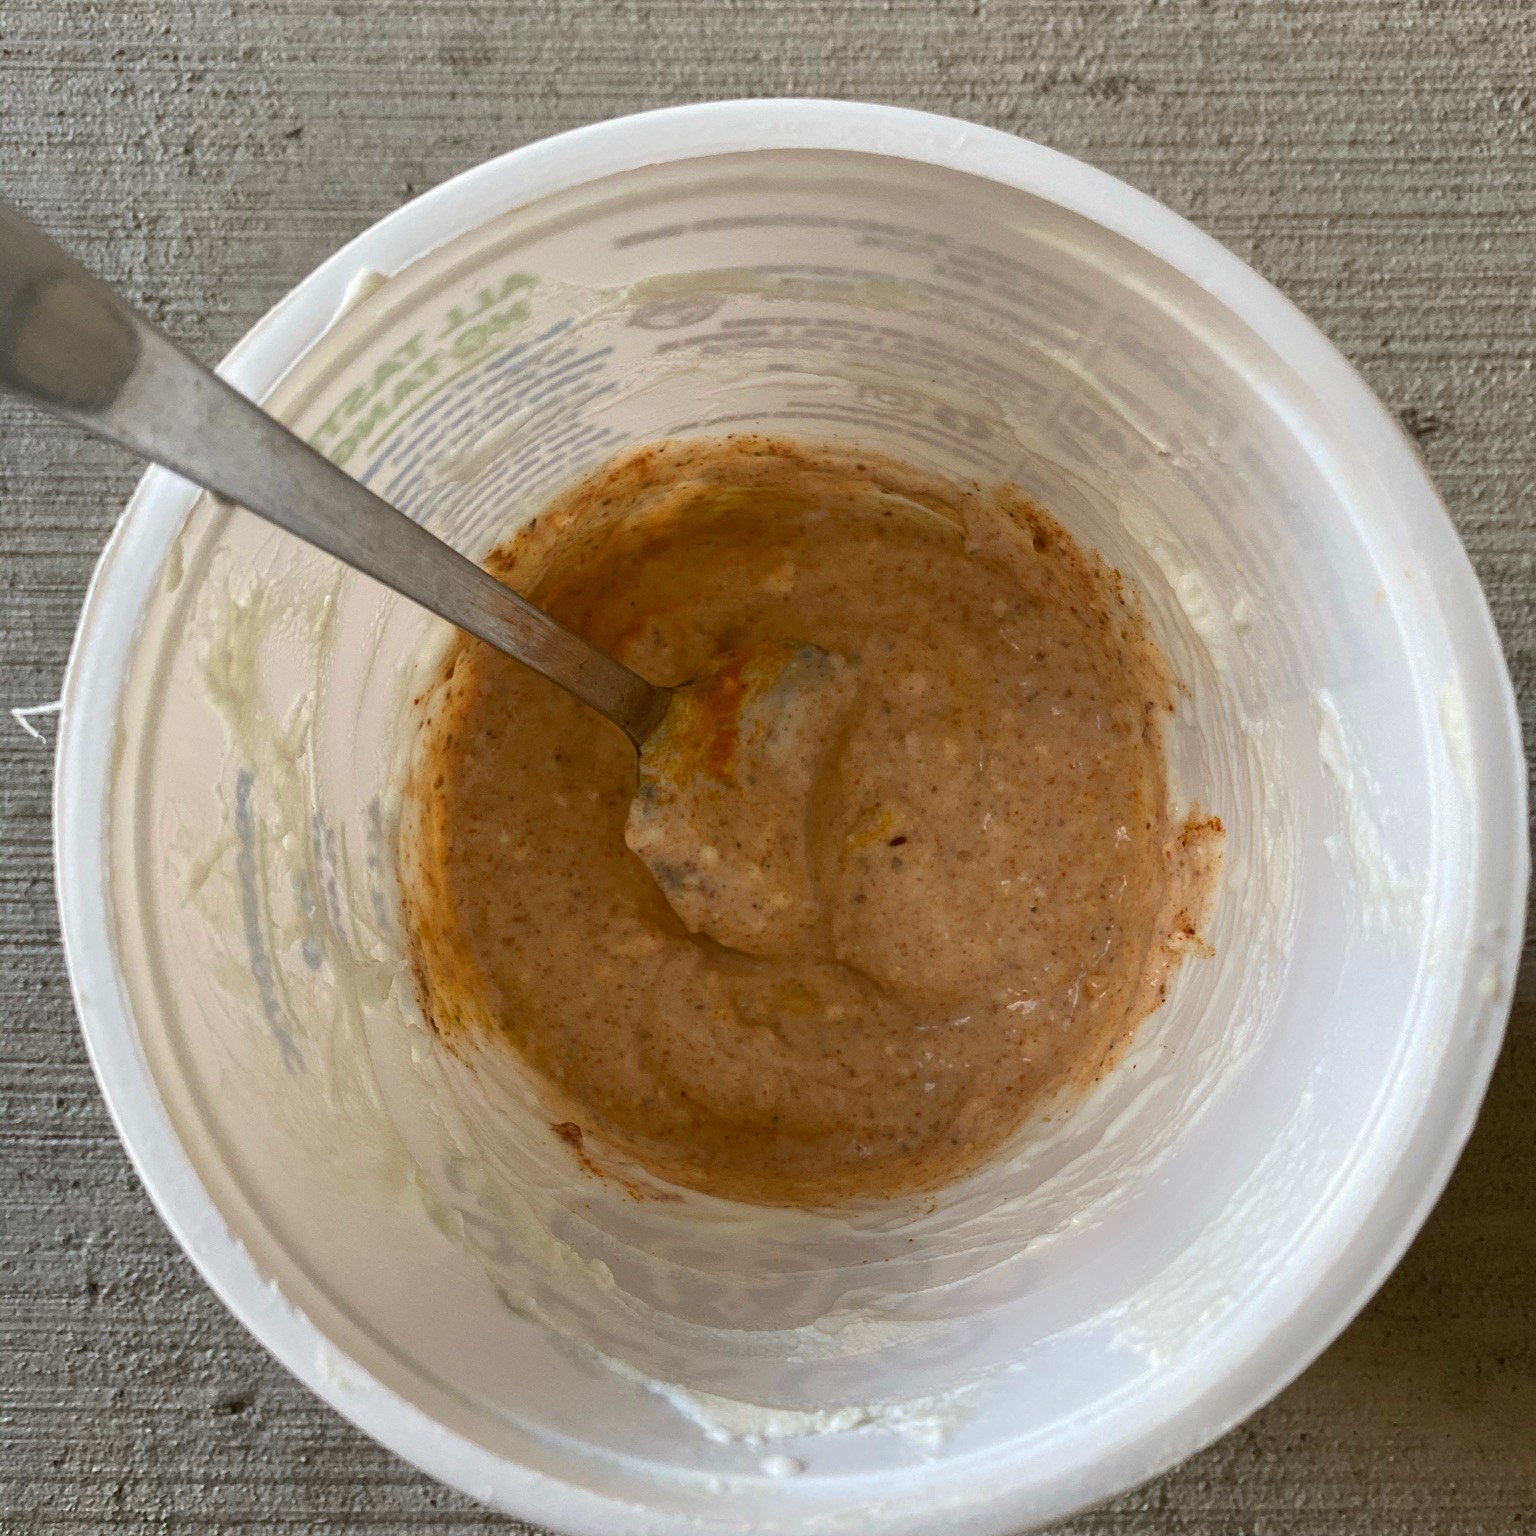
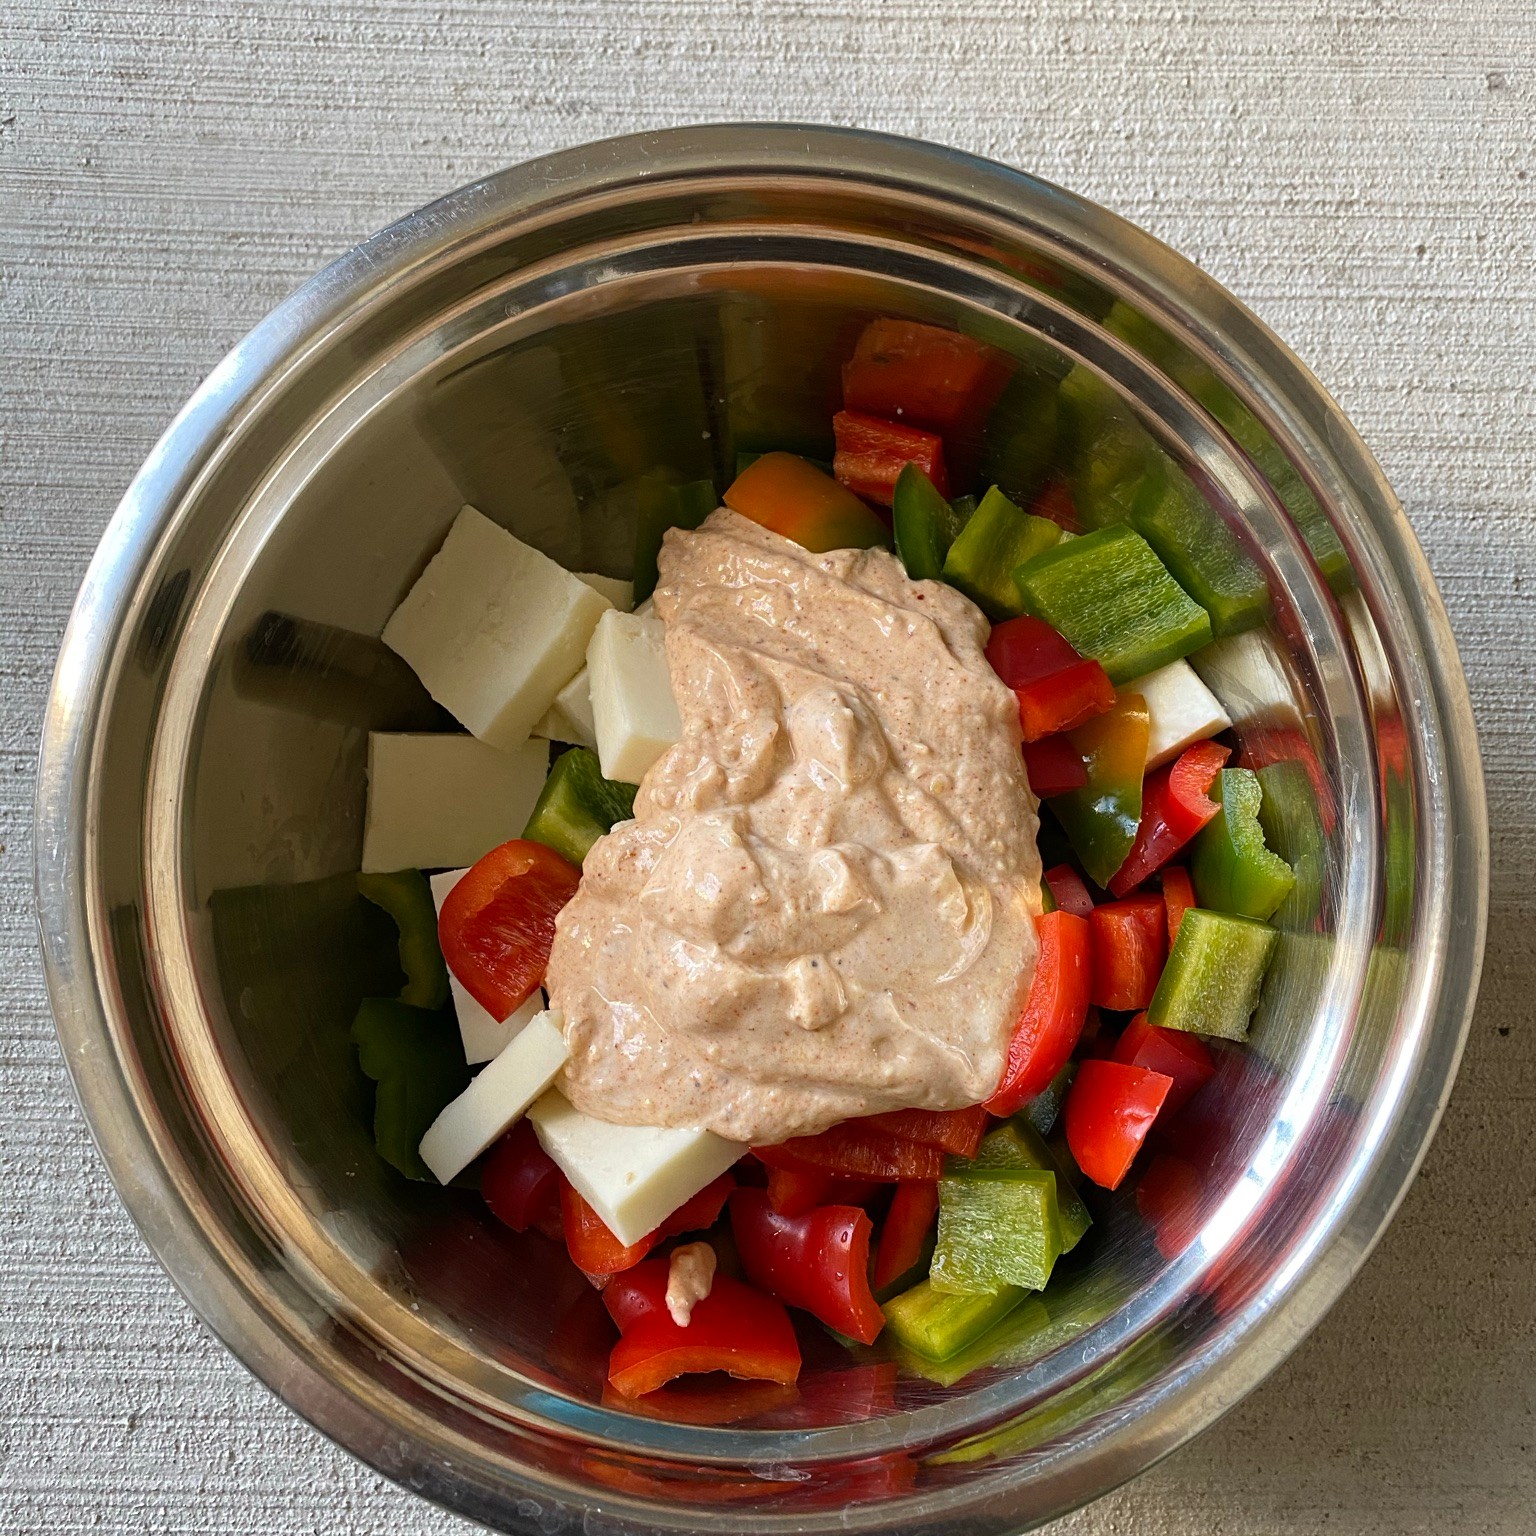
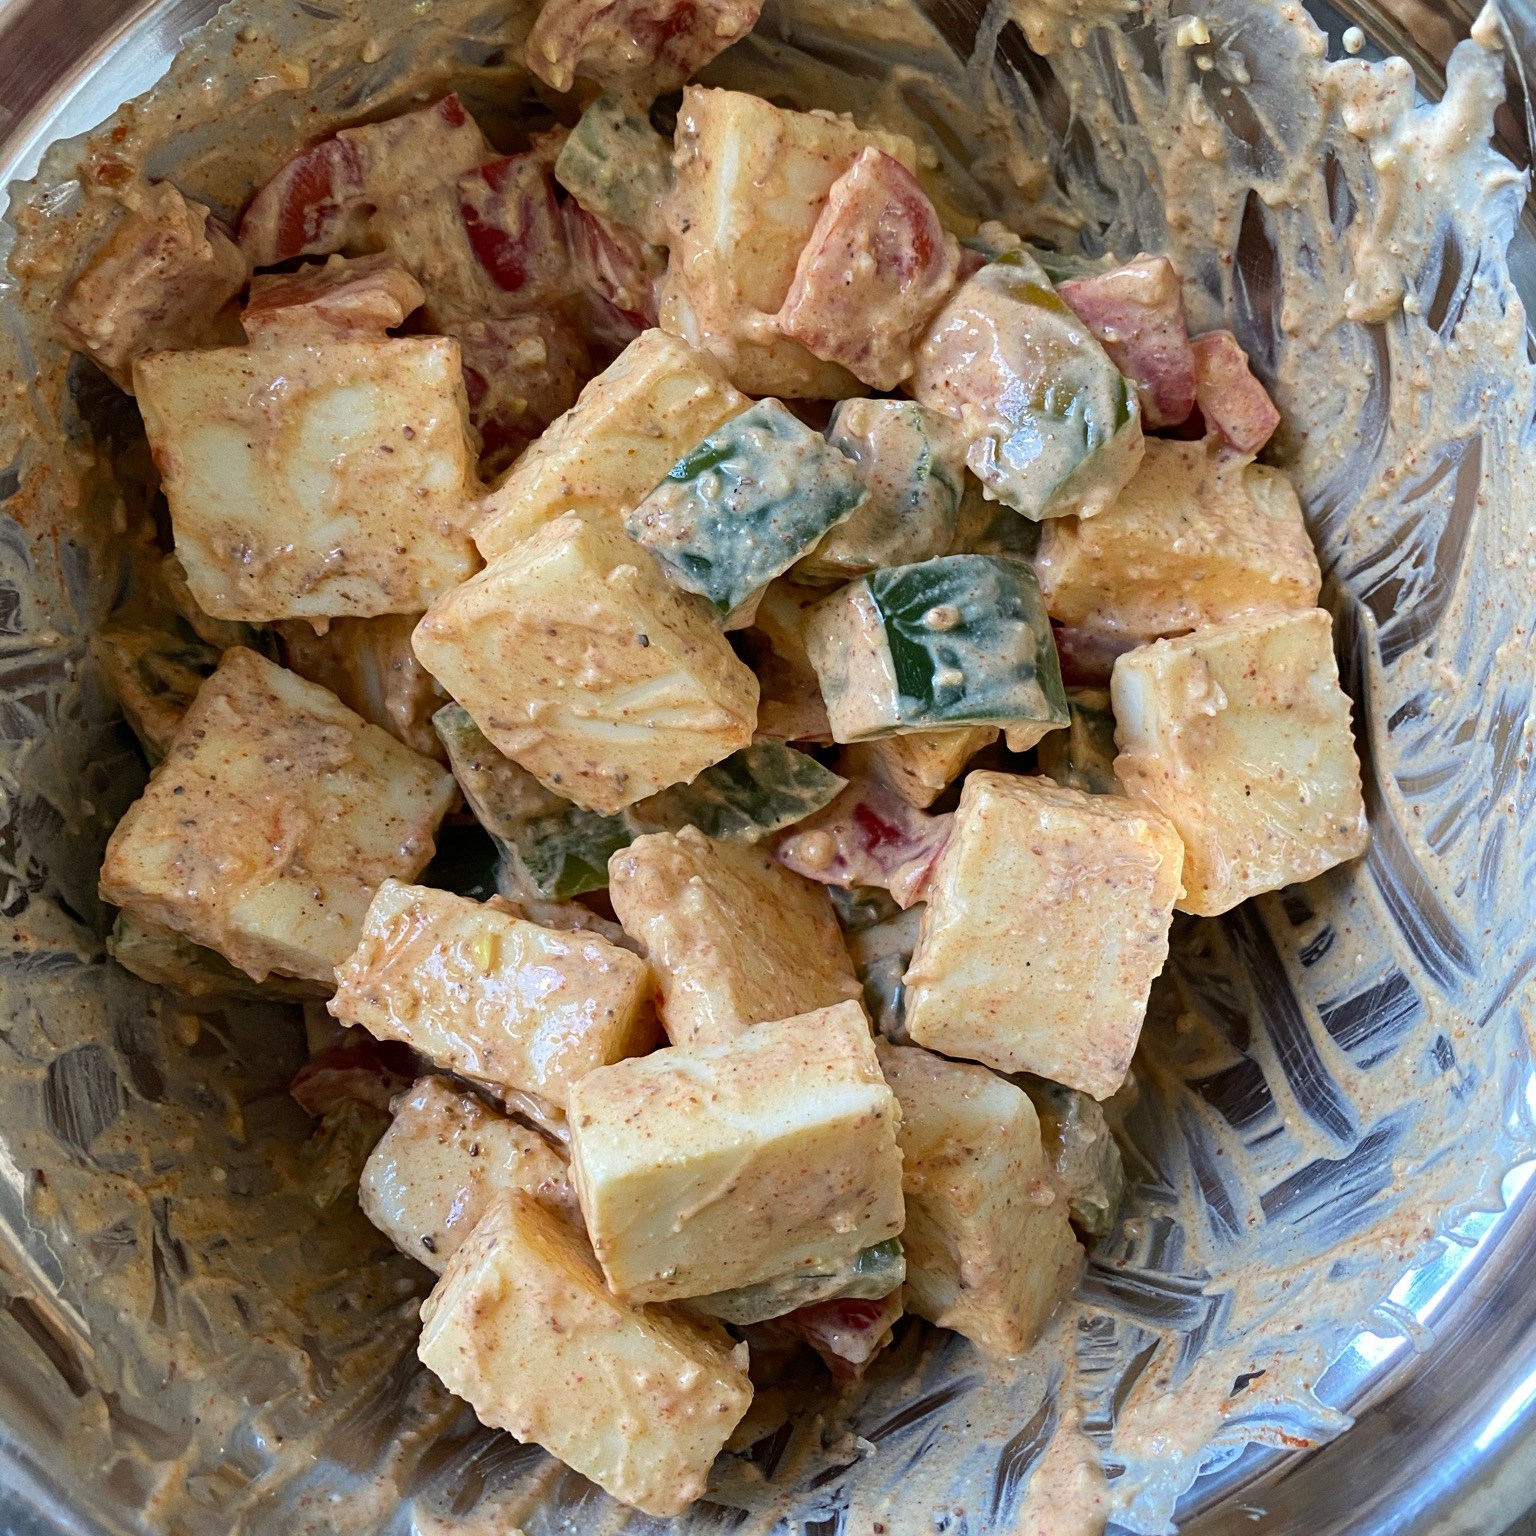
The paneer can be cut into whatever shape and size you choose. As much as I like bite sized paneer pieces in a salad, larger pieces give the appearance of a heavier salad, so I have gone with larger chunks. Simple pantry ingredients like yoghurt and your choice of spices mixed together, coated on the paneer and vegetables and left to marinate for 3-4 hours is all it takes. In the meanwhile, you can prep the greens to put the salad together.

All in all, the flavorful grilled paneer can have multiple uses through the week and makes for a great protein rich meal post-workout. So this can be prepared over the weekend and enjoyed through the week.
Prep time 3-4 hours Cook time 10-15 mins Serves 2
Ingredients
Protein
- Paneer – 1 block of 14oz, large dice
Vegetables
- Multi-colored Bell Peppers – 2-3, large dice
- Iceberg Lettuce – 1 small head, thoroughly washed, dried and chopped
- Cherry Tomatoes – A handful, halved
- Purple Cabbage – 1/2 cup, shredded
- Carrot – 1/2 cup, julienned
Marination
- Yoghurt – 1/2 cup
- Red Chili Powder – 1 tbsp
- Coriander-Cumin Powder – 1 tbsp
- Garam Masala – 1 tbsp
- Ginger – Crushed, 1 tbsp
- Garlic – Crushed, 1 tbsp
- Salt – As per taste
- Oil – 2 tbsp
Ingredient Notes
- Paneer can be substituted with halloumi cheese. For a vegan option, tofu can be the protein substitute and plain plant based yoghurt
- Any variety of greens can be used. I have used iceberg lettuce, but romaine lettuce, spinach, arugula or mixed greens can also be used
Method
- Marination
- To a bowl, add the paneer and vegetables
- Add all the remaining marination ingredients. Mix well and make sure every piece is coated with the marination masala. Place in the refrigerator to marinate for 3-4 hours
- Grilling the paneer
- Air fryer
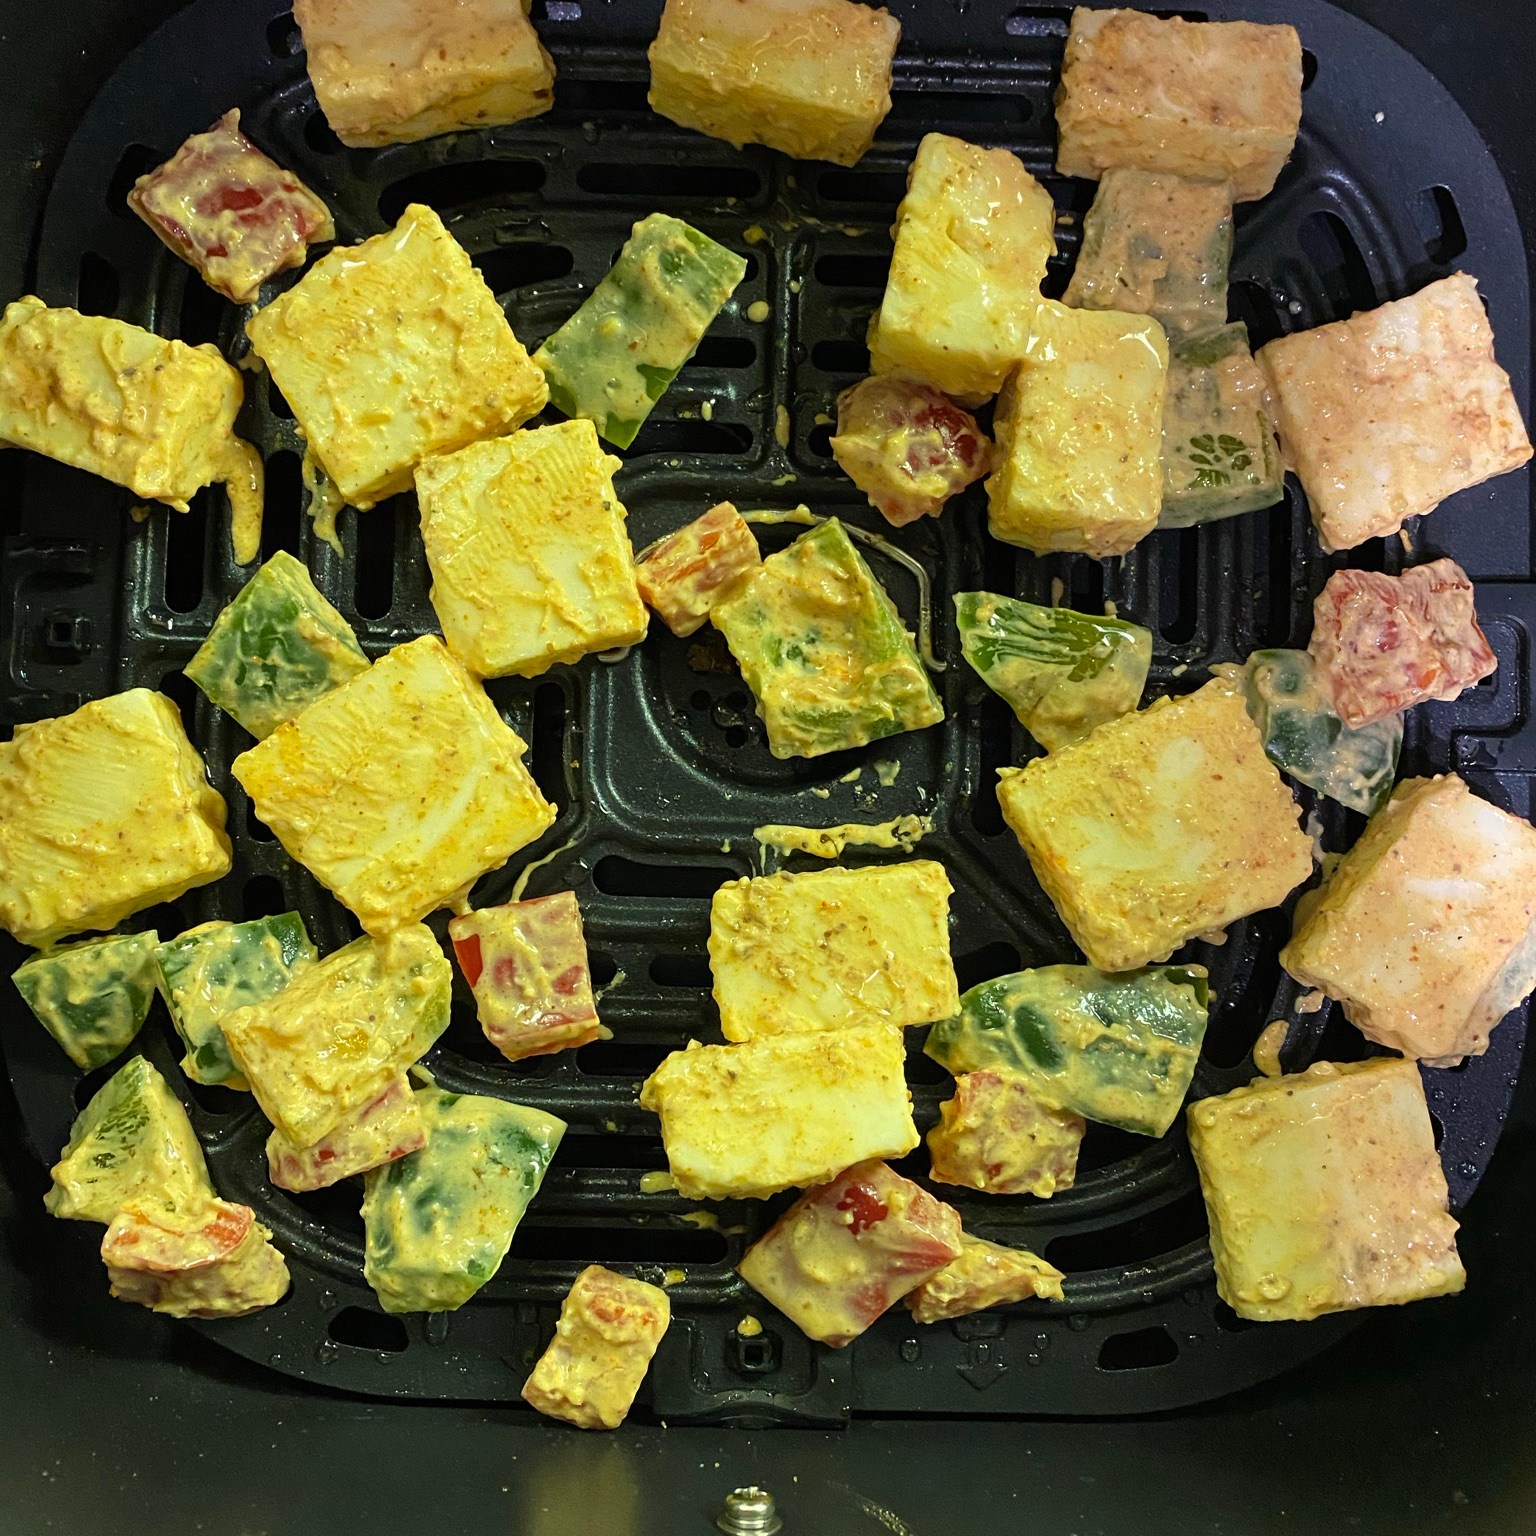
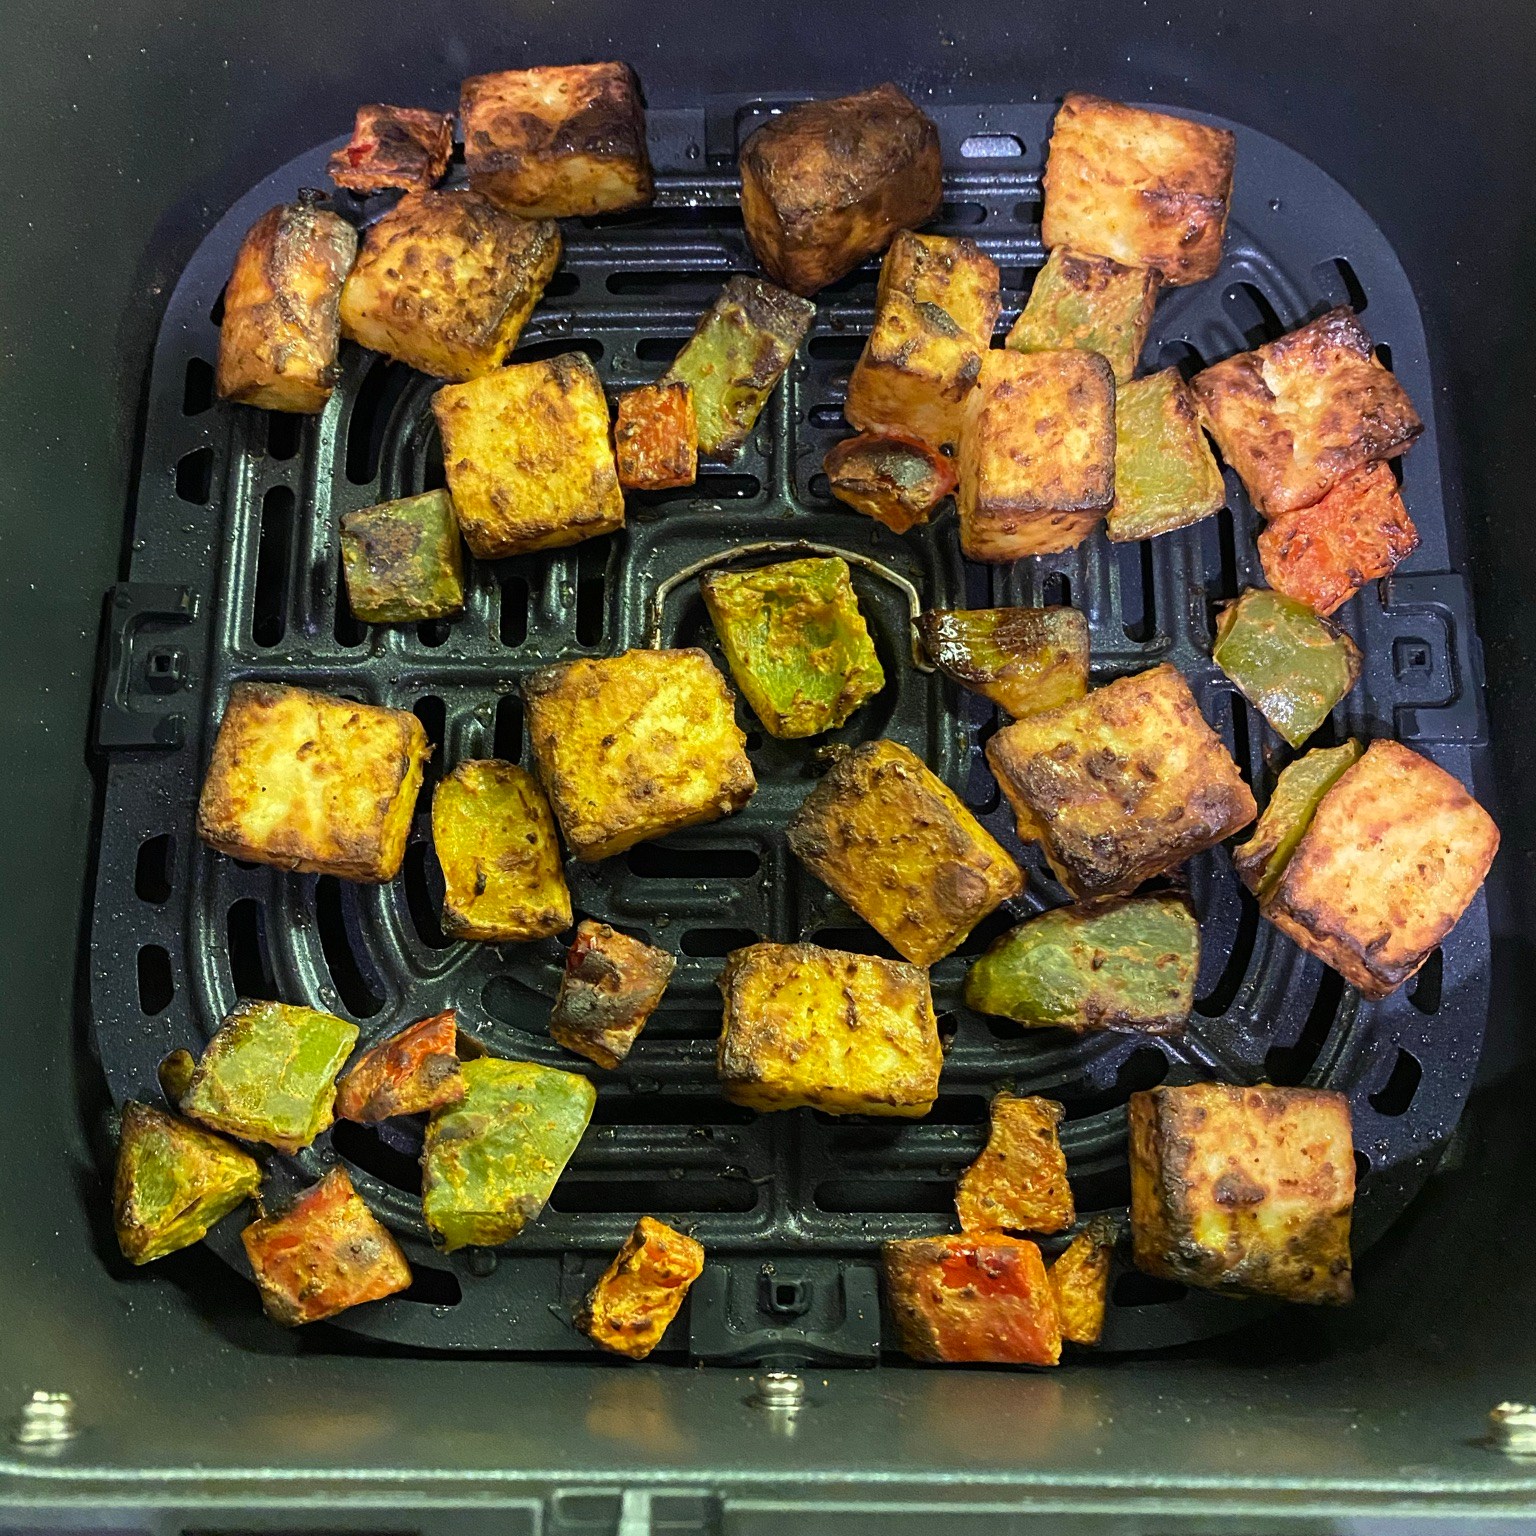
- Set the air fryer to “Air Fry” mode
- Once the pre-heat cycle is completed, add the vegetables and paneer to the air fryer basket. Set the timer to 8 minutes and temperature to 370F
- Stove top grill
- Heat 1-2 tbsps of on a grill pan
- Add the marinated pieces of vegetables and paneer to the grill pan. Cook until all sides are golden
- Oven
- Pre-heat the oven to 370F
- In the meanwhile, place the marinated vegetables and paneer on a baking tray lined with parchment paper
- Once pre-heat is complete, bake for 8-10 minutes until they are golden brown
- Air fryer
- Assembling the salad
- To a bowl or large platter, add lettuce
- On this place the grilled paneer and vegetables
- Add chopped tomatoes
- Squeeze some lemon juice and ENJOY with a dipping sauce like mint chutney or mayonnaise!
You can also follow me on Instagram to be up-to-date with what is cooking my kitchen. If you like this recipe, do share your comments below. Don’t forget to post your version on Instagram using #foodformyloveblog.
-
Kala Chana Salad
When I think of salads, anything except cucumbers and tomatoes on a bed of lettuce comes to mind. For me, salads need to have a combination of colors, flavors, textures and nutrition.
I was not much into salads until I started eating lunch salads at my office cafeteria and boy oh boy, the variety was zero. There was the regular lettuce or spinach, some basic veggies, a couple of cut meat options and a ton of sauces with artificial flavors and preservatives. As a vegetarian, even with a salad my options were limited and frankly quite bland and boring. That’s when I decided that I was going to create my own salads with a variety of veggies, flavors and textures.
This Kala Chana salad is one of my many favorites, due to its sheer simplicity yet its ability to carry so many flavors and textures together.

Kala Chana literally translates to Black Chickpeas. These are actually brown in color and also known as desi chickpeas. Compared to a regular beige chickpea (garbanzo bean), they are rougher in texture on the outside and have a nuttier flavor. From a nutrition perspective, Kala Chana is packed with protein, fiber, iron and folate. Just like many other legumes and pulses, this legume is a regular part of Indian vegetarian diets.
Kala Chana has a firm texture. So it requires soaking for a few hours and then pressure cooking. Despite this, it maintains its shape (without turning into a mush) making it a great fit for salads, curries and soups.
This salad is makes for a great weeknight meal on its own, as a side salad or even as a snack. The best part is, the flavors and additions to this are absolutely customizable. Check out the serving suggestions below for more ideas.
Prep time 4 hours Cook time 20 minutes Serves 2
Ingredients
Legumes
- Kala Chana (Brown Chickpeas) – 2 cups (dry)
Vegetables
- English Cucumbers – 2 cups, diced
- Carrots – 1 cup, shredded
- Multi-colored Bell Peppers – 1 cup, chopped
Spices
- Salt – As per taste
- Asafoetida – A pinch
- Mustard Seeds – 1 tsp
- Green Chilies – 1 tbsp, crushed
Oils
- Cooking oil – 1 tbsp
Ingredient notes
- Kala Chana can be purchased in a variety of pre-packed sizes at Indian grocery stores. Alternatively, they are also available in the same pre-packed sizes on Amazon
Method
- Rinse and soak the Kala Chana for 4 hours. After 4 hours, you will notice that the individual beans will have turned plump
- Pressure cook the soaked Kala Chana for 20 minutes on the high pressure setting in the Instant Pot
- Once cooled, add the boiled Kala Chana to a large bowl. To this, add all the veggies, salt and mix
- To a small pan, add oil. Once it has hot, add the mustard seeds and allow it to crackle. To this, add the asafoetida and green chilies and fry for 30 seconds. This is the flavoring tadka
- Add the tadka to the mixed salad. Mix well
- Top with freshly squeezed lemon juice and enjoy
Serving Suggestions
- Top with fresh coconut
- Top with diced avocado
- Sprinkle with tangy chaat masala
- Add red chilli powder instead of a green chilli tadka
You can also follow me on Instagram to be up-to-date with what is cooking my kitchen. If you like this recipe, do share your comments below. Don’t forget to post your version on Instagram using #foodformyloveblog.
-
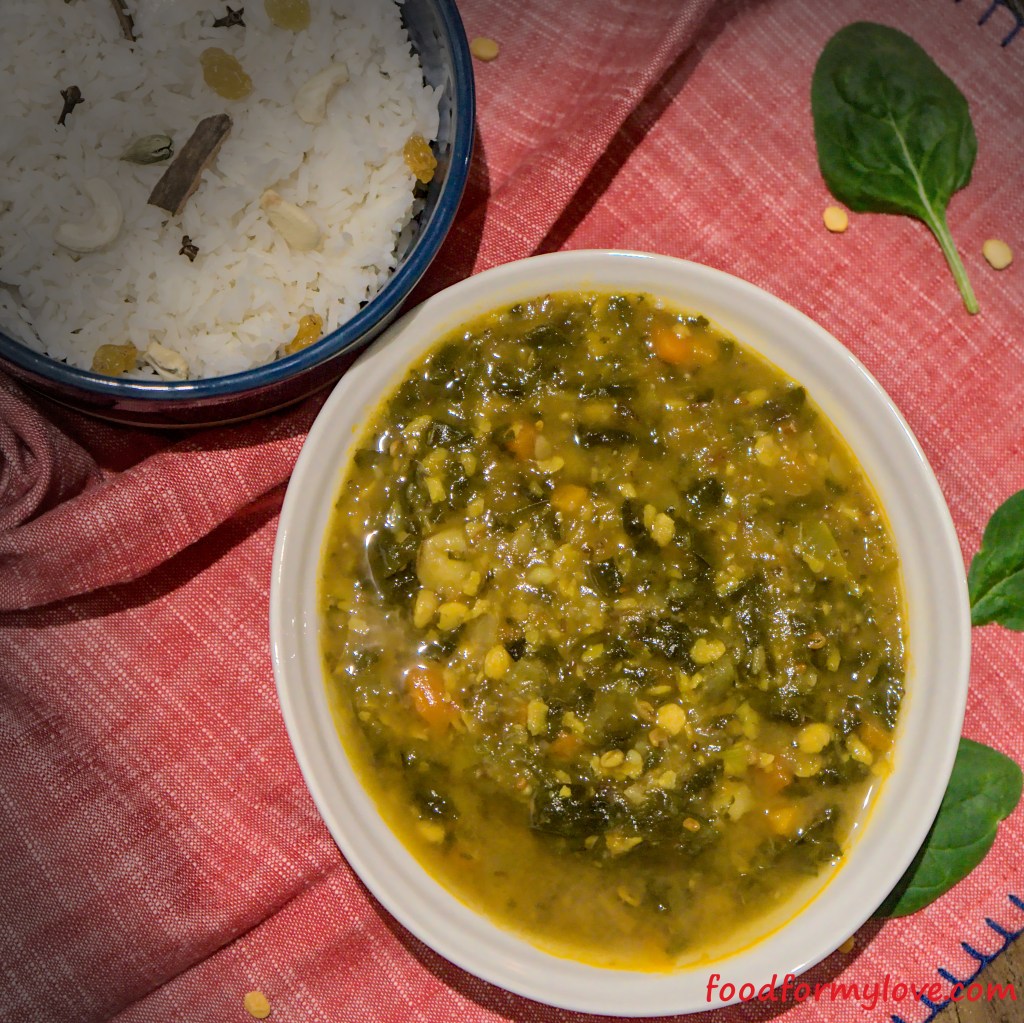
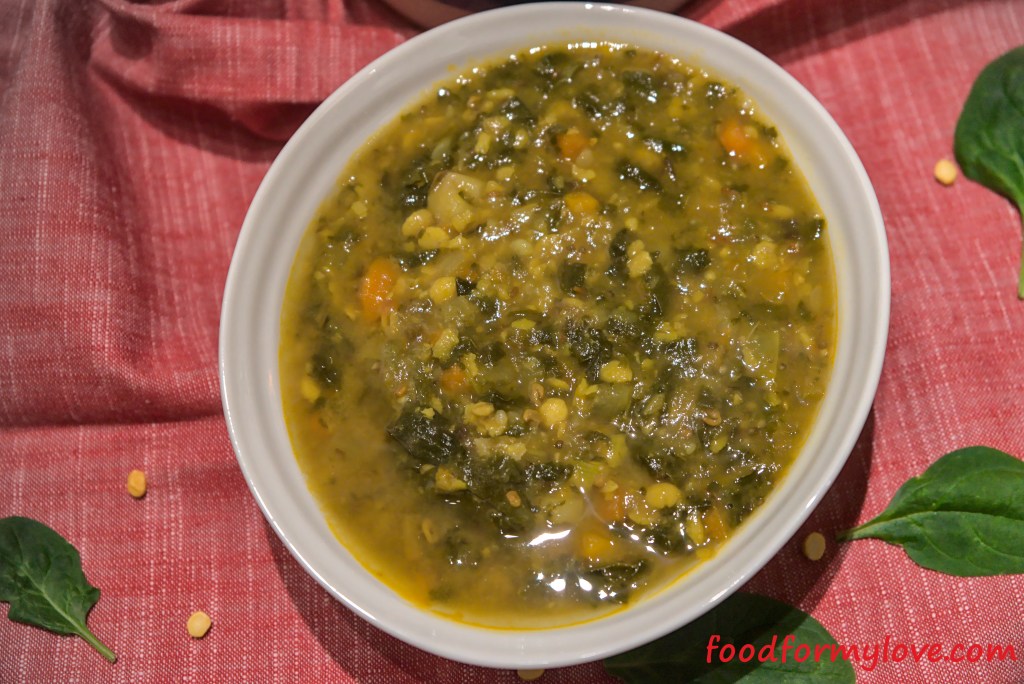
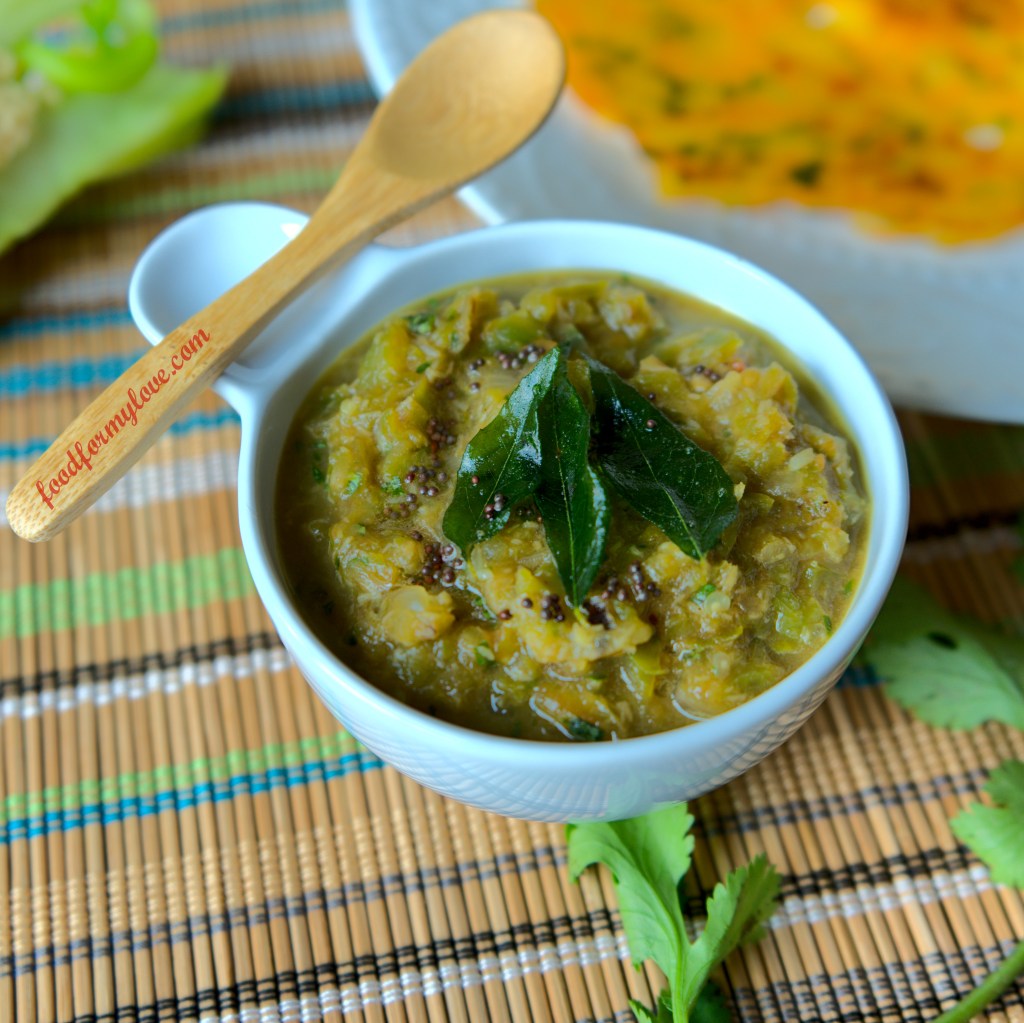
Sindhi Sai Bhaji
There is not much to be said about this recipe, other than it is a must a try. This is literally the best way to get your dose of vegetables and greens all in one go.
When translated from Sindhi to English, Sai means Green and Bhaji means vegetables. It is a staple curry in households from India and Pakistan. The health benefits of this beautiful green curry come from the combined benefits of vegetables such as:
- Lauki (Bottle Gourd)
- Baingan (Eggplant)
- Aloo (Potato)
- Gajar (Carrot)
- Tomato
- Methi (Fenugreek)
- Palak (Spinach)
The veggies act as a source of several vitamins and minerals such as vitamin A and C, and potassium, calcium and iron. Why go for supplements when a simple one-pot curry can give you such an incredible does of nutrition! Better still, the overall curry is so low on calories that you can eat it bowls and bowls of it, completely guilt-free 🙂
binary comment
Let’s take a second to appreciate the simplicity of this curry. And that simplicity comes from the use of simple spices and flavors like green chilies, ginger and garlic and nothing too heavy. It is a perfectly simple amalgamation of spicy and tangy flavors.
binary comment
This recipe is one of those that can be prepared on a Sunday night and can be enjoyed through the week.
Prep time 8 hours Cook time 25 minutes Serves 3-4
Ingredients
Vegetables
- Lauki (Bottlegourd) – 1 small, diced
- Baingan (Eggplant) – 2 medium, diced
- Gajar (Carrot) – 1 large, chopped
- Aloo (Potato) – 3-4 small, diced
- Methi Leaves (Fenugreek) – 1 bunch (thoroughly cleaned and separated) [Approx. 2 cups]
- Palak (Spinach) – 1 small packet [Approx. 2 tightly packed cups)
- Tomato – 1-2 small, chopped
- Onion – 1 large, chopped
Lentils
- Chana Dal (Split Chickpeas) – 1 cup, dry
Spices and Flavors
- Jeera Seeds (Cumin) – 1 tsp
- Methi Seeds (Fenugreek) – 1 tsp
- Haldi (Ground Turmeric) – 1 tsp
- Red Chili Powder – 1 tsp
- Green Chilies – 1 tbsp, crushed
- Ginger – 1 tbsp, crushed
- Garlic – 1 tbsp, crushed
- Tamarind juice or concentrate – 1 tbsp
- Salt as per taste
Cooking oils
- Oil – 2 tbsp
Ingredient notes
- In this recipe, I have used the long Chinese Eggplant because it is not seedy. You could also use the mini purple Indian Eggplants. I would not reccomend the Globe Eggplant because it has a meatier texture
- If fresh Methi leaves are not available at the Indian store, you can find frozen methi in the frozen vegetables aisle. Follow the thawing instructions on pack to use in this curry
Method
- Soak chana dal for 6-8 hours
- Thoroughly clean all the veggies, chop them and set them aside
- Set the Instant Pot to sauté mode
- Once the pan is hot, add oil. To this add jeera and methi seeds
- Once it splutters, add the crushed green chilies, ginger and garlic. Fry well until the spices bloom and all the flavors are aromatic
- Next, add the haldi and red chili powder. Mix well again until the spices have cooked
- Add chopped onions and tomatoes. Mix well until they are well coated with the spice mixture
- Next, add the chopped veggies and mix well. Follow this with the methi leaves, palak and chana dal
- Add 2-3 cups water
- Add salt as per taste
- Add the tamarind juice or concentrate
- Close the Instant Pot lid and pressure cook on high for 20-25 minutes
- Once the pressure cooking is done, allow for natural release of the steam before opening the vent and the lid
- Once the lid is open, use a hand masher or hand blender to mash the curry to get to a semi-thick consistency
- Pour into a bowl and serve it piping hot with a simple pulao or with rotis
You can also follow me on Instagram to be up-to-date with what is cooking my kitchen. If you like this recipe, do share your comments below. Don’t forget to post your version on Instagram using #foodformyloveblog.
-
Vada Ghugni
Who doesn’t love street food! I know I do, as I am sure a zillion other people around the world do too. Street foods are fascinating. They are such a cultural thing, they are almost an opening into the world of a particular culture’s food. A lot of street food is made by non-trained cooks who use family recipes from generations to prepare and sell food to make a decent living. Yet, there lie some of the best secrets to ingredients and cooking techniques that the street food vendors have inherited from their families that are reflective of their cultures and traditions.
For me, exploring street foods is a must whenever I visit a new city, whether it is in India or any other city around the world. When it comes to India, there is such incredible variety across the states that even a lifetime is not enough to explore them all. But at least I can try 🙂
Vada Ghugni (Or Bara Ghugni) is a popular street food in eastern Indian states such as West Bengal and Orissa. But, first, what is it? Bara or Vada is exactly what it says, a regular Urad Dal Vada. Ghugni is interesting, because at first I thought it was just a regular Chole/Channa Masala. But in exploring different recipes, I learnt that the Ghugni is different not just in the spices it uses but also that is has Potatoes in it, and the key difference being that Ghugni uses dried white or yellow peas (or even Kala Channa [Brown Chickpeas] in states like Bihar and Jharkand) that are soaked and cooked.
Did you know white peas and chickpeas are not the same?
White peas (called safed [white] vatana in hindi) are essentially peas that are dried after harvesting and their skins are removed. They work as substitute for fresh green peas. they are typically boiled, cooked and used for dal or in chaats.
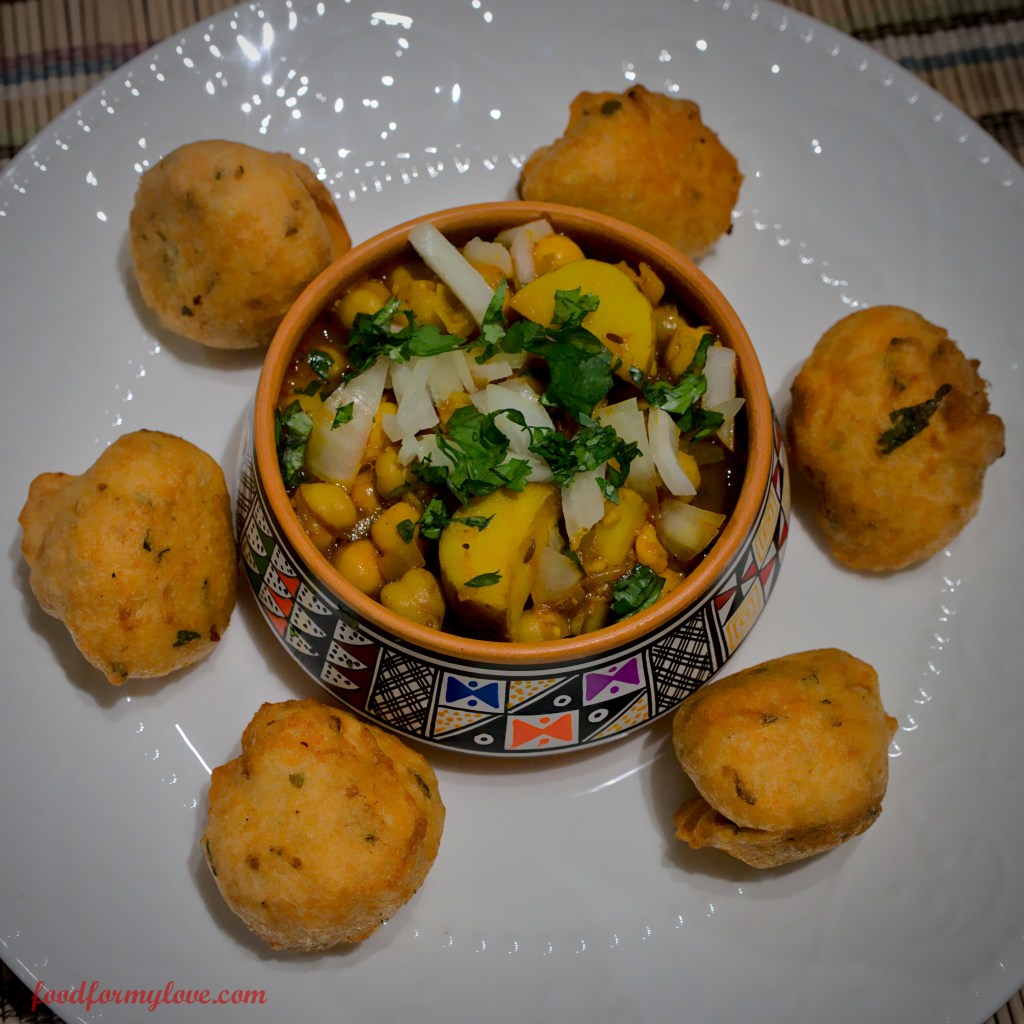
I took the liberty to use chickpeas in this recipe because I did not have white peas in my pantry. That did slightly change the look and texture of the Ghugni (which is supposed to be slightly runny with mushy cooked white peas). But I think I managed to keep the flavor. It is very reminiscent of a vada sambhar, but has a lot more spicy and tangy toppings just like any chaat.
Vada Ghugni, although a “street food”, can be served at multiple eating occasions at home such as breakfast, brunch or an evening snack. It is quite heavy, so I would avoid it as a dinner item.
Prep time 6 hours Cook time 25 minutes Serves 2-3
Ingredients
Lentils and Beans
- Chole (Chickpeas) – 1 15oz can (Approx. 500gms)
- Urad Dal (Black Gram) – 1 cup
Vegetables
- Onion – 1 large, chopped
- Tomato – 2 large, chopped
- Potato – 2 medium sized, cubed (Boiled)
Spices and Herbs
- Jeera (Cumin Seeds) – 1 tsp
- Curry Leaves – 1-2, finely chopped
- Dhania (Cilantro) – A handful, finely chopped
- Green Chilies – 2 tbsp, crushed
- Ginger – 1 tbsp, crushed
- Garlic – 1 tbsp, crushed
- Haldi (Turmeric) Poweder – 1 tsp
- Dhania-Jeera (Coriander-Cumin) Powder – 2 tsbp
- Laal Mirch (Red Chili Powder) – 1 tsp
- Garam Masala – 1 tsp
- Black Pepper – 1/2 tsp
- Salt – As per taste
Oils
- Vegetable Oil – Approx. 1 cup (for frying the vadas) + 2 tbsp for cooking the Ghugni
Ingredient notes
- If using White Peas (Safed Vatana) instead of Chickpeas, use 1 cup of the dried Peas. These will also need to be soaked and pressured cooked
- To add a kick to the Ghugni, additional spices such as Dalchini (Cinnamon) and Amchur (Dried Mango) powders can also be added
Method: Vadas
- Wash and soak Urad Dal for 6 hours
- Add the soaked Urad Dal to a grinder. For the first round, grind without any water. For the following rounds of grinding, slowing add 1-2 tbsps of water each time until the batter is smooth and thick. It should not be runny
- Add the batter to a mixing bowl. To this, add finely chopped curry leaves, black pepper,1 tbsp of green chilies and salt. Mix well and set aside for a few minutes
- Add 1 cup oil to a pot and allow it to heat up. To know whether it is at the right temperature, drop a pinch of the batter to it. If the batter rises to the top, then the oil is at the right temperature
- Using an ice cream scoop, carefully drop a small ball of the batter into the oil. Allow one side to cook and start to turn brown. Then, carefully turn it over to allow the other side to cook. Once both sides are golden brown, carefully take it out of the pot and place it on a paper-towel lined plate for all the oil to be soaked up. Repeat for the rest of the batter (The ice-cream scoop method is for amateur fryers like me 🙂 If you feel confident, feel free to scoop up a ball of batter with your hands and carefully drop it into the oil)
- This quantity of batter should make about 12 vadas
Method: Ghugni
- To a pan, add 2 tbsp of oil. Once it is hot, add jeera and let it splutter
- To this, add the chopped onions (leaving 1-2 tbsp aside for garnishing). Fry until they turn translucent
- Add the crushed green chilies, ginger and garlic. Continue to fry until they the rawness is cooked
- Add the haldi, dhani-jeera and laal mirch powders, mix well and allow the masalas to cook release their aromas for a few minutes
- Add the chopped tomatoes (leaving 1-2 tbsp aside for garnishing), mix well and allow the whole mixture to cook until oil is released from it
- Add the canned chickpeas and boiled potatoes to the pan. Add water, salt, close the lid and let the mixture simmer for a few minutes
- After a few minutes, using the back of a wooden spatula, mash some of the potatoes and chickpeas. This makes the sauce thicker. Add some more water as desired and continue to cook for a few more minutes
- Just before turning off the heat, top it off with some garam masala and mix well
Serving suggestions
- In a small bowl, place 2-3 vadas
- Ladle on a generous amount of the Ghugni
- Top with chopped onions and tomatoes
- Optional toppings include sev, chopped green chilies, cilantro, slivers of fresh ginger, a squeeze of lemon juice, mint chutney and sweet date-tamarind chutney
- Leftover Ghugni can also be served with pooris and rotis
You can also follow me on Instagram to be up-to-date with what is cooking my kitchen. If you like this recipe, do share your comments below. Don’t forget to post your version on Instagram using #foodformyloveblog.
-
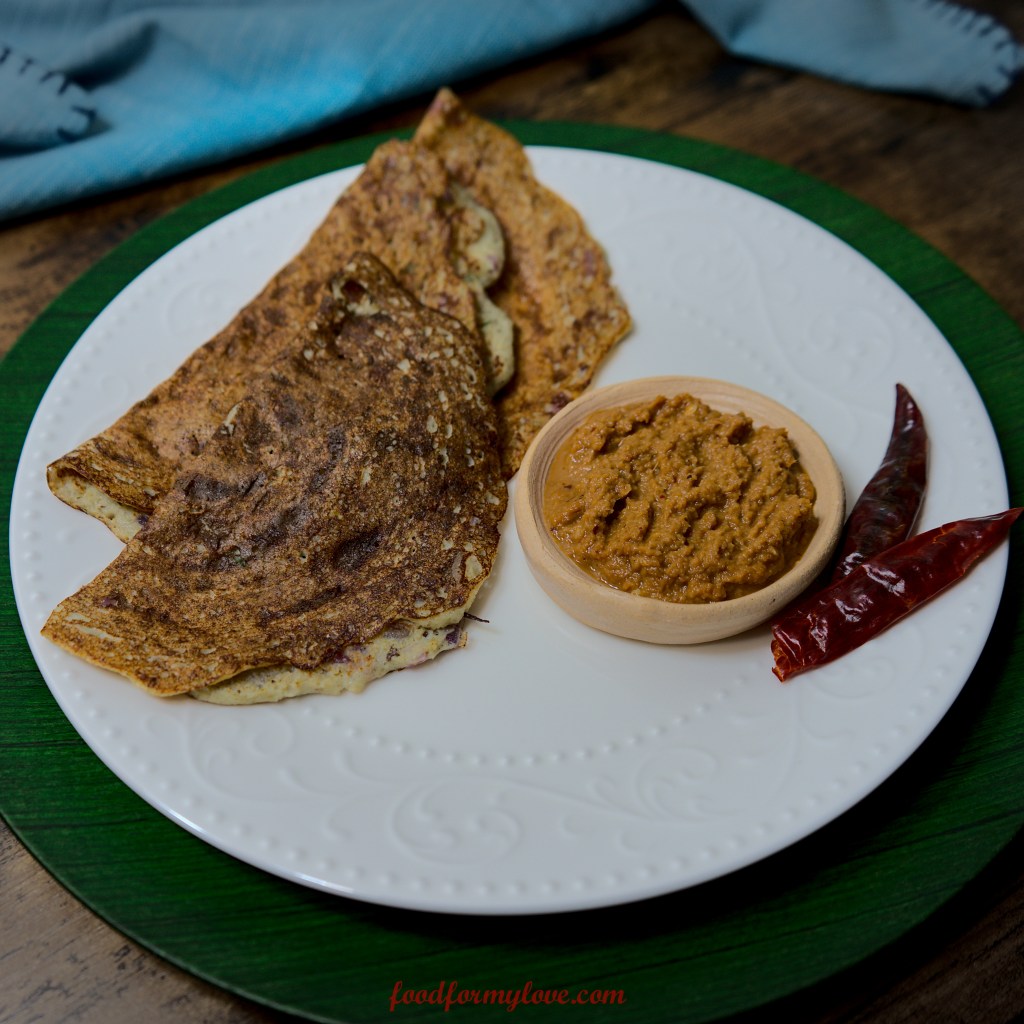
Pesarattu
As a Dosa lover, if there was one thing I would love, it would be to not wait for ages to enjoy a Dosa, as I am sure many of you do too 🙂 In other words, could I enjoy Dosa without having to soak the dals and rice, grind, ferment and then get the final batter? Well, yes indeed. And no, I am not referring to buying Dosa batter from a store. I am referring to the option of a non-fermented version of Dosa.
I have posted an Adai recipe previously, which is a non-fermented Dosa. Pesarattu is yet another one. The star lentil of this dish is the power packed Mung Beans or Green Moong. As we all know, this little green lentil has impressive nutritional benefits, particularly being high in protein and fiber. For this reason, I try to include this particular lentil in my household’s diet at least once a week in some way or form.
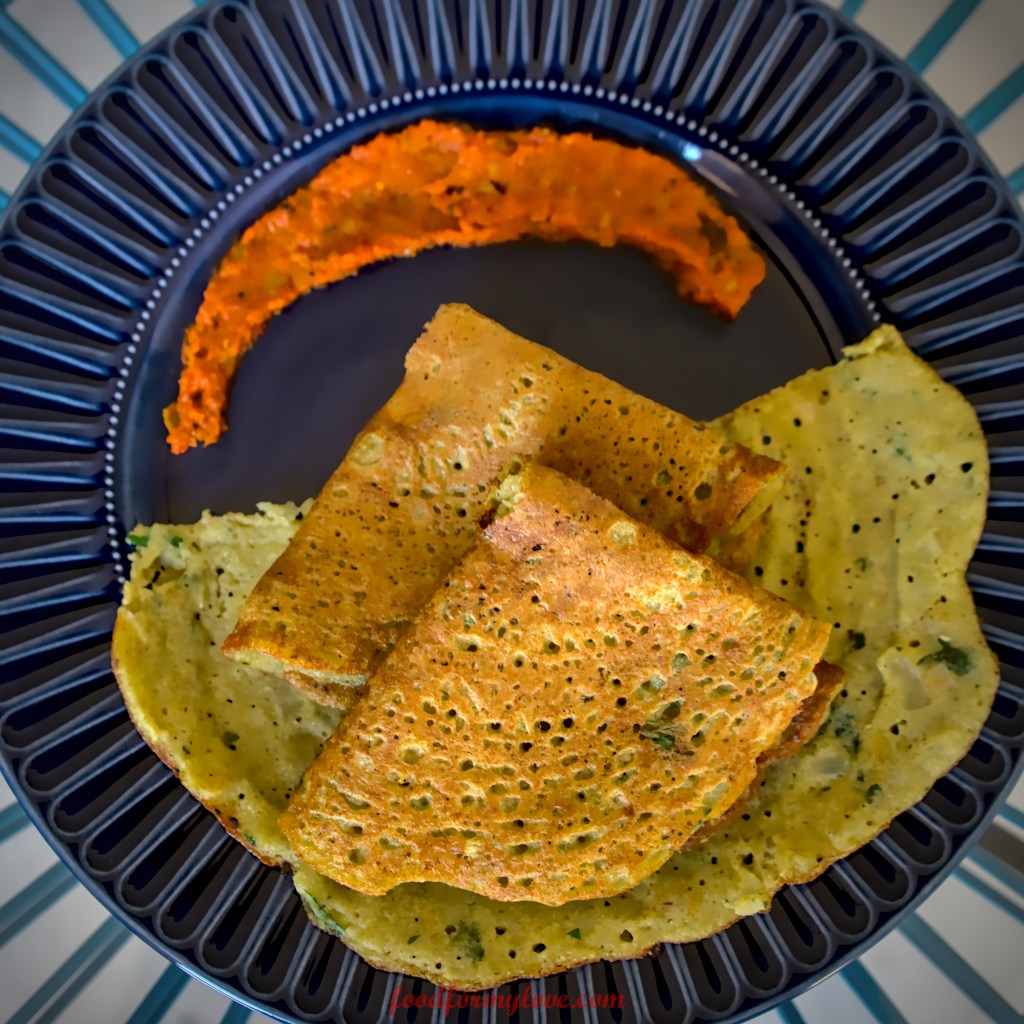
This type of Dosa originated in the south Indian state of Andhra Pradesh. In Telugu, Pesaru-bedalu = Green Moong and Attu = Dosa. Although Pesarattu is traditionally served with a filling of Upma (just like a Masala Dosa is served with a Potato filling), I choose to serve it with a variety of chutneys and podis, courtesy my MIL 😊
Prep time 6-10 hours Cook time 2-3 minutes per Pesarattu Serves 3-4
Ingredients
Lentils and Grains
- Dry Mung Beans (Whole Green Moong) – 1.5 cups
- Yellow Split Pigeon Peas (Toor Dal) – 1 cup
- Rice – 1 cup
Vegetables and Spices
- Onion – 1 small, chopped
- Ginger – 2 tbsp, chopped
- Green Chilies – 2 tbsp, chopped
- Cilantro – 2 tbsp, chopped
- Salt as per taste
Oils
- Cooking Oil – A few tbsps
Pro tip:
Split Pigeon Peas (Toor Dal) is traditionally not added to Pesarattu. However, adding it to this recipe adds a crispness to the Pesarattu. This is due to the fact that the Split Pigeon Peas are lower in moisture than Mung Beans. They resist moisture absorption, thus enabling them to give a crispier texture to the Pesarattu. Alternatively, you can add Split Chickpeas (Chana Dal), which are equally dry leading them to crisp up (similar to making a pakoda where vegetables are dripped in a besan battter [besan is made from ground dried Chickpeas]). Did you know that Split Pigeon Peas and Split Chickpeas dont sprout for exactly this reason!?
Method
- Wash all lentils and grains. Soak them for a minimum of 4-6 hours or overnight
- The following morning, add the soaked lentils and grains to a blender.
- For the first round, blend without adding any water. Use a spatula to clean the sides of the blender jar to make sure there are no lumps
- Then, add approx. 1/2 cup of water to blend into a smooth batter. The batter should be of dosa batter consistency, not too thick and not too thin
- Transfer the batter into a bowl. To this, add all the spices and vegetables and mix well
- Heat a non-stick pan to medium heat. Once hot, sprinkle some water on it as a cleaning mechanism
- Take a ladle of batter, place is at the center of the pan and slowly spread the batter in a circular motion using the back of the ladle. Don’t apply too much pressure while spreading the batter and ensure that the batter is not spread too thin
- Add some 1 tbsp of oil around the spread batter. Cover with a lid for 1-2 minutes
- Once you remove the lid, you will see brown spots on the bottom of the Pesarattu
- Flip it and cook the other side for 30 seconds
- Remove from the pan and serve with your choice of condiments
Serving Suggestion – Traditionally, Pesarattu is eaten with chutneys, particularly, Ginger Chutney. Check out the recipe to this chutney when you make this Pesarattu
You can also follow me on Instagram to be up-to-date with what is cooking my kitchen. If you like this recipe, do share your comments below. Don’t forget to post your version on Instagram using #foodformyloveblog.
-
Ginger Chutney
With a recent affinity towards Ginger, I got introduced to this mind-blowingly delicious Ginger Chutney, courtesy: my mother-in-law. Now, being married into a family from the southern Indian state of Andhra Pradesh, I have the luxury of enjoying an incredible variety of condiments such as chutneys and podis. This one happens to be one of my absolute favorites.
Ginger, or Allam, as it is known in Telugu is know for its medicinal properties, particularly the immunity boosting and anti-inflammatory properties. So a little Ginger Chutney (or Allam Pachadi, as it is called in Telugu) everyday will be amazing for the body.
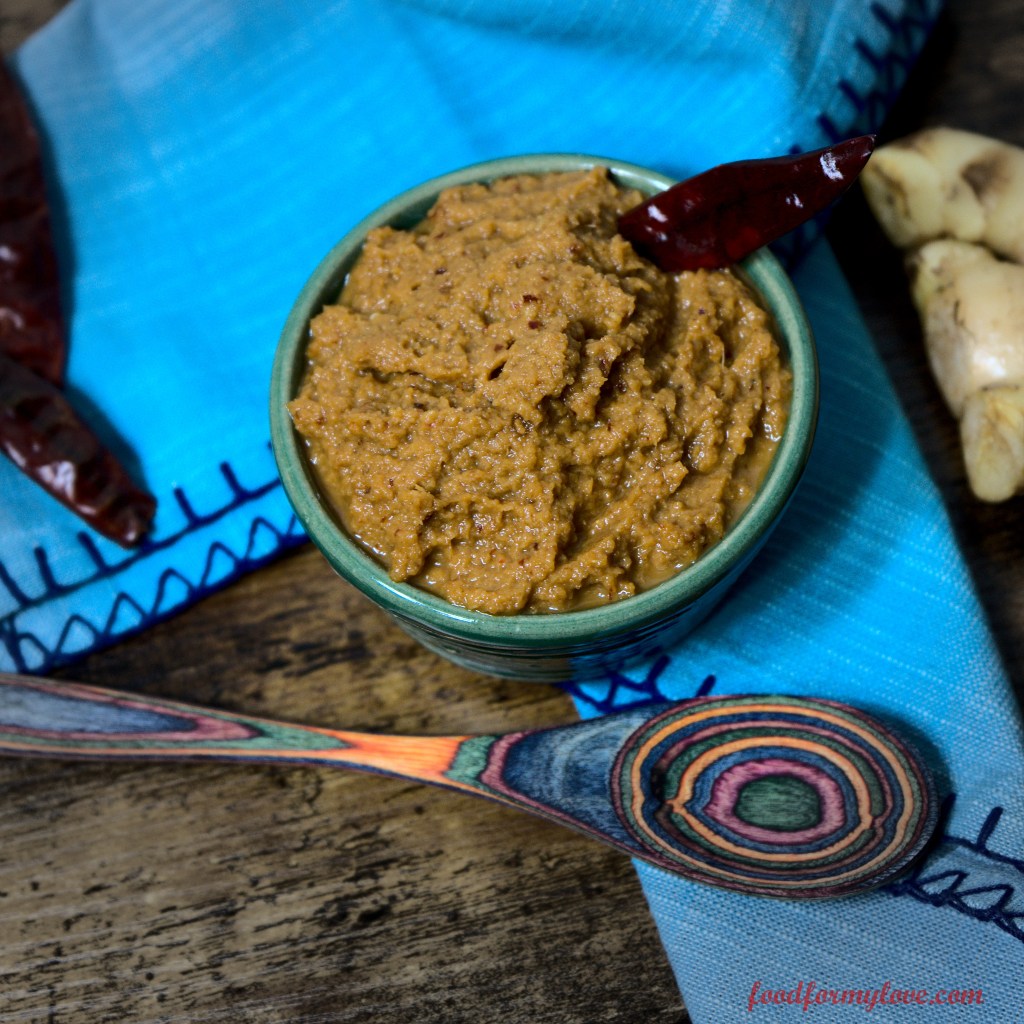
The pungent and bitter flavor of the Ginger may be off-putting to some. But the flavor profile can be managed with other ingredients such as Coconut and Jaggery. The key is in properly frying the Ginger before blitzing it into a chutney. Otherwise, the chutney will taste like eating raw Ginger.
This chutney can be enjoyed with Rice, Rotis, Dosas and Rottis.
Prep time 10 minutes Cook time 15 minutes Serves Bulk item that can be stored long-term
Ingredients
- Ginger – 2 medium sized roots. Peeled, cleaned and roughly chopped
- Dried Red Chili – 2-3
- White Urad Dal – 2 tbsp
- Dry or desiccated Coconut – 1 cup
- Jaggery Powder – 1 cup
- Salt – As per taste
- Tamarind Juice – 1 tsp
- Water – As needed for the desired Chutney consistency
- Oil – 2-3 tbsp for frying
Method
- Add oil to a pan. Once it is hot, add the dried red chilies and white urad dal. Fry until the urad dal turns slightly brown and remove from the pan
- To the same pan, add the roughly chopped ginger and fry for 10-15 minutes until the ginger pieces are transparent and are completely cooked through (This step can be combined with step 1, just be careful not burn the urad dal during the frying process). Set aside to cool
- To a blending jar, add the fried ingredients followed by the remaining ingredients
- At first, add a splash of water and pulse the blender. This is to achieve a coarse consistency for the chutney, which is the best way to enjoy it. If you prefer a smoother consistency, add additional water and blend until the desired consistency is achieved
- Serve immediately or store in an air-tight container for 1-2 weeks
Pro tips from my mother-in-law:
- Thoroughly cook the ginger pieces until they turn transparent. Under-cooked ginger will result in a bitter tasting chutney and will make the chutney inedible
- Adjust the tanginess and sweetness by adjusting the quantity of tamarind juice and jaggery
- Adjust the consistency of the chutney by adding additional water (a little at a time) to achieve a thinner and smoother chutney consistency
You can also follow me on Instagram to be up-to-date with what is cooking my kitchen. If you like this recipe, do share your comments below. Don’t forget to post your version on Instagram using #foodformyloveblog.
-
Bell Pepper Chutney
Condiments, especially chutneys are synonymous with India. In a vast country like India, every state, every city and every household has varieties of chutneys – so many that it can take a lifetime to explore them all.
But here, let’s just explore one simple chutney that my mum taught me, using one of her favorite vegetables (and frankly, mine too) — Bell Peppers. This Bell Pepper (or Capsicum) chutney is a quick and easy recipe that can served with Dosas, Akki Rottis and Rotis. It is definitely different from the the regular Coconut or Mint chutneys, but yet has a very similar texture to a Salsa, or even a chip dip :’)
For this recipe, I recommend using the Green Bell Peppers because of the flavor they carry. The Red Bell Peppers have a sweetness to them that won’t support the flavor of the chutney. Furthermore, the key to achieving the flavor of this chutney is in dry roasting the Bell Peppers. It is the charred flavor that adds a beautiful note to the Chutney.
Prep time 10 minutes Cook time 10 minutes Serves 2
Ingredients
Vegetables
- Green Bell Pepper – 2, medium sized, roughly chopped
- Onion – 1 small, roughly chopped
- Tomato – 1 small, roughly chopped
Spices, Flavors and Herbs
- Green Chilies – 2-3
- Tamarind juice – 1-2 tbsp
- Salt – As per taste
- Cilantro – A handful
Tadka/Tempering
- Oil – 2 tbsp
- Mustard Seeds – 1 tsp
- Dry Red Chilies – 2
- White Urad Dal – 1 tsp
- Hing (Asafoetida) – A pinch
- Curry Leaves – A few
Method
- In a glass bowl, add roughly chopped onions, tomatoes and green chilies with 1/4 cup water. Place this in the microwave for 2-3 minutes. This is a quick cook method for sauces.
- In the meanwhile, add the roughly chopped bell peppers to a pan and dry roast them until the skin of bell peppers blisters and roasted.
- To a blending jar, add the cooked onions, tomatoes and green chilies, together with the roasted bell peppers. To this, add salt and tamarind juice. Also add the cilantro. Blend the mixture into a coarse paste (or fine as per your preference). Once done, pour into a serving bowl and set aside.
- Prepare the tadka – First heat oil in a tadka pan. To this, add mustard seeds. Once they splutter, add the urad dal, hing, red chilies and curry leaves.
- Pour the tadka over the chutney, mix well and serve with Dosa, Rotti or Chapathi
You can also follow me on Instagram to be up-to-date with what is cooking my kitchen. If you like this recipe, do share your comments below. Don’t forget to post your version on Instagram using #foodformyloveblog.
-
Sweet Potato and Black Bean Quesadilla
As a vegetarian, I often have to find fun and creative ways to achieve a balanced nutrition. This is normally important, but is more important in our household because of my husband’s active lifestyle through playing intensive Squash sessions and running more recently. Having joined him on his running sessions, I have realized how important a balanced nutrition is important to keep the metabolism active and to supplement the workout sessions.
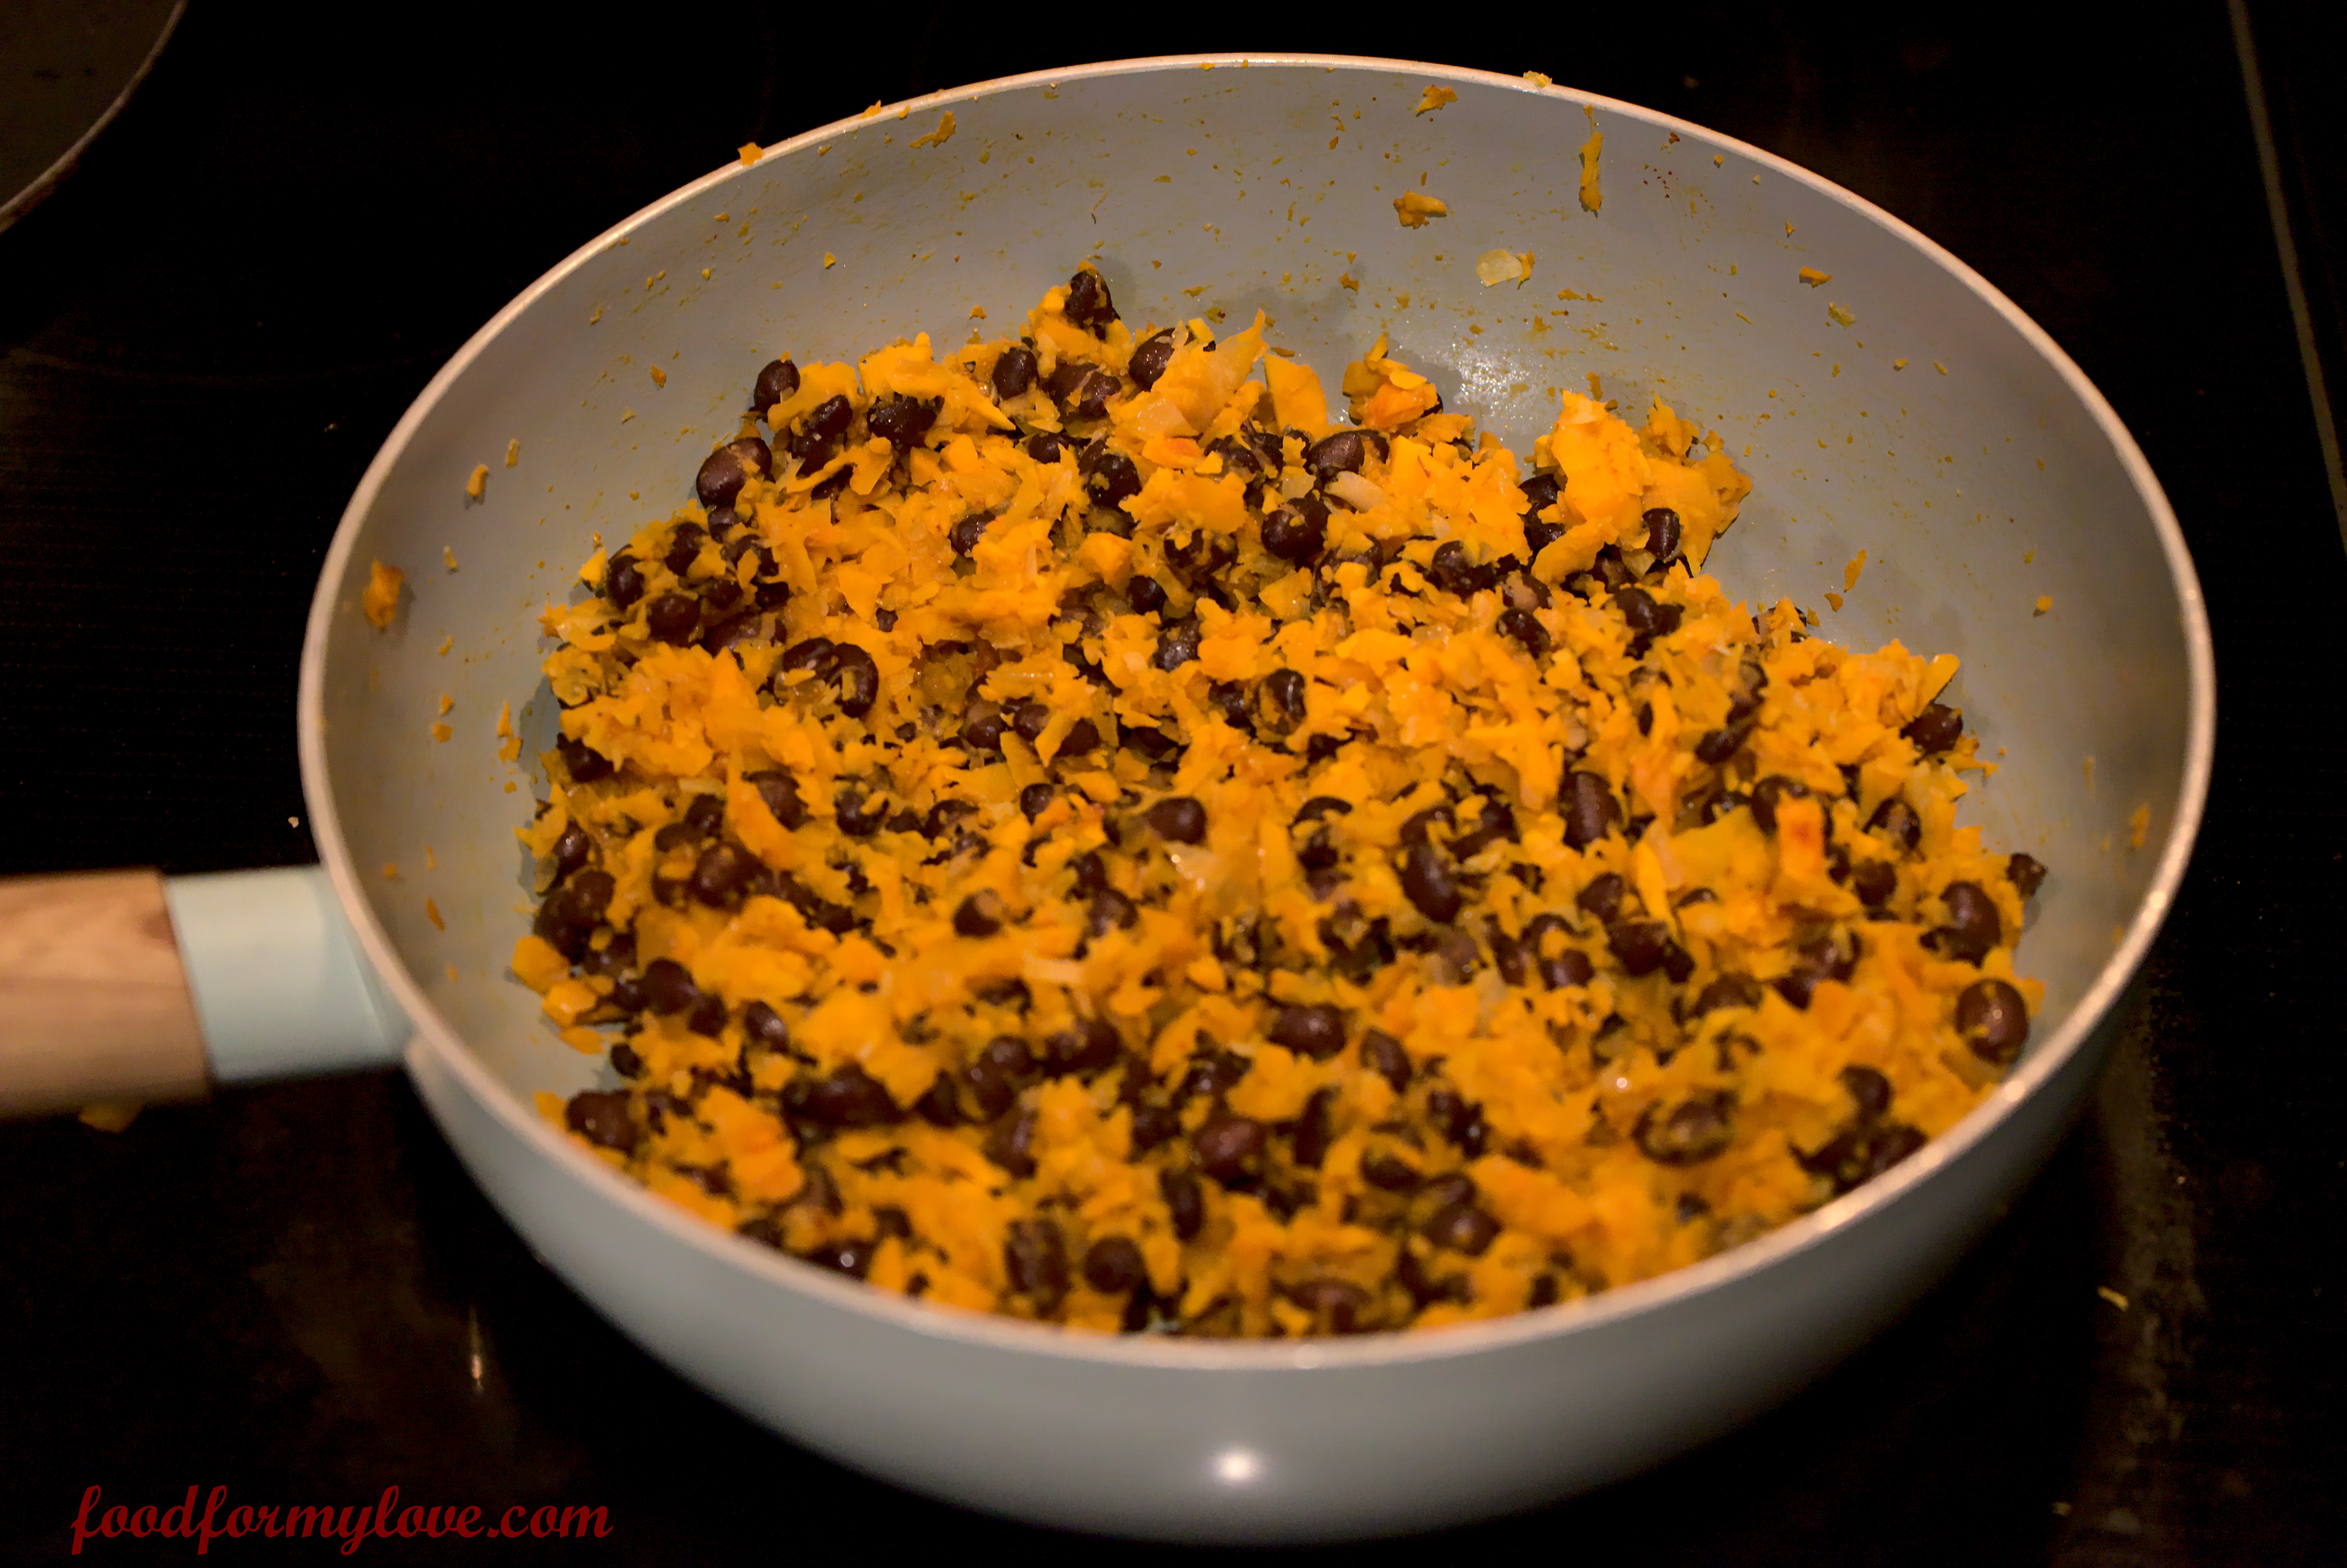
So, I always keep Sweet Potatoes and Black Beans in my pantry. One has complex carbohydrates and the other is packed with protein and fiber. I am always looking for different ways to use both these items. What better way than mashing them together and using it as a stuffing for a delicious Quesadilla?
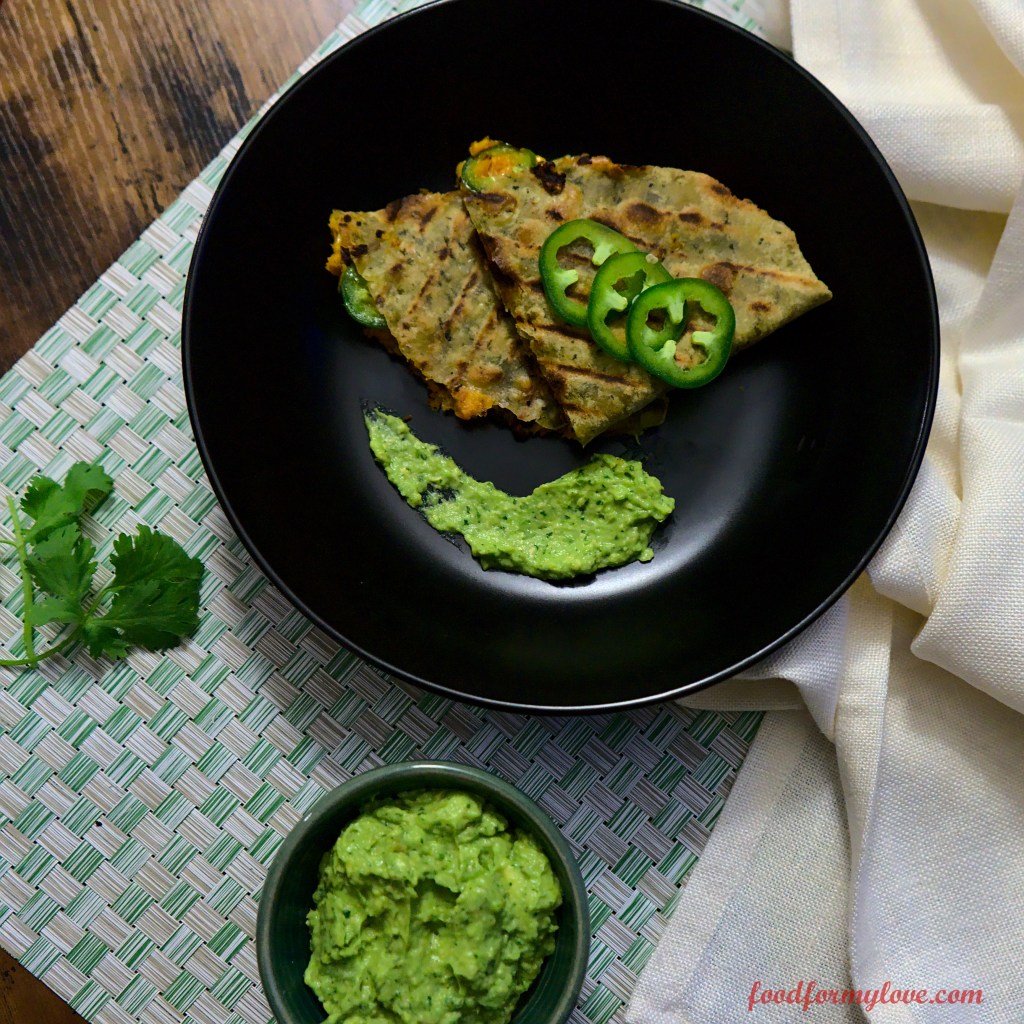
Sweet Potatoes cook very quickly and take up any flavor that you add to them, so that works great. Black beans from a can just need to be mixed in and mashed. So for a quick weeknight dinner, this is a great option. The spices can be modified to your liking, but for something like this, I like to keep it simple, yet lip-smacking with the Tex-Mex flavors.
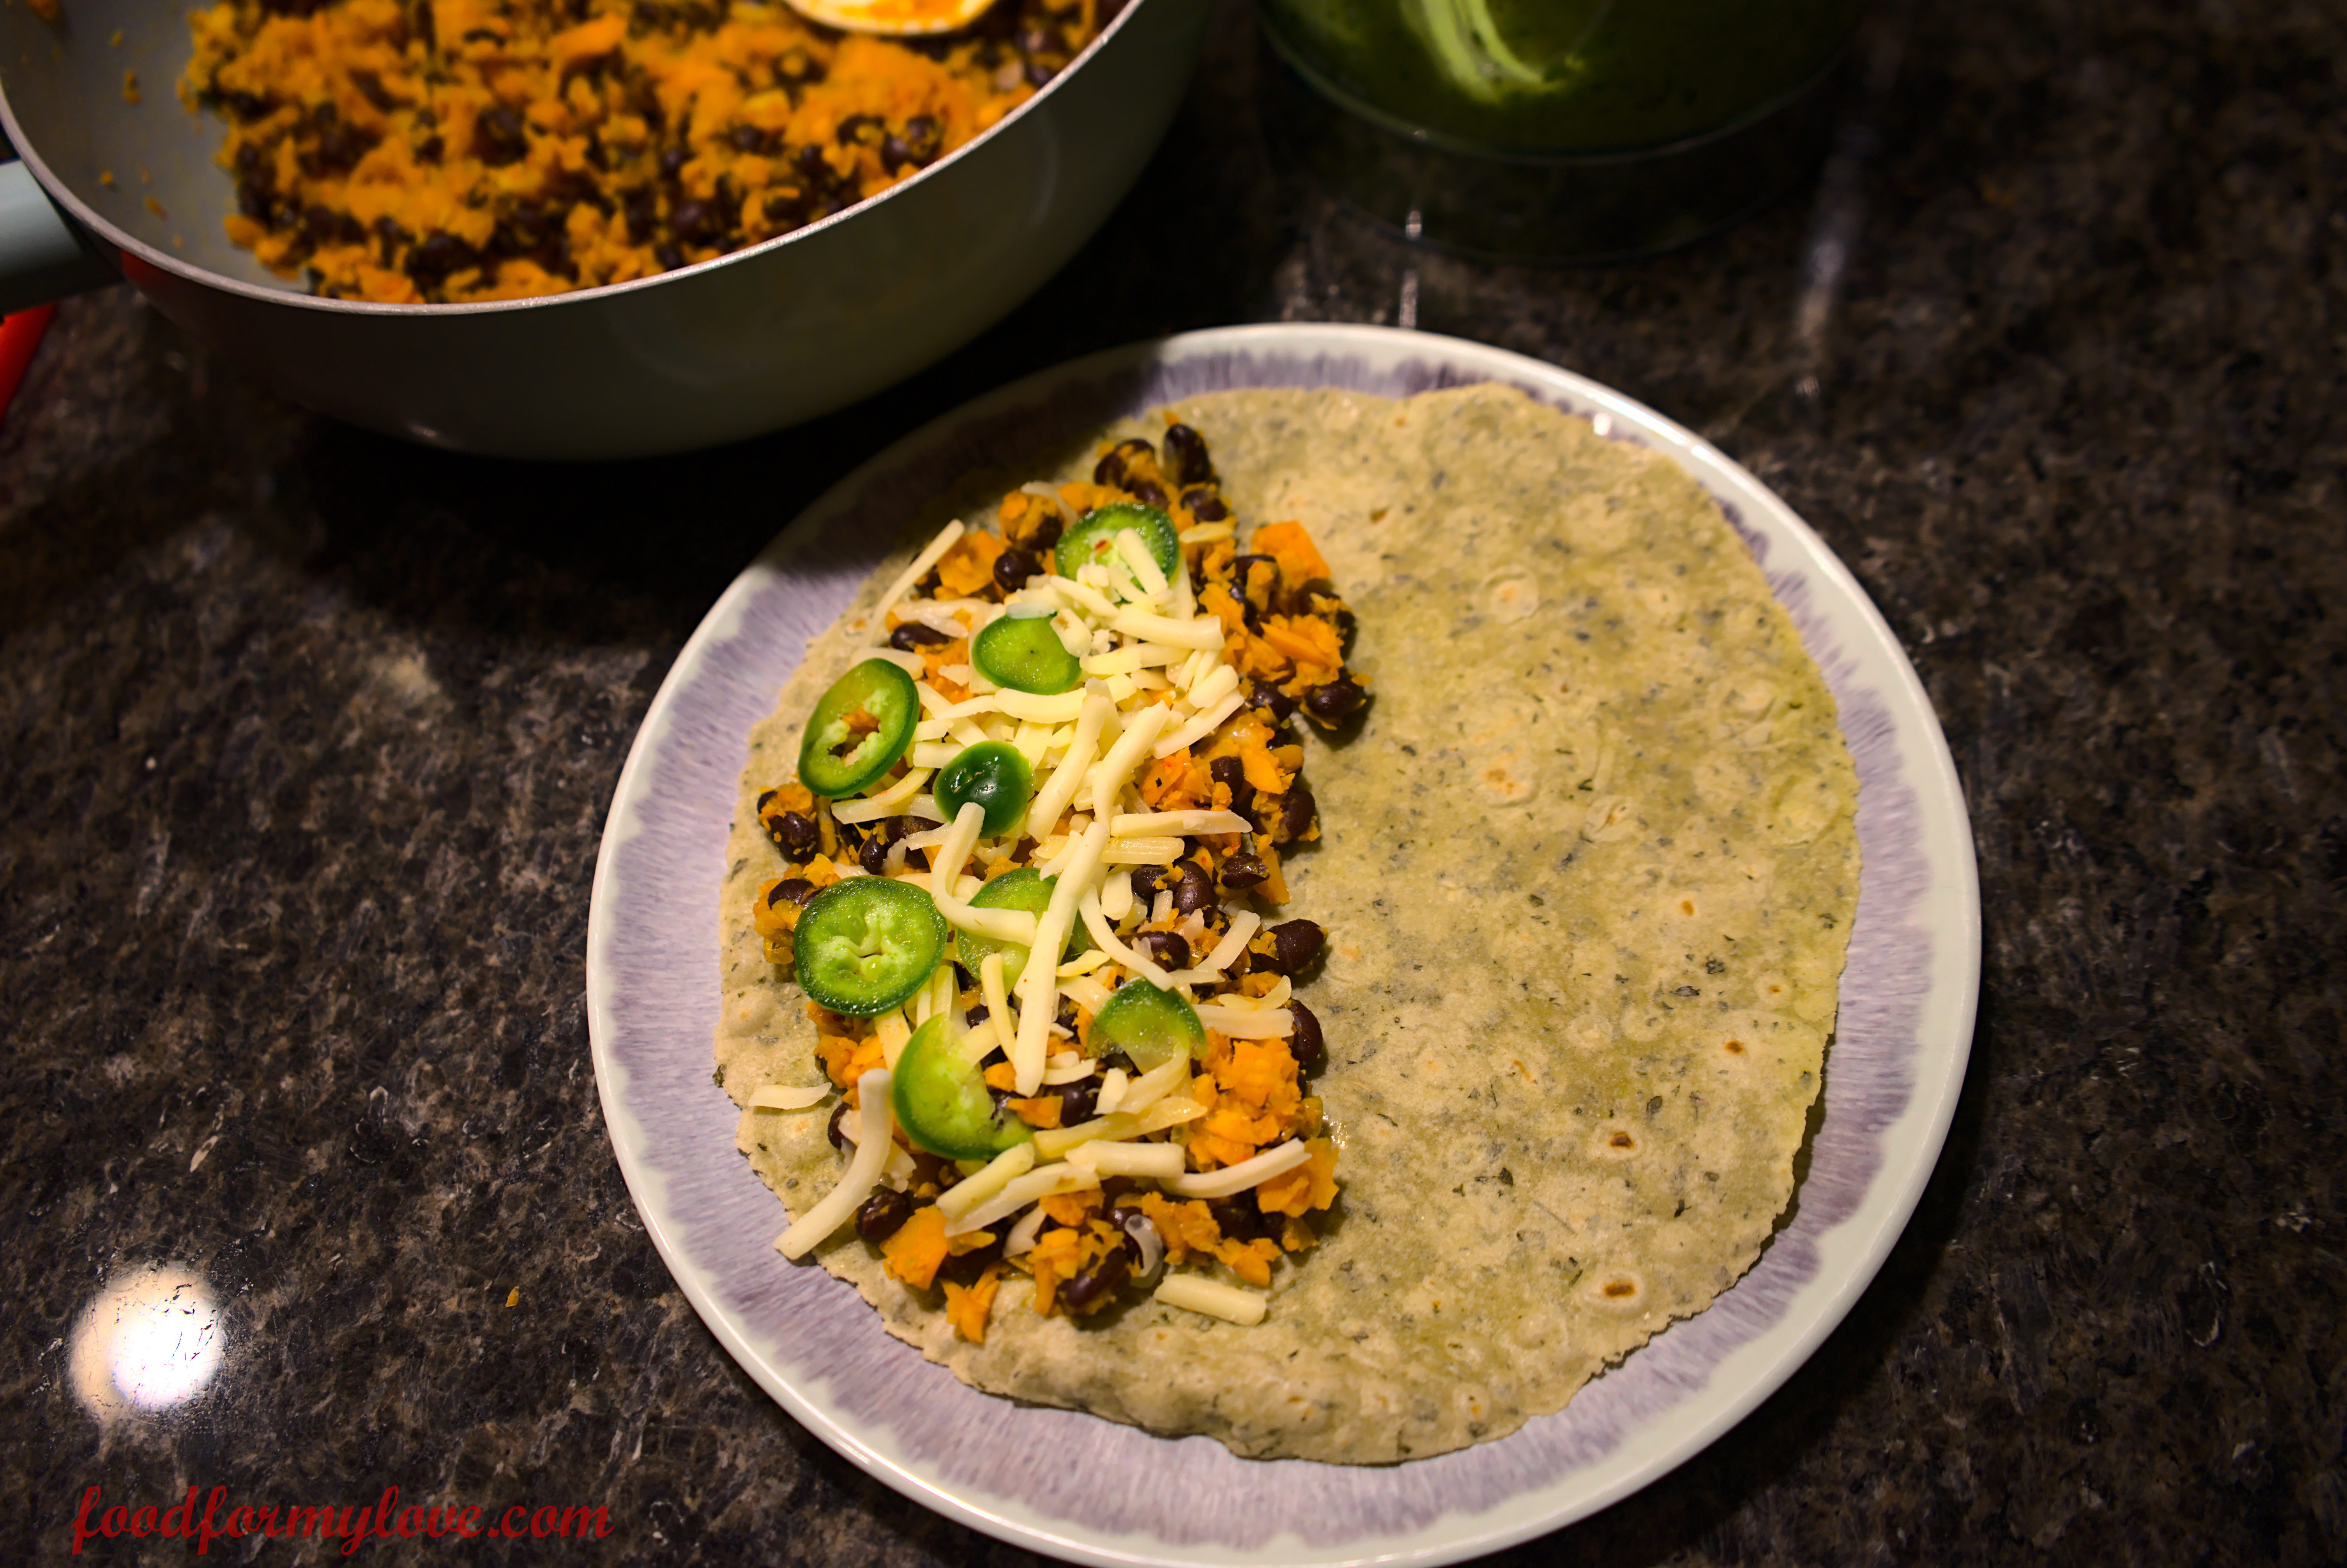
Now, the part that I struggle with is finding healthy Tortillas to make the Quesadilla. There are too many flour and corn ones out there with little to no health benefit. But, I was able to find a Sprouted Whole Wheat Tortilla with Spinach at a Sprouts Farmers Market. The light green colored tortilla is not only tasty and healthy but is also pleasing to the eye.

Of course, like any Quesadilla, I served this one up with some Avocado sauce (similar to a chutney, and is not Guacamole). I was going for the same concept as eating a Kathi Roll dipped in Chutney, but here we will dip the Quesadilla dipped in the Avocado Sauce.
In just 30 minutes, you can put together a weeknight dinner which can make for an especially balanced and nutritious meal post a long run. Any leftovers cans be individually wrapped in foil and re-heated to enjoy the following day.
Prep time 10 minutes Cook time 20 minutes Serves 2-3
Ingredients
Avocado Sauce
- Avocado – 1 large
- Garlic – 1 clove
- Cilantro – A handful
- Salt – As per taste
- Lime Juice – From half a lime
Vegetables
- Onions – 1 medium, diced
- Jalapeno – 2, thinly sliced
- Sweet Potato – 1 large or 2 medium, finely chopped or grated
Beans
- Black Beans – 1 15oz can
Dairy
- Grated Pepperjack Cheese – 1-2 cups (use any other cheese of choice or omit if vegan)
Breads
- Tortilla of choice (8″ size) – 4
Spices and Flavors
- Cumin Powder – 1 tsp
- Coriander Powder – 1 tsp
- Red Chili Powder – 2 tsp (Adjust as per your taste preference)
- Salt – As per taste
- Garlic – 1.5 tsp (Ground) or 3 cloves, finely chopped
Oils
- 2 tbsp + some extra to brush on the Quesadilla while cooking
Method
- Warm 2 tbsp oil in a pan on medium-high heat. To this, add the garlic and allow it to lightly brown. To this, add the onions and cook them until they are transluscent
- Next, add the sweet potatoes and cook them for 5 minutes until they are slightly tender. At this point, add salt and cook for an additional 5 minutes until they sweet potatoes are completely tender
- Add the black beans and mash them in (or mix them in for a chunky texture). Add the seasonings, mix and let it cook for an additional 5 minutes. Take it off the heat and allow it to cool down
- In the meanwhile, prepare the avocado sauce by adding all ingredients to a blender to make a creamy sauce. Chill in the refrigerator until it is ready to be served
- To prepare the Quesadilla:
- Warm a grill plan and brush some oil onto it
- Place a tortilla on a flat surface
- Start by placing a generous amount of the sweet potato-black bean mixture on one half of the circular tortilla
- On this, place some slices of jalapenos
- Then add some cheese and fold the other half of the tortilla on top
- Carefully place on an oiled grill pan and brush the top with some oil
- After 1 minute, the underside of the quesadilla should be golden and crispy with the cheese oozing on the sides. At this point, flip the quesadilla to cook the other side to golden crispiness
- Repeat with the other 3 tortillas
- Slice the quesadillas into 2 wedges and serve immediately with the cool avocado sauce
Serving suggestions
- The quesadilla can be served with a salsa of your choice
- Replace 1 tsp of chili powder with 1 tsp of smoked paprika for a smoky flavor with the sweet potato-black bean mixture
- For an extra kick of spice, add some chopped jalapenos to the avocado sauce
You can also follow me on Instagram to be up-to-date with what is cooking in my kitchen. If you like this recipe, do share your comments below. Don’t forget to post your version on Instagram using #foodformyloveblog
-
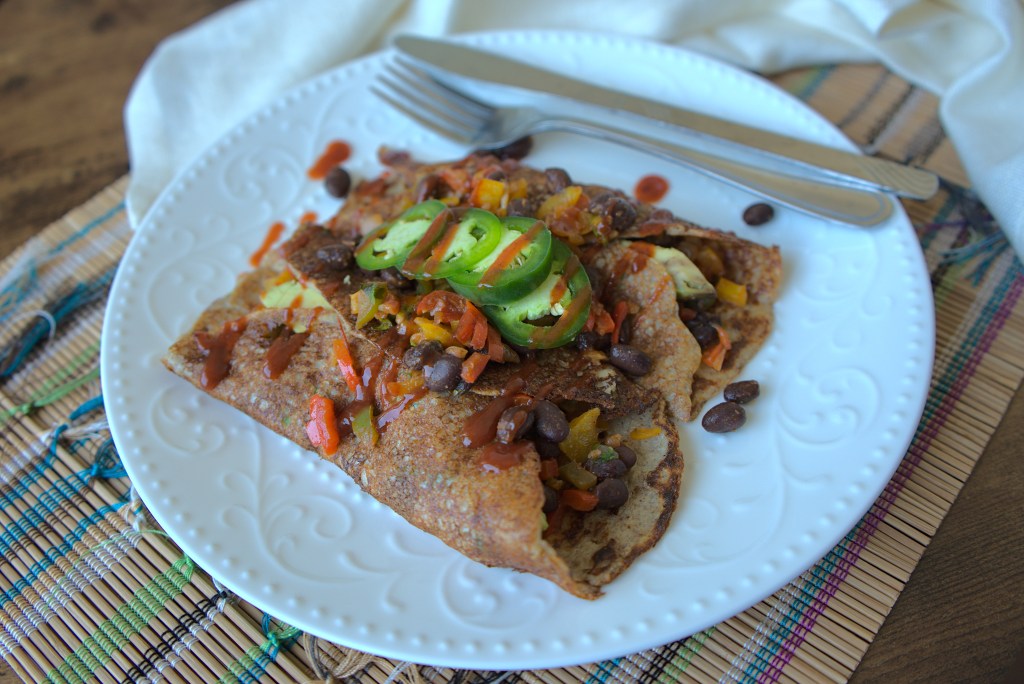
Vegan Oat Crepes
This recipe started out with my husband’s craving for crepes. Now, I am all for crepes, but he does not like the general egg-y after taste of the regular ones. Plus, I wanted to avoid using regular flour. So, Vegan Oat Crepes it is. I chose Oats because they were readily available in my pantry and they are gluten-free. So, that’s a win. Oats, milk and flaxseed meal (egg replacement and binder) blended together to make a thin crepe batter. That’s how simple it is. These can be sweet or savory. The husband chose savory, and I ran with it!
Now, I seem to have a weird obsession with Tex Mex and I think that is because of the similarity of flavors with Indian cuisine and because of the ingredients that are typical of this cuisine such as black beans, peppers and tomatoes. Black beans, peppers and tomatoes are a fail-safe combination that work for a variety of recipes. They are readily available, easy and quick to prepare and carry good flavors. And, I added chopped jalapenos to the batter, just to give them a zing 😉
I am not going to lie, crepe making is not easy, so be prepared for a few flops. But, once you get the hang of it, you will want to try different variations of them i.e. with different flours and see which suits your palette the best. For instance, I heat= that buckwheat flour crepes work great, but I have yet to try them.
What I also love about this recipe is that it has some great nutrient benefits such as protein form the beans and oats and fiber from the oats. So, the basic crepes can be prepared the night before for a quick breakfast in the morning that will keep you satiated. This also makes for a great weekend brunch with a heavier filling that can be prepared in a large batch the previous night. All you have to do is gather the troop, get some delicious crepes, load them with the filling, top it as you please and just kick back and enjoy the brunch 🙂
Prep time 15 minutes Cook time 10-15 minutes Serves 2 (4-6 crepes)
Ingredients
Crepes
- Oats – 1 1/4 cups
- Plant Based Milk (Unsweetened) – 1 1/2 – 2 cups
- Flax Seed Meal – 1/2 – 3/4 tbsp
- Jalapenos – 1, finely chopped
- Salt – As per taste
Filling
- Garlic – 2-3 cloves, finely chopped
- Tri Colored Bell Peppers – 2 cups
- Black Beans – 1 15oz can
- Onions – 1/2 cup, finely chopped
- Red Chili Powder – 1 tsp
- Cumin Powder – 1 tsp
- Coriander Powder – 1/2 tsp
- Jalapenos – 1, thinly sliced in a round shape
- Salt – As per taste
Other
- Oil of choice – As required for cooking
- Cilantro – 1 handful for garnish (Optional)
- Jalapenos – 1, thinly sliced for garnish (Optional)
Method
- First, prepare the crepe batter. For this, add the oats, plant based milk and flax seed meal to a blender and make a thin batter. Transfer to a bowl, add salt, chopped jalapenos, mix and set aside
- Next prepare the filling. For this, add oil to a pan and heat it. Once hot, add the chopped onions and garlic and cook until the garlic has slightly browned and the onions are translucent. Then, add the peppers and cook for 3-5 minutes on medium heat. Then add salt, cumin, coriander and red chili powder and cook for an additional 2-3 minutes until all the spices are cooked and the peppers are only tender. The peppers should not be mushy. Take off the heat and set the filling aside
- Time to prepare the crepes. For this, warm up a skillet on medium heat. Once warm, remove the skillet from the heat and brush some oil on it. Then, place a ladle of the batter on the skillet and turn it in a circular motion to allow the batter to spread thinly. Cook until the edges are golden brown (2-3 minutes). Then, carefully flip the crepe and cook on the other side for 1-2 minutes. Remove from the pan and transfer onto a plate and repeat with the remaining batter
- To prepare the brunch, lay a crepe on a plate, place a generous amount of filling on it and close both sides of it (as though you are preparing a wrap) and press gently to hold it in place. Garnish with additional filling, sliced jalapenos and maybe some hot sauce of your choice and enjoy a delicious brunch
Cooking, preparation and serving suggestions
- While the batter is sitting in between each round of crepe making, it may thicken (due to the flax used in it). So, you can add a splash of milk and mix it up to thin it as you go
- When preparing the crepe
- Don’t be impatient to flip them, otherwise they may break or you may get a pile of mushy batter
- I found that placing a lid on the skillet around the crepe for the first 1-2 minutes and then letting them get golden on the edges results in the sturdiest crepes
- When using oil on the skillet, brush the oil and spread it evenly. You don’t want any droplets of oil sitting around because too many of those will make the crepe batter turn into a mushy pile
- To prepare sweet crepes, eliminate the salt and jalapenos. Use sweetener of choice and some delicious sweet fillings. My favorite would be the classic banana-nutella or strawberry-banana 🙂
You can also follow me on Instagram to be up-to-date with what is cooking my kitchen. If you like this recipe, do share your comments below. Don’t forget to post your version on Instagram using #foodformyloveblog.